Crossout Guide: 7 Tips for Building an Anti-Leviathan
Crafting - all controlled mobile vehicles in the game world (cars).
Survivor - driver of the craft.
Structure - strength, armor as separate components and the craft as a whole.
Power Score (PS) - measure of the combat vehicle's strength. The PS of a vehicle is the sum of the characteristics of all components installed on the vehicle. The cooler the part, the greater the PS associated with it. And the more components installed on your vehicle, the stronger you are and the more formidable your opponents.
Leviathans - bosses, the most destructive vehicles in Crossout. Leviathans appear in the "Invasion" mode. Leviathans are created by players and controlled by the computer.
Hello, my young builders. Today I will share with you my knowledge on creating an anti-Leviathan using Wasps. I, for one, love Crossout for its in-game constructor, which offers great possibilities for crafting vehicles. In Crossout, anyone can create their combat steed from scratch, guided solely by their own preferences. It’s about creating, not just upgrading by selecting the best components from the list provided by the developers. This feature of the game should be used to make thoughtful crafts that will allow you to maneuver in battles against steel monsters, but unfortunately, I constantly encounter incorrect, impractical, and unoptimized combat machines. The fact is that newcomers are unfamiliar with the nuances of the local mechanics. Recently, I have been indulging in battles with leviathans, and almost every match, the random matchmaking throws incorrect anti-Leviathans into my team. Some have cabins not armored. Some transport weapons on the cabin. I think those who own such designs are unaware that the Leviathan, like other bots in Crossout, aims for the center of the cabin, which is why weapons mounted on the cabin can be ripped off with the first volley. Such crafts are not very useful for the team, as they are quickly destroyed or lose their weaponry. To be fair, it's worth mentioning that the "Invasion" mode is one of the most unfair modes in the game because it works against players. But that’s okay, because below are seven tips that will help you create an effective anti-Leviathan.
The Weapons Should Be High Above the Cabin
The Leviathan aims for the center of the cabin, so you shouldn't install Wasps in front of, above, or on the edges of the cabin. Wasps should be positioned high above the cabin. This placement not only makes them unreachable for enemy weapon fire (Mandrakes and grenade launchers not included), but also allows you to fire at the Leviathan from cover (see screenshot 1). You can raise Wasps above the cabin by mounting them on a column or an arch. Practice has shown that an arch serves as a better base for Wasps than a column. When constructing the arch, you should follow four rules. First, the columns of the arch must consist of mesh pass-through parts (see screenshot 2). Secondly, the base of the arch columns must be covered with armor (see screenshot 3). Pass-through parts receive less damage than armored parts; however, a couple of armored parts will make the foundation of your arch even stronger. The other parts of the columns can be covered with narrow bumpers (see screenshot 4). Third, the columns of the arch should be maximally distant from each other (see screenshot 5). Fourth, the columns of the arch must be placed on the cabin as far back from the front edge as possible (see screenshot 6). Mount the Wasps on top of the arch. If there is excess energy, you can also attach a scope, which will allow you to knock out the Leviathan’s weapons from a safe distance.
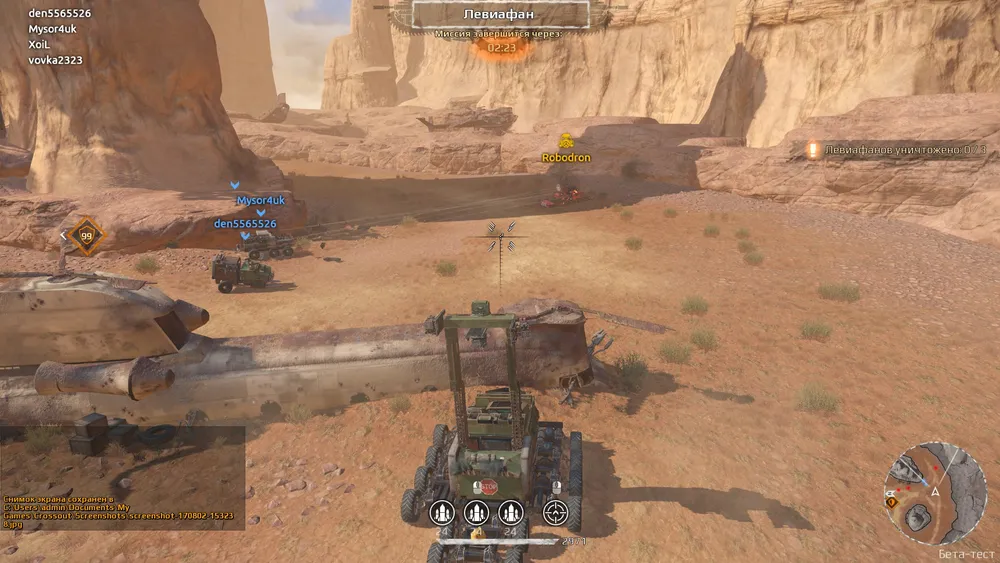
screenshot 1

screenshot 2
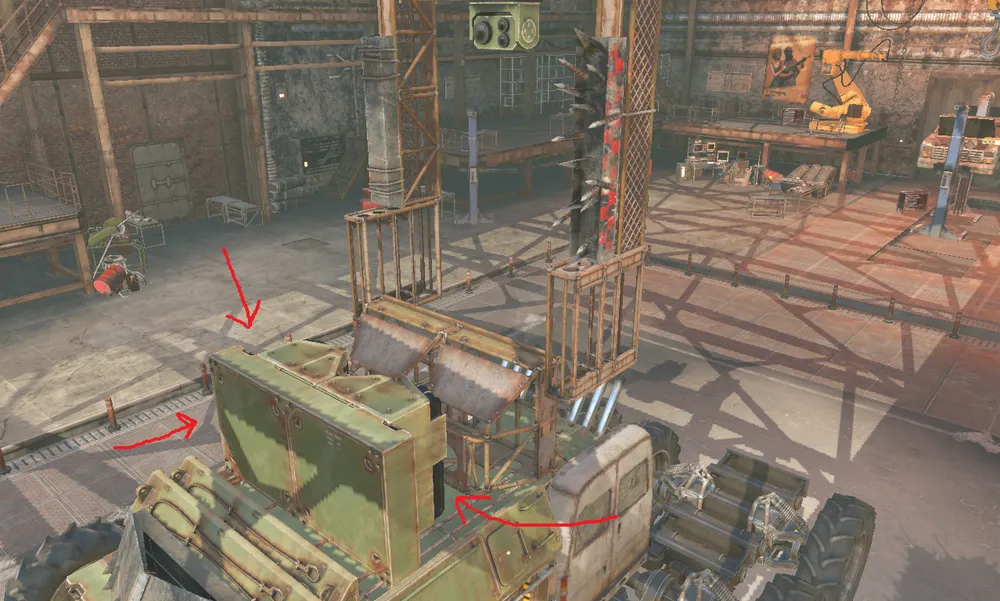
screenshot 3
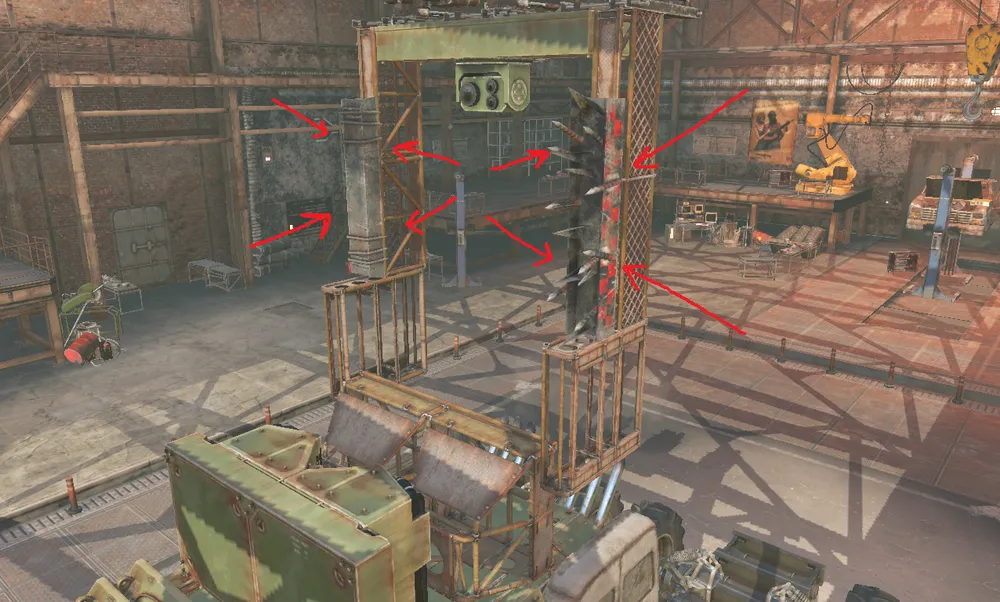
screenshot 4
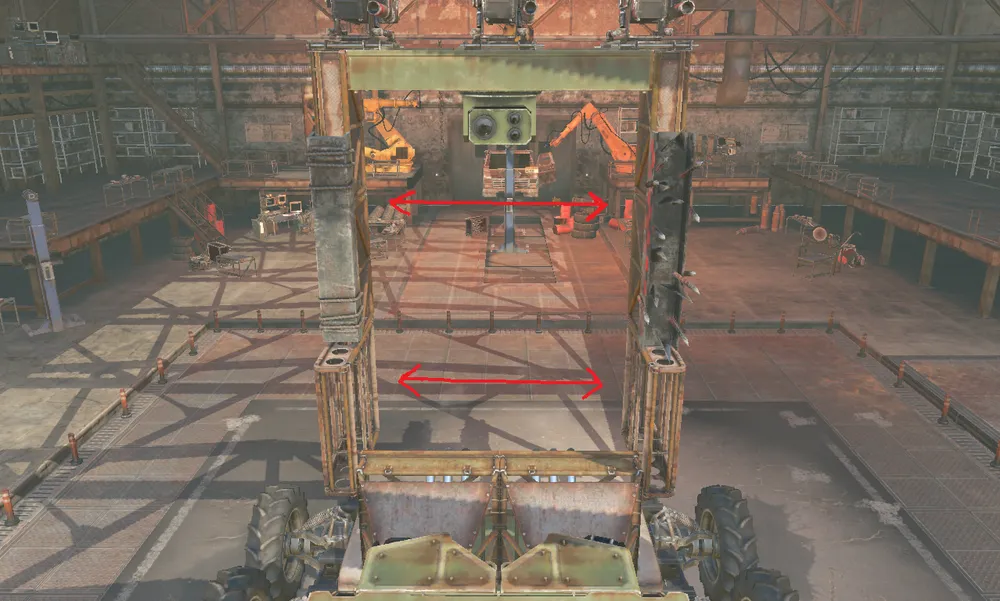
screenshot 5
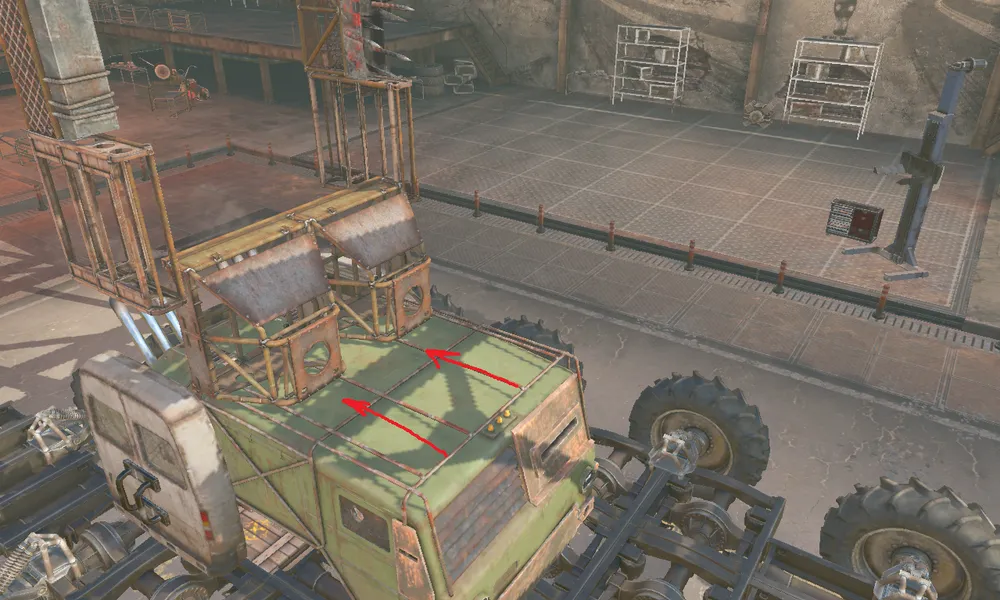
screenshot 6
The Front Should Be the Most Armored Part of the Craft
Since the anti-Leviathan is usually facing the enemy, its front must be the most armored part. Make a well-armored nose for your anti-Leviathan using the most durable armored parts; combined armor works great for strengthening the front. By combined armor, I mean armor where the layer of armored parts alternates with a layer of pass-through grids. Such armor is stronger than armor made of just panels and walls. Just keep in mind that grids should not be placed on armored parts, but armored parts can and should be placed on grids. If you attach a grid to an armored part, any damage will pass through the grid and rip off the armored part along with everything attached to it. If you still decide to install an armored part behind a grid, leave a space of 1 cube between them (see screenshot 7).
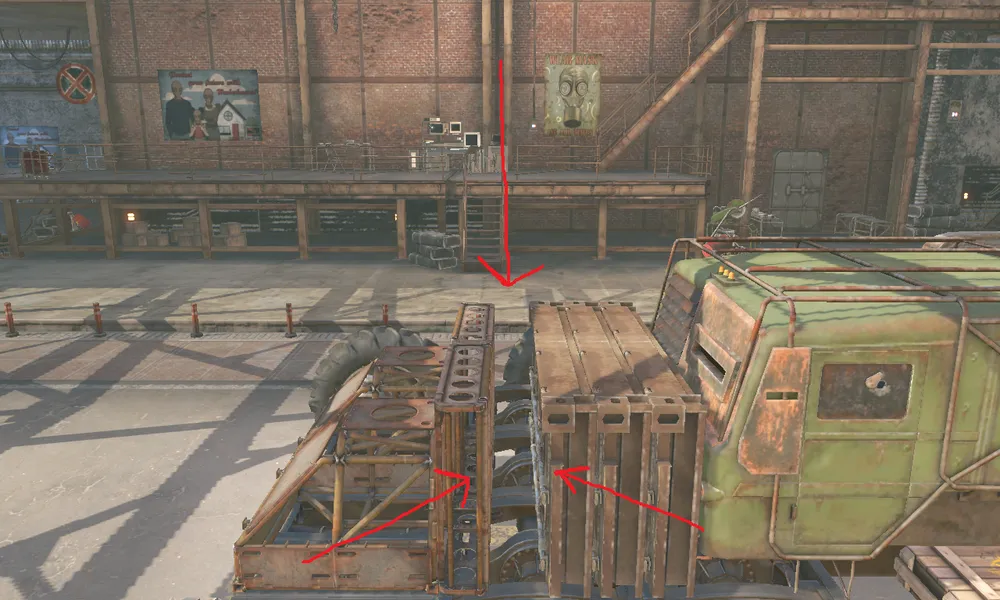
screenshot 7
Use Ammunition Storage
The Wasps' ammo count is only 16 rounds. You can expand the ammo count using various ammo stores. A regular ammo store increases the charge count of all weapons by 30%. You should install at least 3 of these on your anti-Leviathan.
Explosive Modules Must Be Well Protected
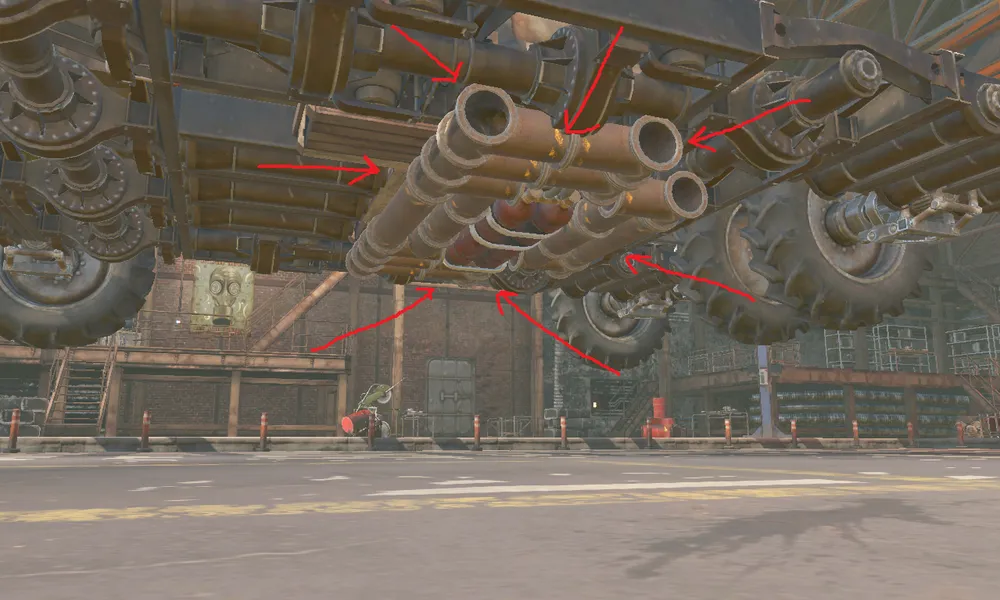
Explosive components: ammo and generators should be hidden under the cabin in the frame (see screenshot 8) - the safest place for explosive modules. If parts of the explosive components stick out from the frame at the bottom, they should be covered on all sides with narrow armored parts, such as dumpster pipes (see screenshot 9).
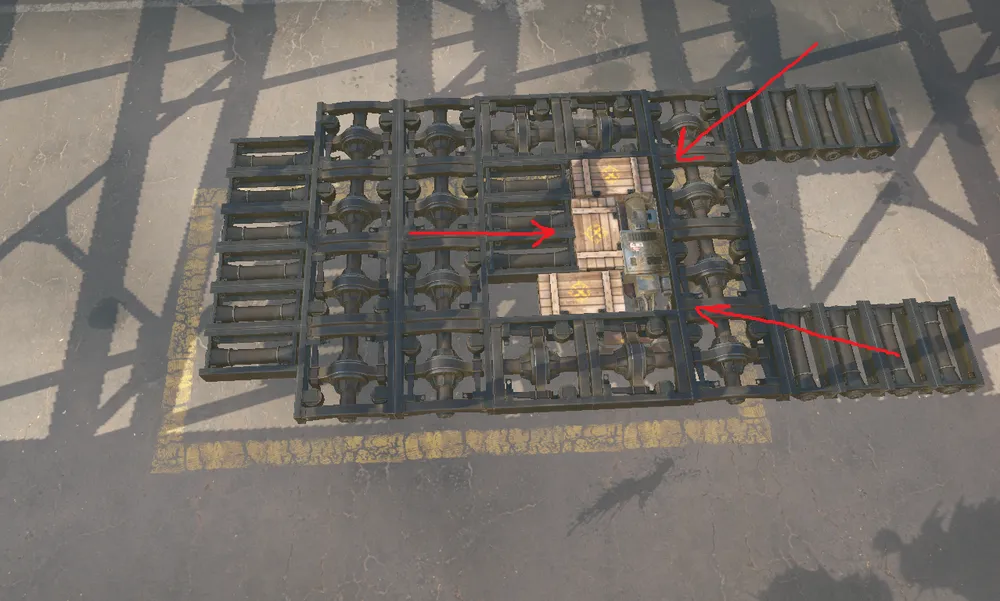
screenshot 8
screenshot 9
Use Large Wheels and Engines
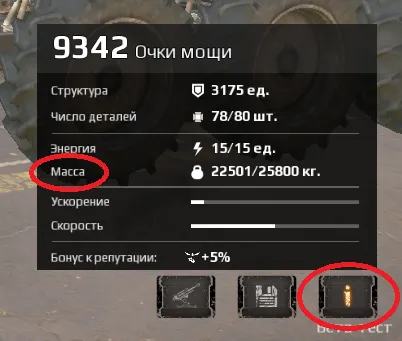
The main difference between a Leviathan and other crafts is the number of weapon units. A Leviathan has more weapons than anyone else. They can have a dozen or more. You don’t need to be an expert in Crossout to understand how devastating each shot from a Leviathan can be. Clearly, in battles against such opponents, you need to take the most durable crafts made of the most robust parts. It seems that by loading up an anti-Leviathan with more high-structure armored parts, the structure of the combat machine will increase. However, it's not that simple. The thing is, high-structure armored parts increase not only the structure but also the weight of the craft. Layer upon layer, and you won’t even notice how you exceed the weight limit. Excess weight is a negative bonus that negatively impacts the speed and acceleration of the craft. To eliminate excess weight, you should install an engine and several pairs of large wheels - they have the highest load capacity. You must install a couple or two pairs of steerable (ST) wheels at the front and back, depending on the size and weight of the vehicle, and you can place non-steerable wheels in the center. The engine should be either a powerful one or Mk2. The powerful engine is cheaper and consumes 1 point of energy less, but Mk2 increases the reload speed of guns and rocket launchers by 20%. You can find out how much your craft exceeds the allowable weight by hovering your mouse over the "Weight" item in the craft's characteristics window (see screenshot 10).
screenshot 10
Use Large Parts
Unfortunately, implementing your engineering concept means dealing with several limitations that modify the crafts players can build. One such limitation adjusts the number of parts used in crafting a vehicle. The limit on parts depends on your level of development. At the maximum level, you can use up to 80 parts to create a craft. If you think that’s a lot, then you haven’t dealt with crafting heavy vehicles. You need to choose parts for your anti-Leviathan in such a way as to maximize structure while reaching the limit. After all, when the most dangerous machines in the game are fighting against you, having sufficient structure is as valuable as having enough currency. So remember once and for all: one large part is preferable to two small ones, as the larger part usually has as much structure as two small ones, but counts as one system. That is, an 8\4 frame will easily replace two 4*4 frames, and a large panel will replace two small ones.*
The Craft's Frame Should Be Large
The craft's frame is built from small frames. Each small frame has a certain amount of structure that contributes to the overall structure of the craft. In Crossout, armored parts are divided into two types. Parts of the first type add some structure to the vehicle's life bar. Parts of the second type do not impact the craft's structure, although they have their own structure. The first type includes frames and most armor elements, while the second type includes plows and various bumpers. Therefore, if you want your anti-Leviathan to be durable, you need to build it on a large frame consisting of many 8\4 and 6*4 frames.*
[**FORZA HORIZON 3 + 4** (ULT) AutoActivation](https://plati.market/itm/forza-horizon-4-ult-all-dlc-fh3u-autoactivation/2519758?ai=967750)
Keywords: game, crossout, crossout, guide, leviathan.