Completing the mode Big Walk (Extreme)
Hello everyone, since questions still arise regarding the completion of the mode "Big Walk"/"Extreme", I decided to create this post with a more detailed description of individual missions, some recommendations, and optimal routes.
The basis was taken from the posts Big Walk Completion and Mafia: Map.
Location of all missions.
All mission locations can be found by visiting the lighthouse.
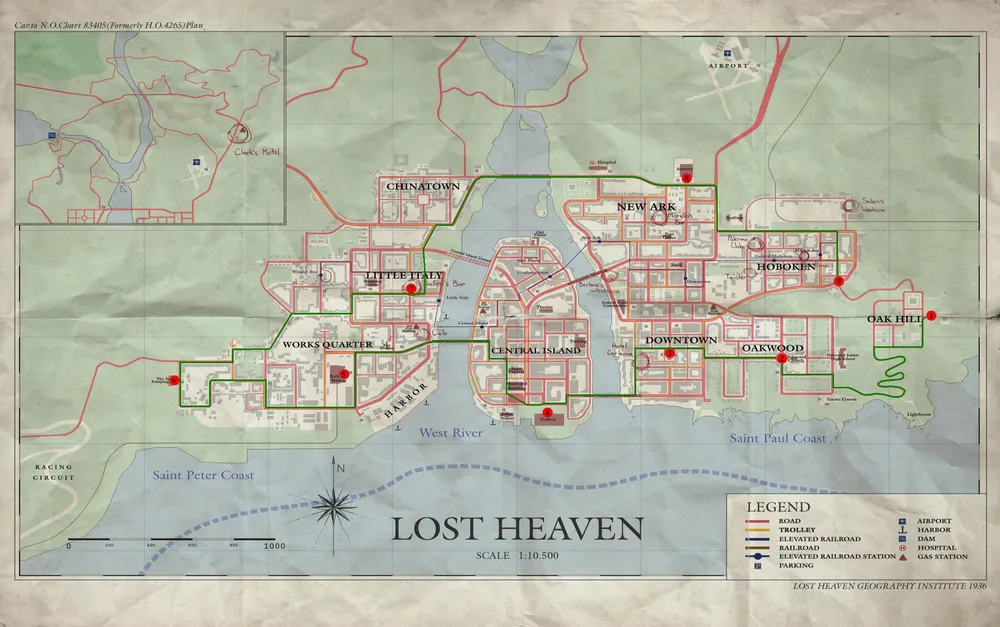
Mission 1
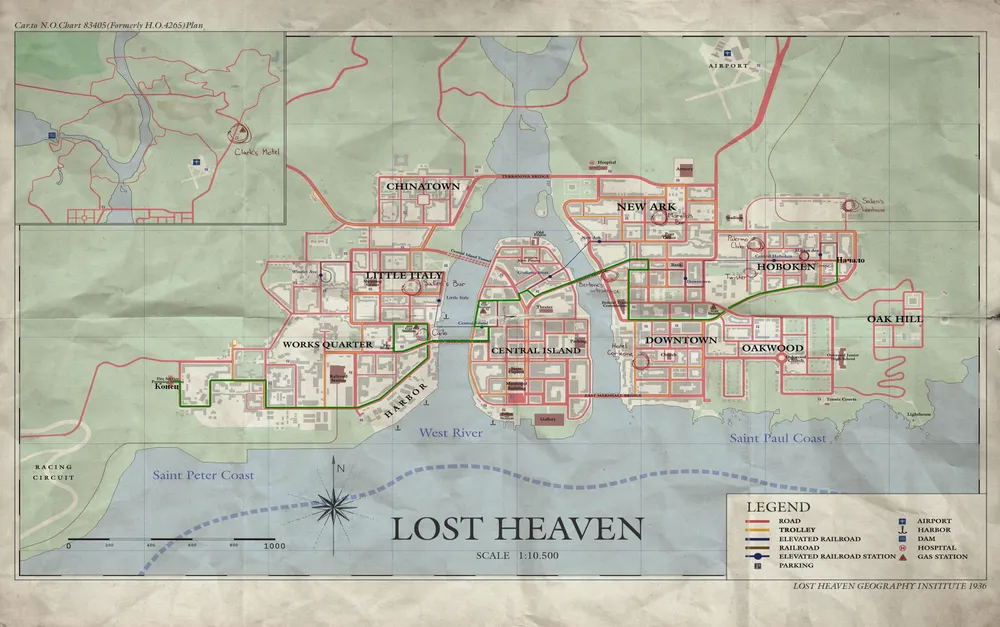
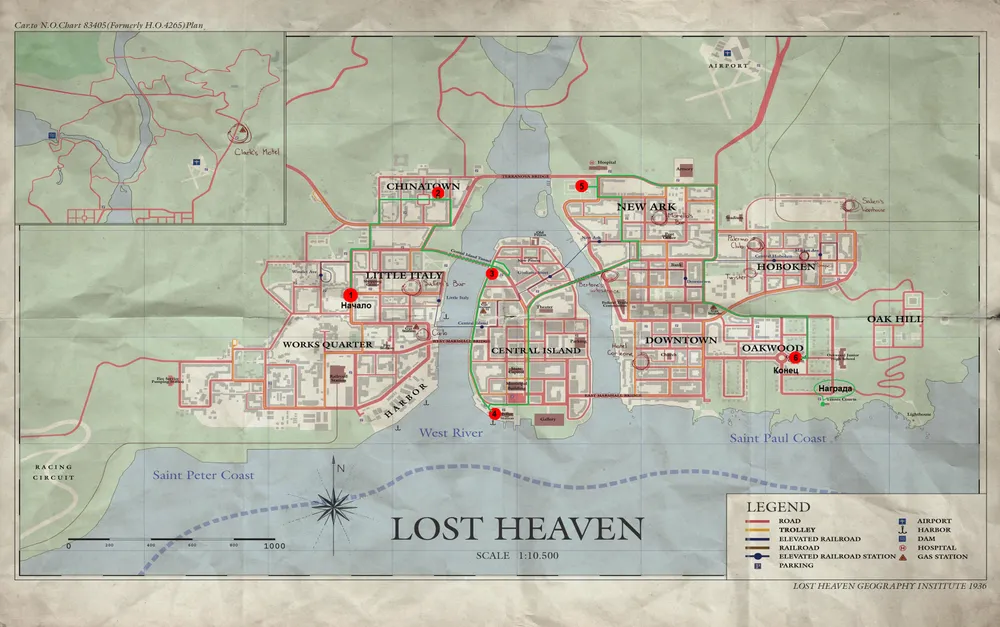
In this mission, you will have to drive a truck containing explosives from point A to point B. The difficulty of the mission is that the truck's speed must not drop below 34 mph (about 55 km/h) and you need to reach this speed within 30 seconds at the start of the mission and maintain it until the finish; otherwise, the truck will explode. Since there is no time limit in this mission, the main condition when choosing a route is not the shortest distance, but the availability of straight road sections, wide intersections, and turns.
The map shows the most optimal route to follow, which almost guarantees a win. In this mission, it will be helpful to use the horn and speed limiter when making turns, especially in Little Italy, and you can also use manual gear shifting, but that’s up to personal preference; it’s possible to do without it. Upon entering the tunnel, be sure to disable the speed limiter and reach maximum speed, as you will face a steep ascent upon exiting. As I mentioned, the three most dangerous turns are in Little Italy; your speed can drop to critical levels on these turns, generally down to the tunnel and after Little Italy, the chances of exploding are negligibly small.

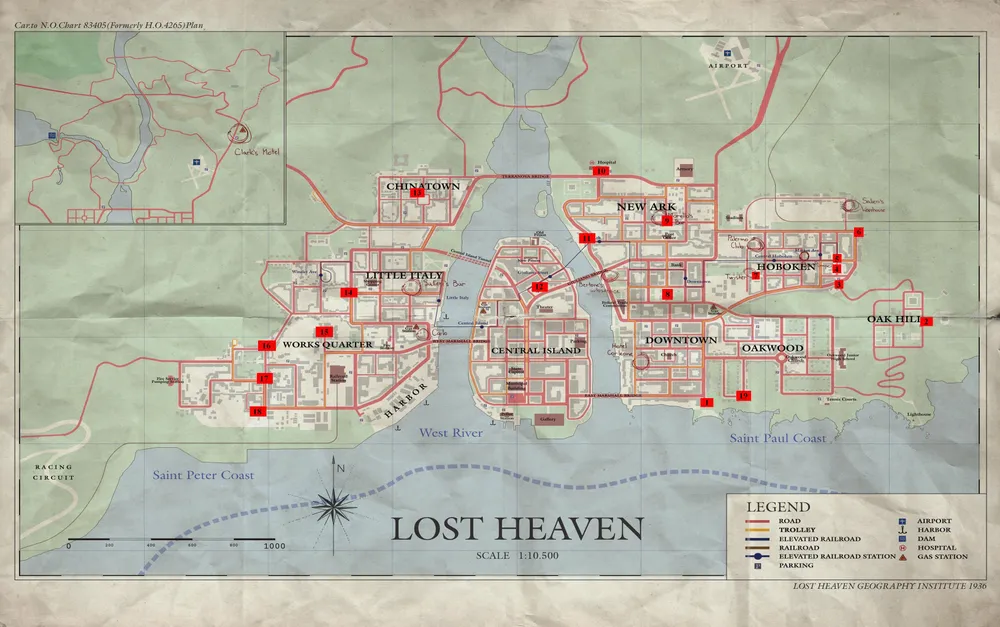
Mission 2
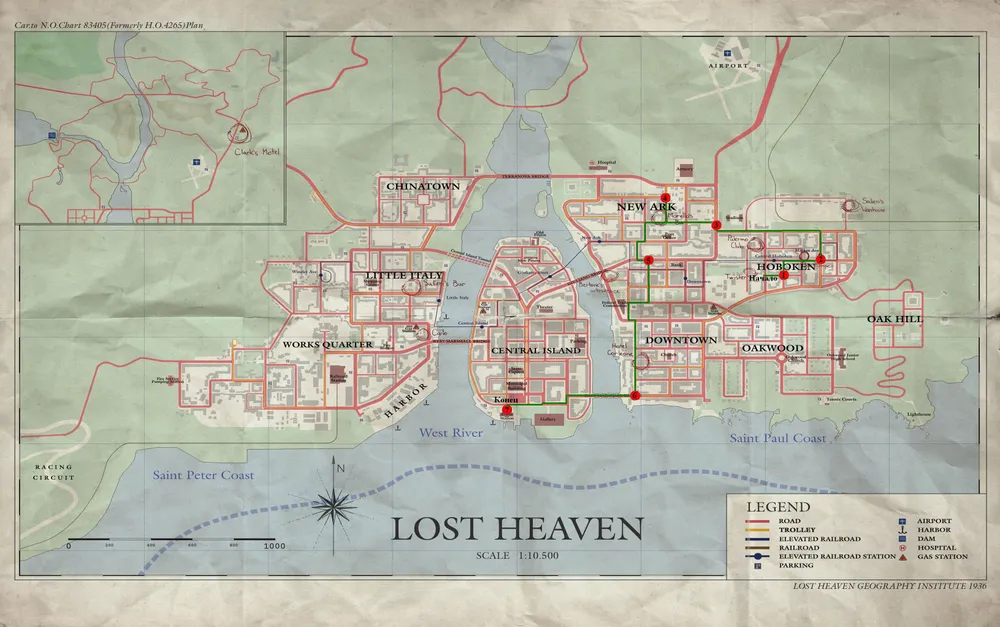
To get another bonus car, you will need to defuse bombs scattered throughout the city. The locations and detailed route are shown on the map.
You can use the provided car for this mission; it is quite sufficient for successfully completing it, or you can opt for a faster car obtained earlier. To defuse a bomb, you need to approach it and press the action button (default key: “U”). The time given for defusing each bomb is more than enough, and there should be no problems with it.
Now let’s briefly go over the individual stages:
The first bomb is located near the person who gives you the task. Climb the hill and defuse it.
The bomb is placed right in the center of the lawn, on the grass next to a tree.
The bomb is at the entrance to the church.
At the entrance to the port building on Central Island, another bomb awaits you.
The Lost Haven Station building.
The next bomb is located on the outskirts of the city, so it’s better to hurry.
In the courtyard of Salieri's bar, inside the garage. You can drive into the courtyard with the car to quickly start the next stage, but you can also leave the car on the road without entering.
The penultimate bomb; just follow the proposed route.
The last and largest bomb. It's not difficult to get to it; after defusing it, you will receive the vehicle parked next to the bomb.
Mission 3
In this mission, you must switch the positions of three racing cars on trucks located in different parts of the city. The mission is not too difficult if you know the city well and use the shortest path between the racing car parking areas; the main thing is not to confuse the order in which the cars should be switched, otherwise, the mission will fail. The first racing car is located right in the yard, to the right of the person who gave you the task. Get behind the wheel and drive the racing car to the building of the old prison. Get out of the racing car, switch to the car installed on the truck, and after you drive off from the truck, drive in the racing car you used to get there. Now you need to drive the second racing car to the third location, located under the bridge, and do the same there, that is, swap the cars. Finally, drive the third racing car back to the place where you started the tasks (point 1), and don’t forget to load it onto the truck. If you manage to stay within the time limits and don’t confuse the cars, you will receive a Caeser 8C Mostro as a reward, as well as all racing cars from the fifth mission available in free walk mode. This mission is quite easy to pass; it should be noted that you need to be careful when loading the racing cars onto the trucks to avoid flipping over.
Mission 4
This mission may seem quite simple, as you are required to drive a truck from one location to another; the difficulty is that the truck bed is filled with nitroglycerin, and at the slightest collision, the truck will explode, in addition, the mission is time-limited. The only solution is to choose the shortest path and speed through at full throttle; it is recommended to use the horn to clear the way from other cars. If everything goes well and you arrive on time, you will receive the Masseur truck, similar to the one given in the first mission.
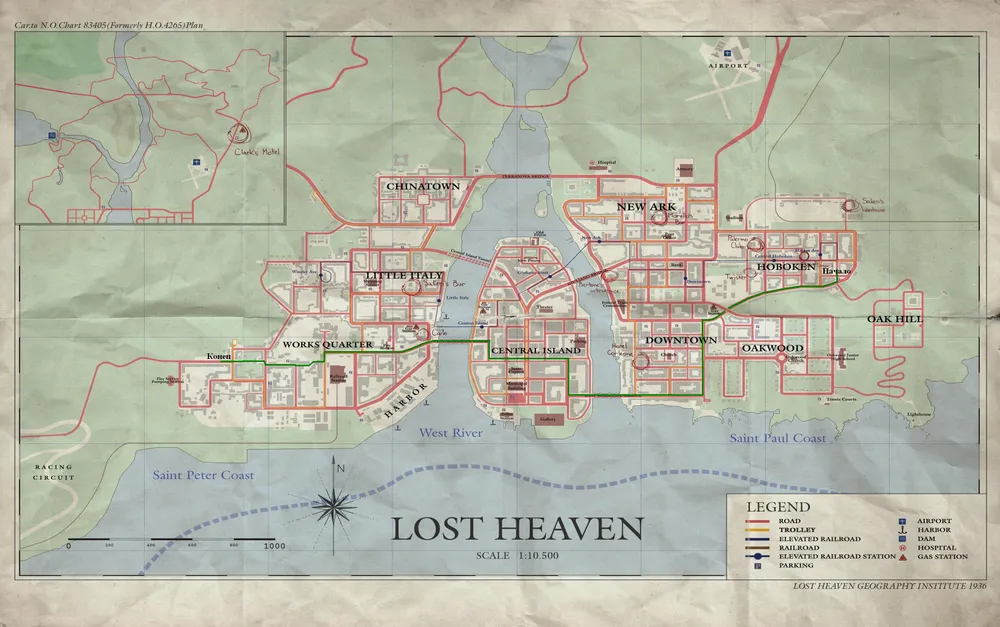
Mission 5
This mission belongs to the easier ones; you just need to drive a car from one place to another; the difficulty lies in the fact that fuel runs out very quickly if you press the accelerator too hard. Therefore, you will need to plan your route to visit all gas stations; otherwise, if you run out of fuel before that, the mission will fail. However, since there is no time limit in the mission, you can push your car to the gas station using another powerful car.
Mission 6
This mission is rightfully considered the most difficult of all. You will have to pursue a plane so that the distance between it and your car does not exceed 200 meters; otherwise, there will be an explosion. In this mission, you will need to showcase all your driving skills and make turns without skidding. Don’t be discouraged if it doesn’t work the first time; the plane flies in such a way that only a few dangerous moments will arise at turns, and otherwise, stick to the indicated route.

Mission 7
A rather unusual mission. You need to visit all the marked points on the map in the allotted time. The feature of this mission is that as your speed increases, so does the distortion of perception, i.e., the faster you drive, the longer the path seems (there's a visual illusion). I recommend familiarizing yourself with the route in advance to reach all the places, as the way is not that short, and to avoid colliding with other road users, use the radar. Upon completion of the mission, you will receive a rather interesting car, Crazy Horse. It’s quite nimble, but at the same time, it is rather hard to control.
Mission 8
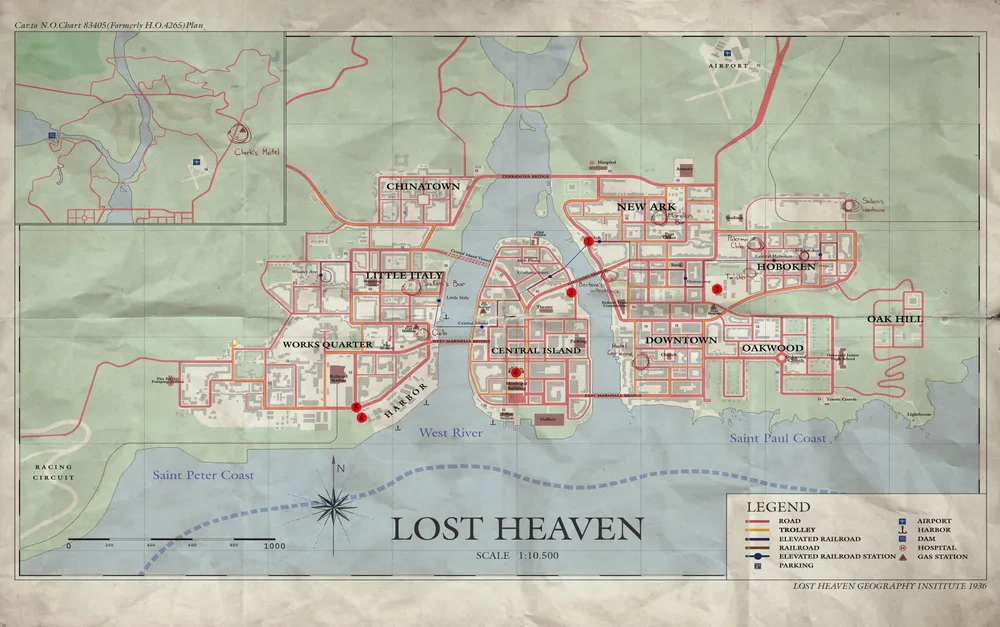
In this mission, you won’t have to drive anywhere. You just need to kill three snipers. The difficulty is that you will also be in their sights, so stay alert and use cover (hide behind the person who gave you the task, the prize car). The locations of the snipers are indicated on the map, and you can take the rifle near the prize car.

Mission 9
This mission involves pursuing an invisible man. Regardless, spotting him is quite simple; you just need to keep a close eye on him and not lose sight of him, as he will try to outsmart and escape from you. The invisible man will constantly switch between running and stopping, ducking into a phone booth. However, eventually, he will head towards the subway station, but do not hop on the first arriving train; instead, watch the invisible man closely. You need to get off at the second stop and then run after him to the gates where he will disappear, and you will receive an additional car parked on the roadside.
Mission 10
A seemingly simple mission: you need to drive the Bolt Ice across the bridge, and in return, you will receive a bulletproof Black Metal 4WD, but bombs will be falling from the airship above the bridge, and the car will start to stall if you accelerate above 40 mph. There are two ways to complete the mission: the first is to stay closer to the left side of the road and avoid the falling bombs; after several unsuccessful attempts, you will find the optimal route. The second way is as follows: before starting the mission, take any car, push the Bolt Ice across the bridge, then take the task, choose a more powerful car, and after passing the dangerous section, get back into the Bolt Ice and calmly drive to the destination.
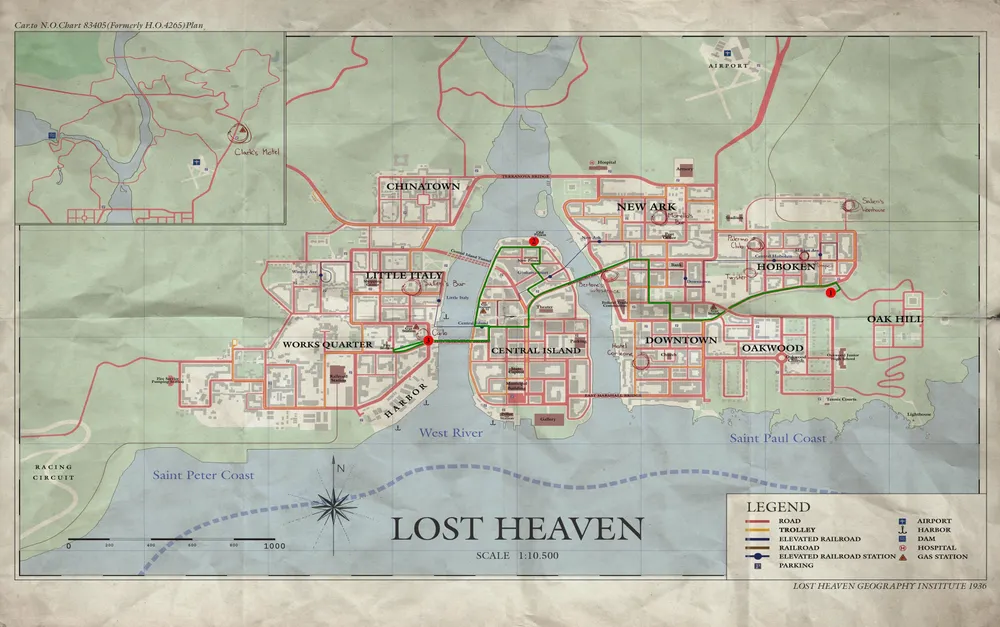
Mission 11
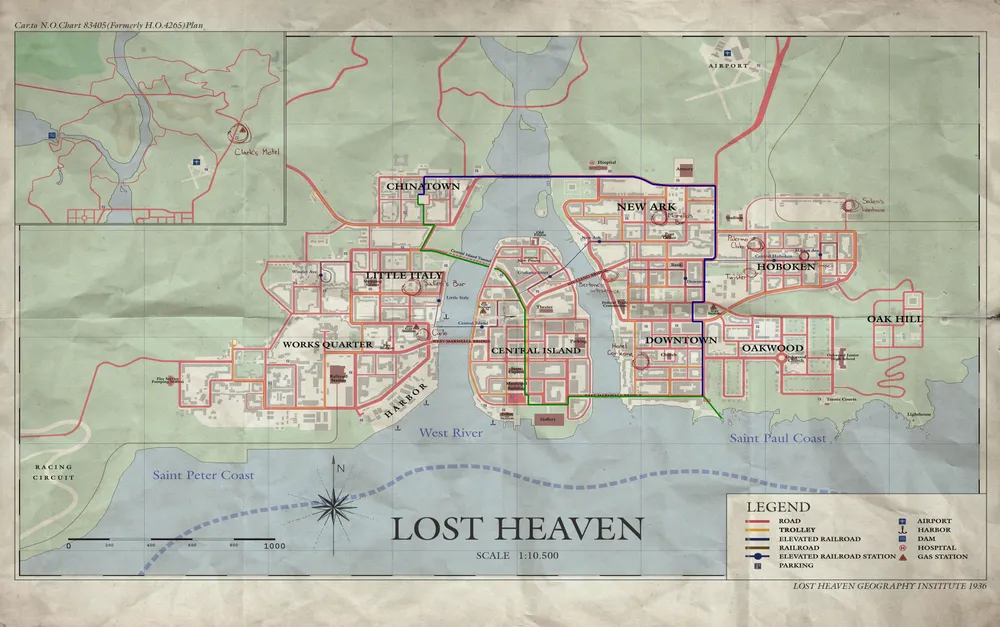
In this mission, you will need to defuse explosives located in taxis, and for that, you need to knock them into the water. The locations of the taxis are indicated on the map, as well as possible drop-off locations; I recommend preparing powerful cars at these places before starting the mission, which you will use to push the taxis into the water. By the way, at the last drop-off location, there will be a surprise — two cars, but only one of them is filled with explosives, and there won't be enough time to sink both cars, so make your choice.
If I remember correctly, you need to choose the first car — that’s where the explosives are.
Mission 12
This mission is the simplest and has practically no tricks. First, you need to run around the building three times, then crouch three times (default key "CTRL"). After these simple maneuvers, take the box and follow the person who gave you the task. When you reach the location, you need to place the box against the wall next to another box (default key "U"); you can also just drop it nearby, but it may not stand properly, and the task will not count.
Mission 13
Here you will need to save a girl from a sea monster. The key to success in this mission is choosing the shortest route since you will have to drive quite a distance to reach the girl, so before starting the mission, choose a more powerful car and follow one of the indicated routes. You can take a weapon near the person who gave you the task, but you can also use the weapon received in earlier missions, such as the sniper rifle from mission 8. When you reach the shore, descend to the water and shoot the top of the pole with the lock to which the girl is tied. Your reward will be a fairly speedy little car.
Mission 14
This time you will drive around the entire city and answer all calls at phone booths (default key "U"). Since the time to answer is limited, you need to orient yourself well in the city or use the provided map. All you need is a powerful car and attentiveness, especially at the last booth located near the chapel. When you finish the mission, you will receive a bonus car waiting for you by the tennis courts.
Mission 15
In this mission, you need to keep an eye on the flying saucer, which will lead you to a new car. Although the saucer occasionally stops and waits for you to approach, you can still lose sight of it, so the map should help you.

Mission 16
If you love shooting, this mission is for you. You will need to go through an alley and kill all the bandits located on the balcony. You can find a machine gun right at the entrance to the courtyard. It’s quite simple overall; just stay alert when turning left into the courtyard. And in the end, you will encounter three more bandits with shotguns.
Mission 17
Here you will need to drive a white car to the specified location. The challenge is that you will be pursued by explosions, and if you drive too slowly or hesitate, you will have to start all over again. The secret is to choose a route where the turns and intersections are as wide as possible; then you can go through them at higher speeds, and the car won't suffer so much from the explosions; however, it can withstand 1-2, but not more.

This mission isn’t particularly difficult, but only if played on old machines; that is, the older the computer and its specifications, the easier it is. The problem is that on modern machines, it becomes too hard and nearly impossible to complete.
Recommendations for resolving issues\[/h2\]\]
What I can advise:
- You can "play around" with the game’s settings in the settings menu; the graphics will look worse, but it will resolve the "problem" of this mission.

Before attempting this mission, load your computer with something "heavy," and then the mission will become quite passable.
The last option is to use specialized software to optimize the game settings for modern hardware, and this mission will also be passable quite easily.
Mission 18
In this mission, you will need to drive almost across the entire city in a rocket car; naturally, time is limited, and smoke pillars set the route. You can view the entire distance that needs to be covered below. By the way, don’t try to cut corners and drive closer to the smoke pillars, as the next stage will not begin until you complete one stage, and the mission will not count.

Mission 19
And finally, a rather simple mission. You need to kill Speedy Gonzales, who runs quite fast. For successful completion, walk down the adjacent street; Speedy Gonzales will be standing and waiting for you; when you approach him, he will run — shoot him. You could try to chase him in your car, but the first option will be more reliable.

I hope the information provided will be enough for a complete walkthrough of this mode. If you have any more questions, feel free to ask them in the comments; I’ll do my best to help.
Many thanks to ivanovich for helping to prepare this post, especially for the arrangement of the maps.