Siege of Dragonspear - walkthrough, part 4

With the destruction of the Coastal Way bridge, the only safe crossing over the Winding River is the Boareskyr Bridge, where your father, Bhaal, was killed by the mad god Cyric. Every step in this direction fills you with dread.
And you are not alone in this. The Flaming Fist is also fearful of what lies ahead. If Caelar destroys the Boareskyr Bridge, the expedition will not reach Dragon Spear Castle in time to stop the crusade. The forces of Baldur's Gate and their allies will be neutralized. Defeat.
These fears grip your allies but also drive them forward. The anxious whisper quiets down as there is less than a day's journey left to Boareskyr. The Flaming Fist has made camp and is preparing to meet the crusaders while you plan your next move.
**[Siege of Dragonspear - walkthrough, part 1](http://www.gamer.ru/baldur-s-gate/siege-of-dragonspear-prohozhdenie-chast-1)**
**
Siege of Dragonspear - walkthrough, part 2
Siege of Dragonspear - walkthrough, part 3
**
RETROSPECTIVE
In this case, in this section, I want to tell you not about a missed event or a late-found "life hack", but about some small interesting moments.
The first is related to the dialogues of the main character with companions. These dialogues seemed insignificant and did not make it into the past part. But after the events of this chapter, it became clear that they are more interesting than they seem. And to refer to them in this part, I will describe them in this section.
While traveling with Corwin (see walkthrough, part 3, p. 1.4) in the area near the Coastal Way bridge, she will ask whether it is true that the main character is the son of Bhaal. In the dialogue, you can confirm this or evade the answer. If you confirm the kinship of the hero with the god of murder, it will become clear that this nuance troubles her, despite the fact that she shows sympathy for the main character and trusts him, at least wants to trust.
Another dialogue can arise while traveling with Safana. In it, she will say that she does not particularly like nature and prefers to be in the city. In addition, she will quite insistently ask for a compliment. If you refuse, she will call the hero a rude person and suggest reconsidering her relationship. If you decide to flatter her, then, no matter what compliment you make, she will still be dissatisfied and will advise you to come up with something better next time.
The second moment is related to an item obtained much earlier in the game's prologue, but its "highlight" I only uncovered now, in this chapter.
So, in the prologue, after dealing with the mage Porios (see walkthrough, part 1, p. 4), you obtained the Cloak of Minor Secrets. This cloak, among other things, allows you to get a random spell scroll ten times. But there is a chance that instead of a scroll, one of seven notes from Alveus will appear. Therefore, having only ten charges, it is impossible to obtain all of them without numerous saves/loads. This, of course, takes a lot of time and getting all the notes will not reveal any secrets, rewards, etc. Therefore, in general, a waste of time. But for those interested, so that you, dear players, do not waste your time on this, I will leave their content here:
Dear Greenbough Publishing,
I am writing to correct the confusion in which, apparently, my last message was sent to the wrong address. Your response regarding my next manuscript "Adventures with Your Whole Limbs through All the Perils of the Road: To and From" — this is my latest composition about the life of an adventure mage. As the greatest first-level mage who has ever lived (to date), my reflections and experiences are very important for both novice and seasoned adventurers. My writing style is not only light and interesting to read, but the content of my manuscript can save many lives.
You can imagine my embarrassment when I received your response that your line of comedic tomes was filled for this year and you suggested contacting again in future seasons. Please recheck your list of approved writings and respond at your earliest convenience.
Sincerely,
Alveus Melkanter
(This parchment is torn at the top. It looks like it was ripped from a larger piece.)
Rule three: taverns can be very useful for survival in an adventure. Before heading into a damp tomb or gloomy dungeon, visit the local tavern. Buy lots of drinks. Soon your party will be merrily singing and drinking all night long. The next morning, while they are recovering from their excesses, you can quietly leave the city.
Rule four: some will tell you that second-level spells are necessary for a successful career. Don't believe them! With great power comes great responsibility, so if you stick to first-level spells, no one will expect you to stick your neck out in a dangerous situation.
Rule five: a mage is as good as their mantle. Although you'll never be able to compete with my exquisite collection of the finest mantles of Faerûn (can you? I am too modest. No one has ever been able to compete with this collection of garments), you should find a good tailor at your earliest opportunity.
Remember that with intelligence, prudence, an unquenchable scream, and a constant fear of death, you too can become a successful adventure mage!
Potential Aphorisms
Green slime in the hand is worthless, and you don't have a hand now. Always wear gloves.
A statue is always a potential gargoyle. Carry a crowbar, chipping statues, and give it to someone in heavy armor.
A full pocket of gold is nice; a full bag of gold is even nicer. But it's hard to run with it, so an oversized bag is a good investment.
Something about bacon? "Your bacon is burned" is bad, but bacon is also delicious...
(The legible text gradually ends, and the rest of the page is filled with scrawls.)
(This note is titled "Advice for a Beginner Mage.")
If you are reading this, you are likely a young mage just starting out in your career. You may aspire to the heights of the greatest wizards of Faerûn. "Elminster," you think. "The Black Staff. Melkanter."
NO, just not Melkanter! You laugh at your foolishness. Who could ever compete with the greatest first-level mage who has ever lived (to date)?
I’m here to tell you that, truth be told, you will never be able to acquire experience and a respected name comparable to mine, but you can at least hope to reach a level from which my shadow seems slightly less long and cold than it currently does. If you heed my advice, you will be on the right path to becoming a second-rate imitation of me.
Rule one: some believe that recognition for a job well done is the easiest way to earn a reputation. But getting credit for work done well by someone else who is now dead, so they can’t object, is actually more effective...
(The scroll is further torn and the rest is missing.)
This crumpled piece of parchment is repeatedly signed with the name "Alveus Melkanter," and his style becomes more ornate. Between the signatures are fragments of sentences, including: "I hope this book saves your life!" and "May you never need the advice contained in this volume because you listened to me and instead chose to become a cobbler!"
Ideas for the Next Book
(The following notes are written pedantically.)
- Always stay behind the group. Monsters rarely attack from the rear.
- The middle, the middle is also good. Surround yourself with sturdy comrades in full plate mail.
(Here is a drawing of a figure with a pointed hat surrounded by armored people with huge swords.)
- You can also follow the group, keeping to the side. Let's say a hundred yards. Use spells from a distance and join in when the looting begins.
- You can even, a mile from the party? They can yell if they need help.
(The next few items are crossed out.)
- You can just stay home.
Dear Aguhi,
I received your message with great joy. Corresponding with those who have read my books and studied my advice, which have positively impacted their lives, is a great pleasure for me. That you were able to write such a letter without using your hands makes this feat even more impressive - I suspect that in the future you will embrace my frequently repeated mantra "Do not fight an angry ogre or any ogre if it can be avoided."
From your note, I gathered that you found my words less helpful than I could have hoped when it came to fighting ogres. I have a few questions regarding the events that led to such a unfortunate incident:
How did you find yourself among a pack of wild, bloodthirsty ogres? For many years, I have offered numerous guidelines and strategies aimed at helping a reasonable adventurer avoid such a situation. At the very least, my advice on fortifying your home and the frequency with which one leaves it (my advice is "never") should prevent such an occurrence from ever happening.
Who challenged whom? I sincerely hope it was the ogre's idea, as I am utterly confident that the shortcomings in such a scheme, stemming from your side of the equation, became painfully self-evident.
Have you ever considered a profession that entails less risk of having your arms torn off by a bloodthirsty ogre? Those who are not cut out for adventure often end up with missing limbs if they do not act with due caution. While they lack the potential glory that few lucky ones manage to wrestle from a life filled with exploration and combat, there is nothing shameful about playing the role of a farmer, a courtesan, a tailor, or any other more mundane occupation. After all, someone must clean my boots.
Nevertheless, however you came to this lamentable state, I hope you can find solace in the attached copy of my latest book. As you are a reader of my works, I have signed the collection and will ask the courier to add ten percent to the price that I usually charge. May you find enlightenment or entertainment within its pages during your recovery.
Sincerely yours,
Alveus Melkanter.
TABLE OF CONTENTS
**
**
WORLD MAP
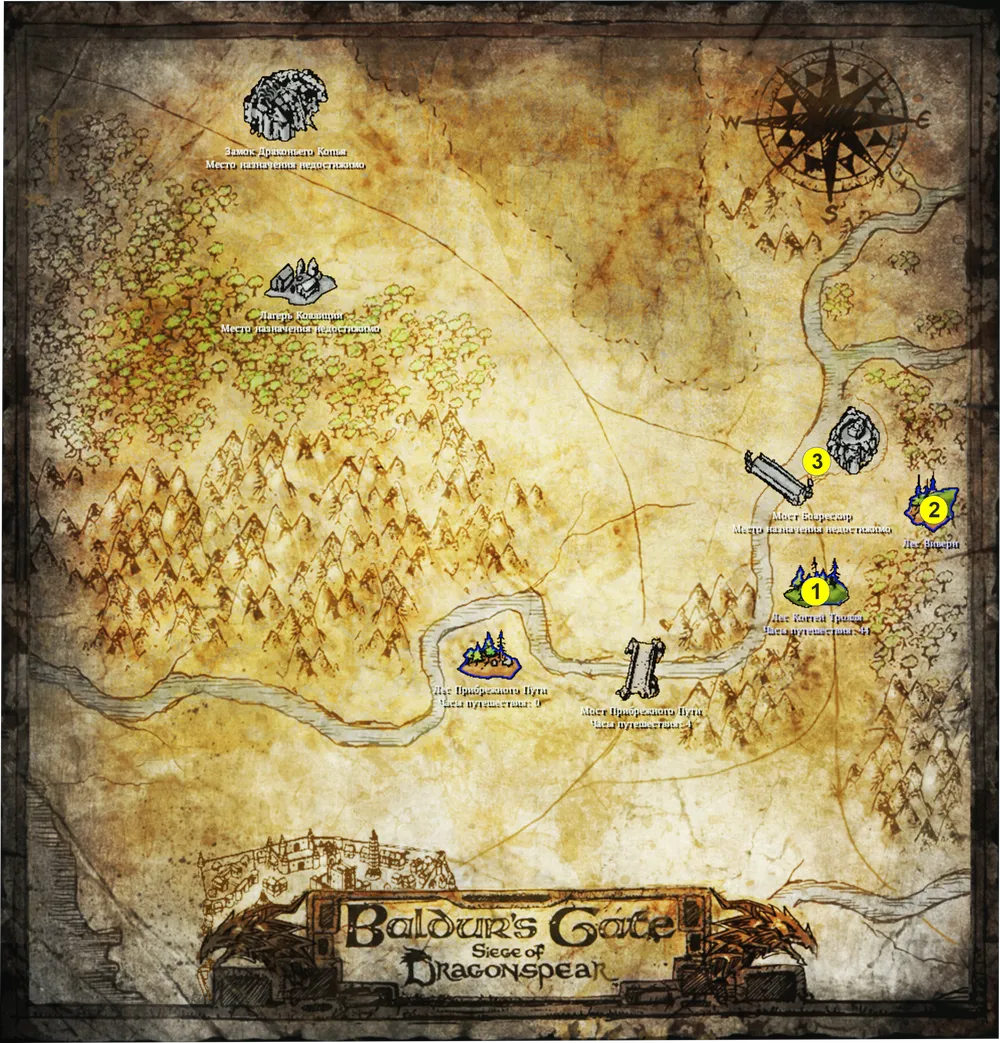
1 - Troll Claw Forest; 2 - Wyvern Forest;
3 - Boareskyr Bridge and Bridgefort.
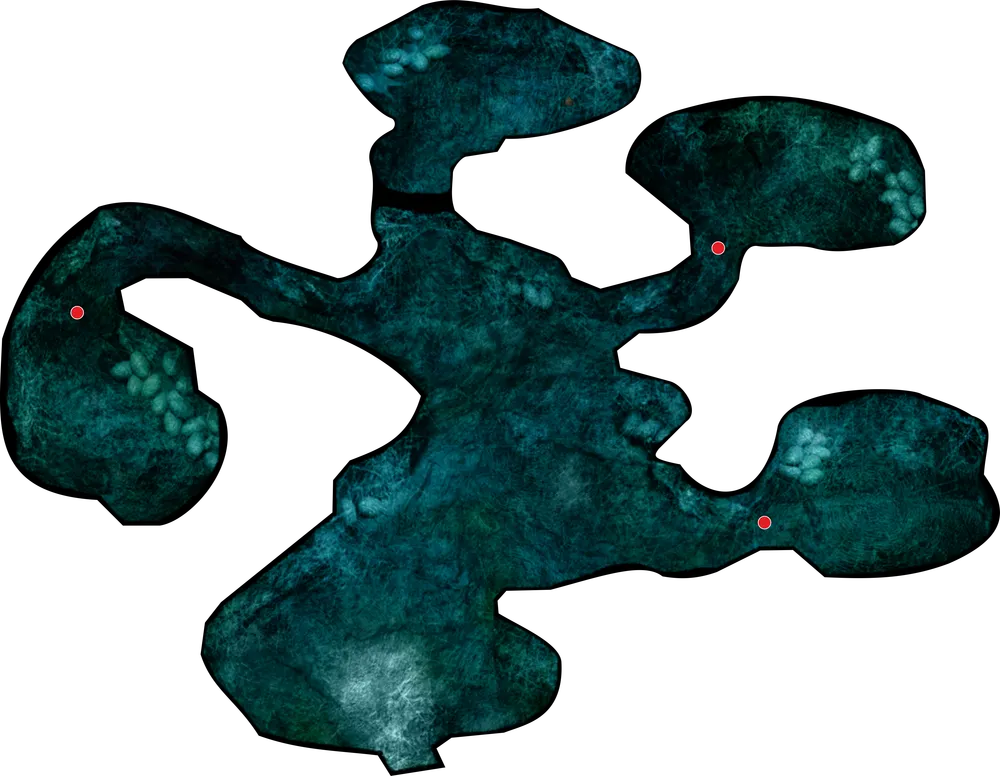
TROLL CLAW FOREST
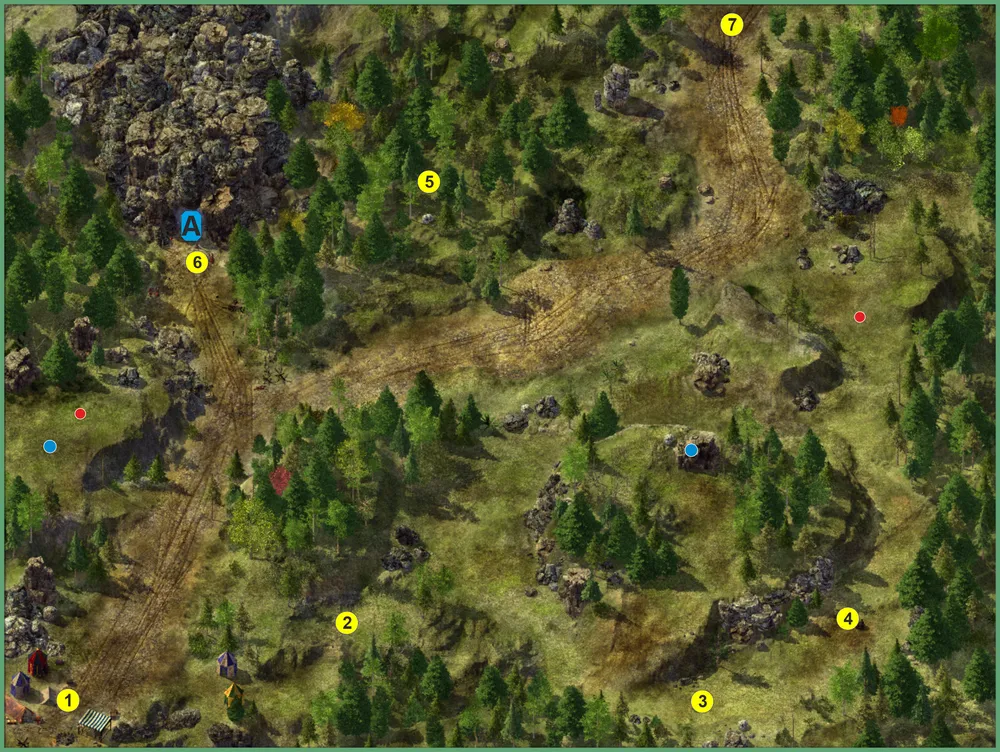
1 - Flaming Fist Camp; 2 - Half-Orc Squad; 3 - Orc Squad; 4 - Bandit Ambush; 5 - Lost Family; 6 - Troll Cave; 7 - Bridgefort Refugees;
red dots - traps; blue dots - points of interest;
A - entrance to the cave.
1. Flaming Fist Camp. Just like the previous chapter, this one starts in the Flaming Fist camp. You should be familiar with it by now: Belegarm (see walkthrough, part 2 - on the march, p. 2) will sell goods, in the chest next to him, you will find 20 +1 arrows, 20 +1 bolts, and 20 +1 ammunition, Mijena (see walkthrough, part 3, p. 1.1) will provide temple services, Faird (see walkthrough, part 3, p. 1.3) will provide inn services, and any companions not in your group will be wandering nearby. Raifus (see walkthrough, part 2 - on the march, p. 1), next to whom companions should be, will not be in the camp this time. Like before, there is a supply chest located in the western part of the camp.
As soon as the game starts, Corporal Duncan will talk to you and report that scouts have scouted the area. The crusade is holding the Boareskyr Bridge and has besieged Bridgefort. A troll cave was also spotted to the northwest.
After the dialogue, he will approach Skee's tent and start reprimanding her for not showing up for training. Skee will take this irritably and will strike the corporal, knocking him down, before returning to her tent. Once he recovers, he will promise to get back to her about this conversation and walk away.

1 - Belegarm; 2 - Mijena; 3 - Faird; 4 - supply chest; 5 - Otilde.
For the first time in this camp, you will meet Lieutenant Otilde. She will tell you that she does not trust the three half-orc mercenaries who recently joined the crusade and will ask you to provoke them into a fight so that the command has a reason to expel them from the expedition. You will find these "irregular troops," as the soldiers in the camp call them, to the east.
2. Mercenaries. The half-orcs are irregular soldiers who recently joined the Flaming Fist's army. Otilde has asked you to deal with them.
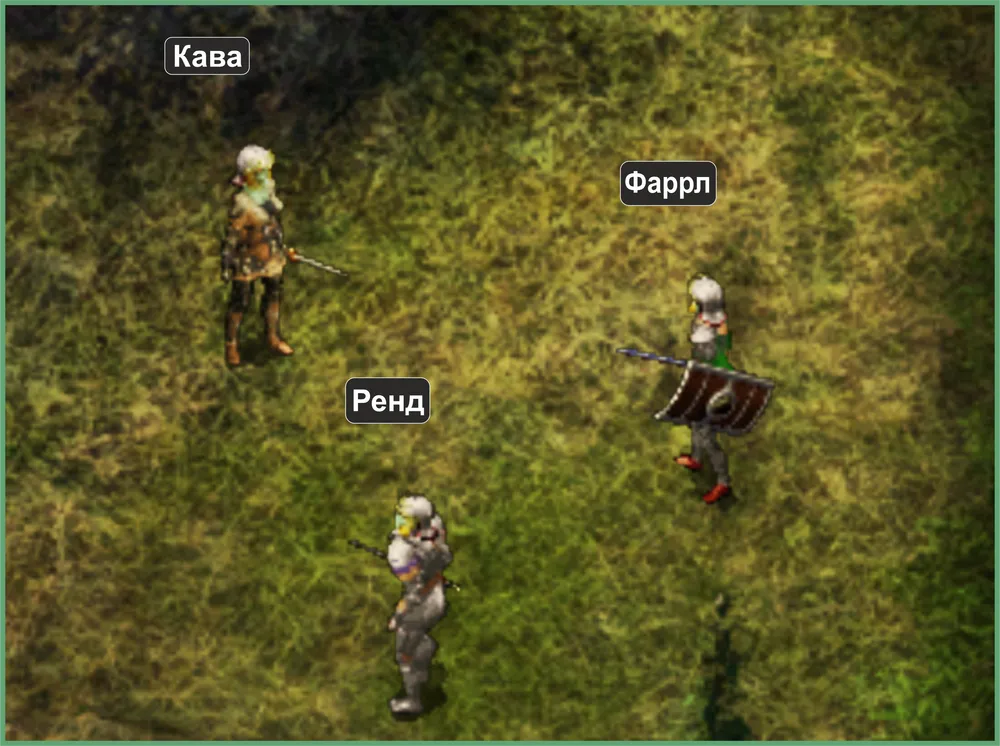
Half-Orc Squad
There are three options for interacting with them:
attack first, provoking them to fight. Once one of the half-orcs takes enough damage, they will flee;
talk to Kava. She will agree to tell you about herself only for a "mug of cold ale." There is no ale at the moment, so you can either choose another way or return here later;
talk to Rend. He will offer to tell you about himself if you spar with him and his friends in a non-lethal duel. If you agree to his terms, the trio will attack you. You must attack them carefully so that nobody dies. If you win the duel, Rend will tell you that he was part of the crusade but left after he became disillusioned with one of the commanders, Caelar, of the half-orc named Bargest, who commands the camp occupying the Boareskyr Bridge. Rend hoped that Bargest would accept a fellow half-orc into his elite guard, but he was given no chance and was generally treated poorly. Now Rend wishes to take revenge for the neglect. After learning his story, you can either allow them to stay, or force them to leave.
When you return to Otilde, you will earn 6,000 XP. If you forced the half-orcs to leave, Otilde will pay you 105 coins.
The affairs around the camp are finished, and it is time to scout. However, keep in mind, if you go out at night, you may encounter a pack of "Shadows" — special panthers using the "blur effect" talent.
3. Orcs. In this area, you will meet a group of orcs, including a priest and a leader. After the battle, search the nearby corpse of an adventurer. You will find a unique mace, Hope +2, and some coins. Climbing the hill north of the orc encounter, you will come across a squad of ogres. After defeating them and collecting loot (simple two-handed swords and healing potions), you can explore a pile of stones, likely part of a long-abandoned construction.
4. Bandit Ambush. Approaching the bandits, they will demand payment for being on their territory: either money or life. However, they will immediately recognize the main character as the killer of Sarevok (according to their words, they previously worked for the Iron Throne) and then flee. But if you hit them with a fireball before they start speaking, you will be able to kill them all in one shot. This will earn you around 340 XP, and on their bodies, you will find 120 regular flaming arrows, 3 flaming arrows +2, and 6 scrolls of Melf's Acid Arrow. A great arsenal against trolls.
5. Lost Family. Heading northwest to the main road and crossing it, in a forest thicket you will encounter a man, woman, and child. They are refugees heading to Baldur's Gate. In dialogue, they will ask you how far it is to the city. You can ignore them, or give them 10 coins. No rewards or consequences have been noticed. On the road near this place, you will encounter a pack of ghouls. Apparently, they are robbing refugees passing by on the road and are the reason why the family is hiding in the thicket.
6. Troll Cave. Passing west of the meeting place with the lost family, you will come across the entrance to the cave. Once you enter, a few trolls, including a troll shaman, will immediately attack you. The bandit arsenal obtained earlier may come in handy here (see above p. 4).
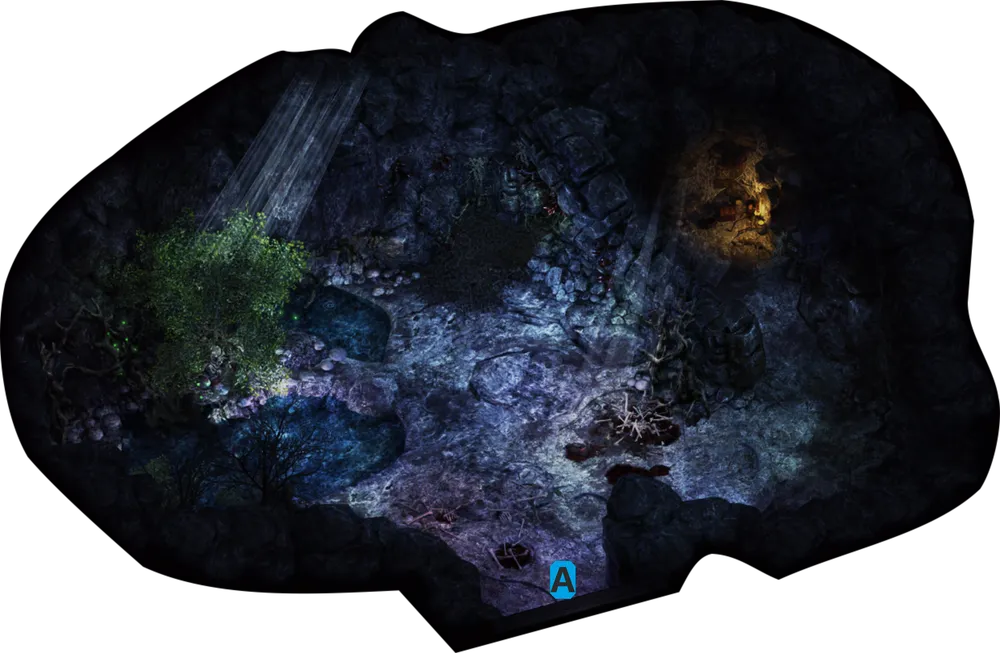
Troll Cave
A - exit from the cave
After defeating the enemies, search the cave. To the left of the entrance by the tree, you will find ten precious "Waterstar" gems, and to the right of the entrance in a pile of bones lie a precious ring and necklace, a skull, and a brand. In the eastern part of the cave, heroes may notice a passage into a dark area. Opening it, a ghostly troll will attack the group, and after defeating it you will earn 1,500 XP. On the far wall of the dark area hangs a torch, which can only be seen by a character with infravision. You can light it using the brand found earlier. When the torch illuminates the area, you will have the opportunity to search the body of the dead adventurer and the chest next to him. You will find a simple mace, a random gem, a medium shield +1, a medallion of "Embraces," a scroll of "Enchanted Weapon," and a wand of fear.
After finishing the scouting of the nearby area, you can return to the camp and rest.
And again, a strange dream...
7. Bridgefort Refugees. Heading from the camp along the main road, you will reach the northern edge of the map. There you will meet several refugees, including an old acquaintance Jaheira, and her new acquaintance Voghiln. Asking her, you learn that after defeating Sarevok, she and her husband, Khalid, headed to Bridgefort, as they were quite tired of the city of Baldur's Gate. But soon the Boareskyr Bridge was seized by the crusade's army. Jaheira found herself trapped outside of Bridgefort, while Khalid was inside. After this, she and her companion Voghiln will join the hero's expedition, and they can be recruited into your group. She will also tell you about a teleportation circle capable of transporting a small party to Bridgefort. However, to use the circle, you will need a special Amulet, which Jaheira suspects may not be far away, in the ruined Temple of Bhaal. Just penetrating the old temple will not work, as it is occupied by the sect of the mad god Cyric.
Note: while traveling in this location with Safana, she will start a dialogue in which she will ask if the main character has thought about the words he said to her last time (see above, the retrospective section). If you say that you thought about it and now know the right words, you will have to compliment her again. This time she will acknowledge it as "not bad, for someone without experience" and expects a gift next time: a gem, a piece of jewelry, in general, "something very valuable that will show her how special she is." If you refuse to flatter or find a gift, Safana will become angry and declare that from now on she only has business relations with the hero.
And in the case when the group contains Corwin, she will admit that she has never served in a coalition of several independent military forces and does not trust such alliances very much, as they are strong as long as they agree, but sooner or later, they all betray each other. After that, the conversation will turn to Corwin's personal problems in her relationships with other people. In the course of the dialogue, you can:
confess that you are drawn to her. Then Corwin will reciprocate, admitting that it is mutual, but the bitterness of past relationships prevents her from moving on and she needs time to think everything through;
say that you are not interested and propose to keep the relationship strictly professional;
ignore all hints. In this case, Corwin will acknowledge that the conversation is becoming incoherent and will terminate the dialogue.
If the group contains Viconia, she will lament that apparently, in this world, one cannot take a step without being forced to endure the company of "surface dwellers." Surface dwellers do not trust those like her, the drow, even though she has proven her loyalty more than once. However, she also does not trust the hero and his companions, but unlike others she has dealt with, she enjoys traveling with the hero. When asked why she left her homeland, she will refuse to answer, saying that it is a long story and she will tell it some other time.
Having received new information from Jaheira, it's time to move on. After the dialogue with her, activating the transition map, a new location for transition — the Wyvern Forest — opens in the northern part of the map.
GAPING PIT
There is a chance that, after leaving the Troll Claw Forest, on the way to the new area, you will find yourself in an area not marked on the map. This area is littered with smoldering bodies, burn marks on the ground, and scattered debris, all surrounding what is likely the epicenter of a recent explosion — a massive gaping pit in the ground. Magical energies still linger here, indicating that the destruction was caused by a spellcaster of considerable power.
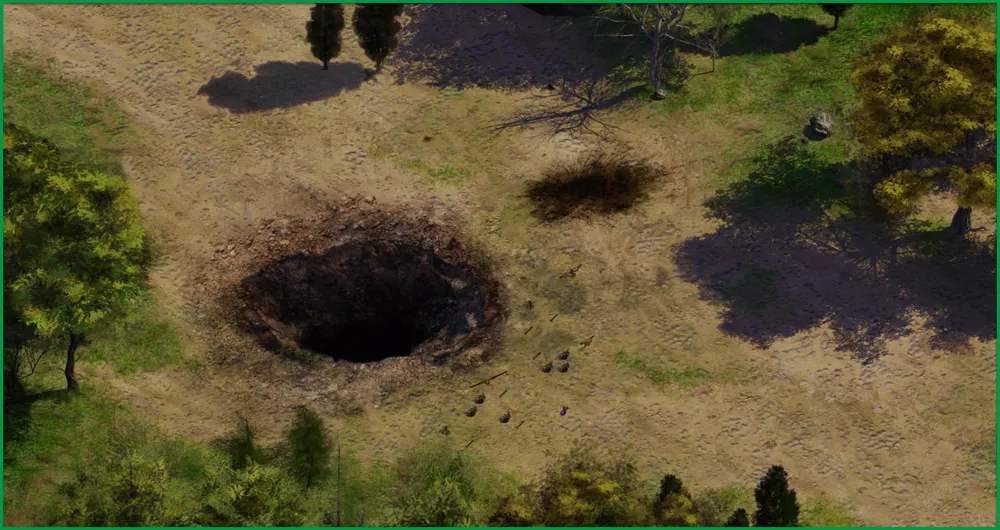
Map of the area
The pit is surrounded by goblins who have decided there is something to loot here. The best way to deal with them is to shoot them with a fireball preemptively, the spell will kill most of the goblins and finishing off the remaining is not a problem. After the victory, examine the pit. The hero will see an opportunity to descend into an underground cave.
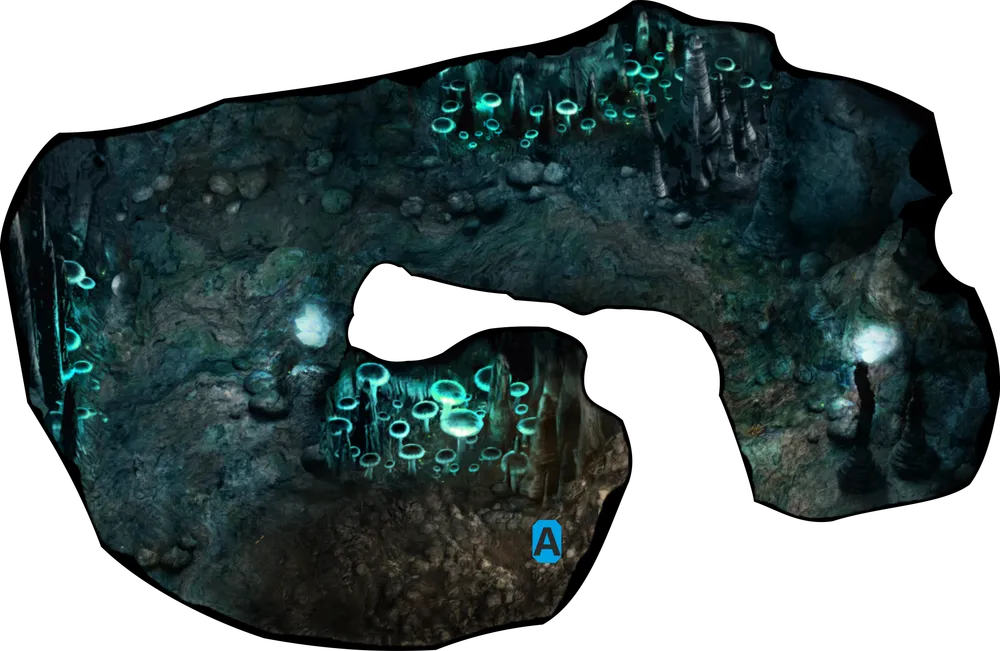
Cave under the pit
A - exit from the cave
Descending, you will notice that the cave is filled with many mushrooms, including "Red Myconids," which will attack the party. After the battle, you will see many dead elves. Among them is a mage, on whose body you will find a letter and three scrolls of spells: Resistance, Teleport Field, Minor Spell Deviation. From the letter, it becomes clear that the mage, being the strongest of his brethren, was sent on a mission by an anonymous sender, pursuing a certain "Exile" who did something very low. However, despite the displayed mercy of the queen of elves, there are those eager to see him dead. Apparently, the mage and his entourage caught up with the target, and while it is unclear which of them applied such a powerful spell, one can conclude that the elves lost to the "Exile."
Venturing deeper into the cave and defeating the remaining Myconids, you will come across another dead elf, whose body is being gnawed at by bugs. Killing them will allow you to obtain two very rare items. Elven armor +2, in which there remains the ability to apply spells (perfect for bards and combat mages), and a +2 spell-breaking sword, which on a critical hit can dispel defensive spells (the best choice for assassin mages and inquisitors).
After returning to the surface, if you continue west on the road, three Ankhegs will attack you. After victory, you can take their shells as trophies.
The affairs here are finished, you can move on.
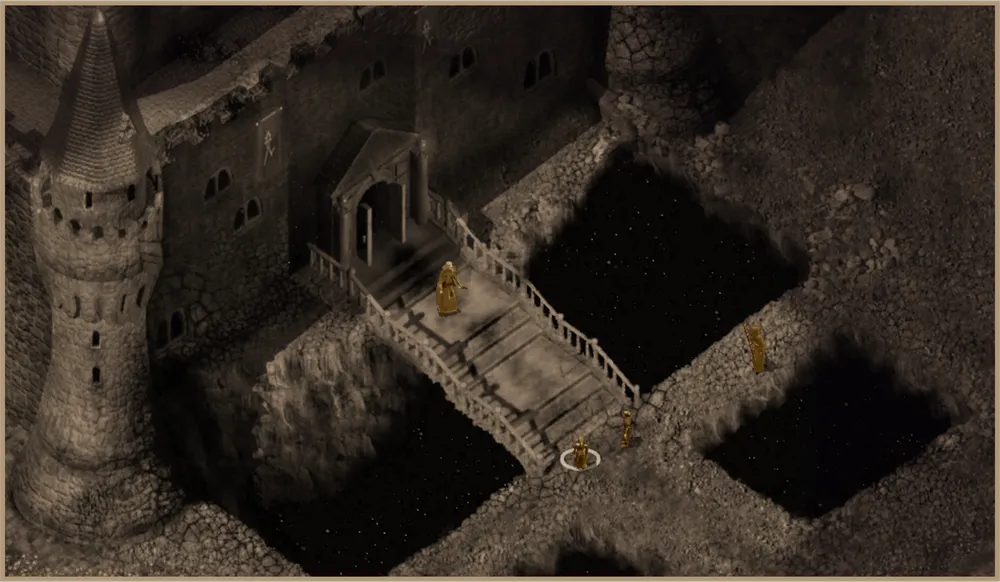
TEMPLE OF BHAAL
The old Temple of Bhaal, which Jaheira mentioned, is located in the caves of the Wyvern Forest, but reaching it is not so easy.
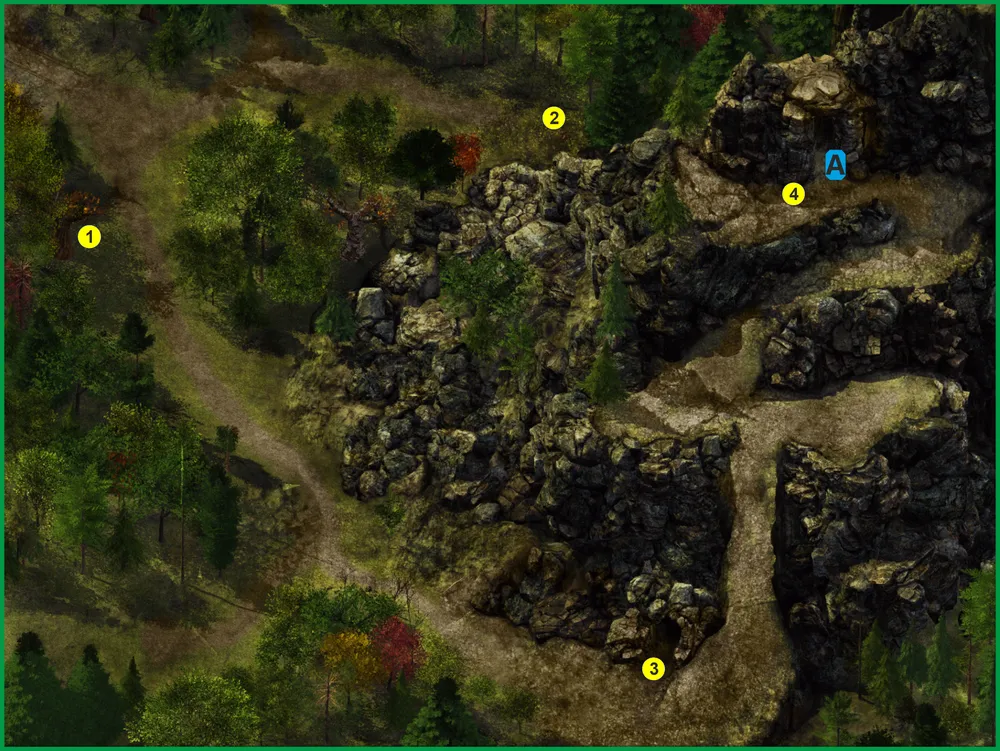
Wyvern Forest
1 - Kugan; 2 - Giant; 3 - Spider Nest; 4 - Dragon's Lair;
A – entrance to the lair.
1. Kugan. Probably a local hunter or ranger. As you approach her standing point, she will speak to the hero and warn that the area is crawling with spiders, especially the caves. After that, she will leave the location. Just after this meeting, down the road, you will be attacked by wyverns. At night, there is a chance that instead of wyverns, there will be shadows (see above, Troll Claw Forest, p. 2).
2. Giant. Turning off the path to the east, you will run into a giant and his two tame wolves. Behind them, you can make out a dead adventurer. Dealing with them, examine the body. You will find 20 piercing arrows +1, 5 dispelling arrows, stalker's bracers, and a composite longbow +1.
3. Spider Nest. Heading south along the path, you will encounter a group of small spiders, who, upon seeing you, will rush into their burrow.
Spider Nest
Red dots - traps
Upon entering, you will discover the nest, where you will meet many different spiders, including giant ones (3,000 XP), small spiders (450 XP), phase spiders (1,400 XP), and sword spiders (2,000 XP). One spider will drop a trophy — a giant spider's leg. You will also find in the nooks of the cave a +2 two-handed sword, five spider eggs, and four spider silks. The trophies will not be excess, so gather everything, just in case you might need them later. If the group contains M'Khiin (see walkthrough, part 3, p. 4), you will also find a half-eaten goblin, from which you can take +2 goblin skin armor.
Note: spider silks are difficult to find. To gather them, you will need to hover the cursor over the walls with spider webs throughout the cave. They will not be illuminated like other nooks, but in the necessary places, the cursor will change its shape. The collection points for the spider silk are randomly generated each game, so it won't be possible to note them on the map.
Later, after you have killed all the spiders and gathered the trophies, a colossal Rhinoceros Beetle will appear along with bombardiers and regular bugs, to feast on the remains of the spiders and their eggs. If you wish, you can simply run past them and exit the cave. You can also take spider eggs in the inventory of one of the characters and use it as bait for the beetle, so that you can defeat the other bugs without involving the giant in the fight. But as soon as you kill all the bugs, it will immediately attack. The beetle is worth 4,000 XP, and it will drop a "rhinoceros beetle shell." Another trophy for the collection.
Note: If the Rhinoceros Beetle does not appear, just wander around the western room of the nest (where there are three cocoons with eggs that can be collected). The trigger for the bugs is there.
4. Dragon's Lair. Ascending the hill, you will encounter the entrance to a cave. Once inside, you will find a sleeping green dragon named Morentferin.
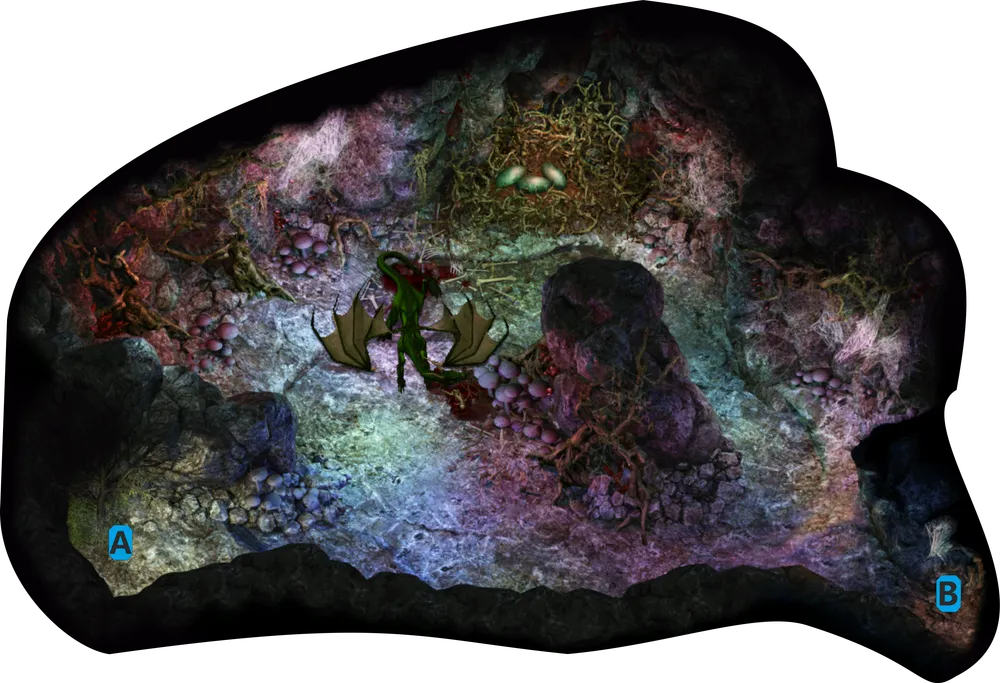
Dragon's Lair
A - exit from the lair; B - passage to the cave of buggers.
You can try to slip past while heading east, keeping the southern wall of the lair or attempt to kill it. But the fight will be difficult. You need to stockpile antidotes and protective spells. Victory over the dragon will reward you with 13,000 XP and the trophy "dragon scales," also, where the dragon was sleeping, there will be the body of an unfortunate adventurer, from whom you can pick up a sable cloak, and in the nest, you will find 3,000 coins and a bunch of precious gems. In the eastern part of the lair, there is a passage to the tunnel of buggers.
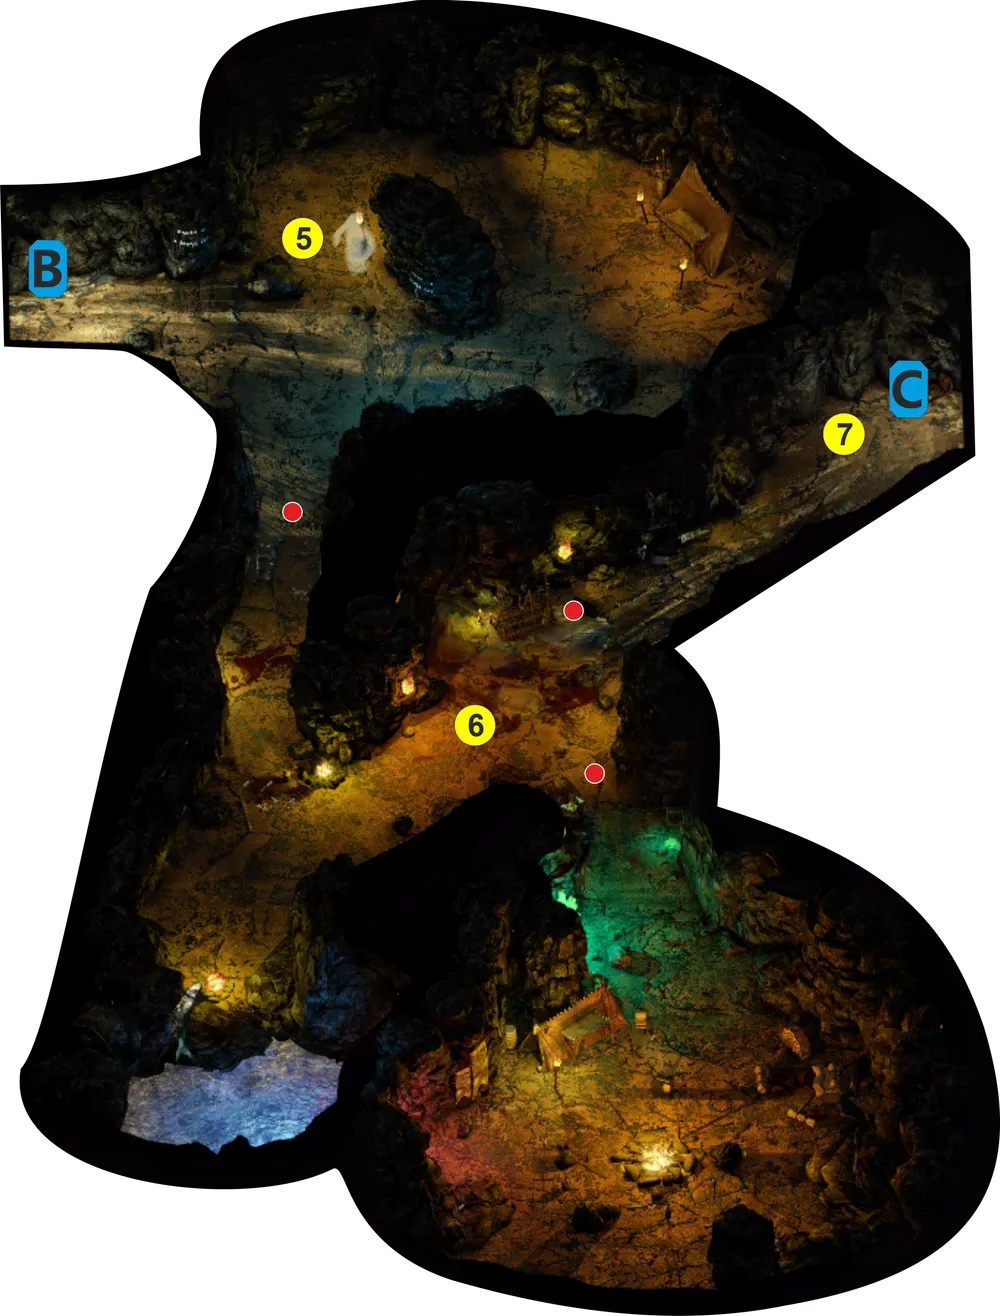
Tunnel of Buggers
5 - large shadow; 6 - leader; 7 - cultist;
B – exit from the tunnel; C - access to the Temple of Bhaal.
5. Large Shadow. Upon entering the first room of the tunnel, the first group of buggers will attack you. After victory, if you have any observation points left (see walkthrough, part 2 - TAP, p. 6), you will see another wandering cloud. Using a charge, you will summon a "large shadow." It is not verbose, and all you can decipher from its words is "interstellar space." With an intelligence or charisma of 16 and above, you can persuade the shadow to destroy all enemies in the tunnel. Otherwise, there will be a battle with it. For victory, you will receive 3,000 XP.
If you have already used the points twice before (see walkthrough, part 2 - TAP, p. 6 and walkthrough, part 3, p. 5), then at this stage, the quest vision of Zaviak will end, and the points will disappear.
6. The Leader of Buggers. If you did not negotiate with the shadow, you will have to fight your way through the tunnel. Eventually, you will confront the leader of the buggers named Snorgash. He will be unhappy about the attack on his clan and will raise the alarm. There is no option to negotiate with him since priests from the temple provide him with weapons, food, and heal his wounds, in return for the clan protecting their abode. He will not dare betray the cult.
7. Cultist. Approaching the passage, you will meet a cultist of the cult of Cyric trying to escape from the temple because strange things are happening in it. You can let him go or kill him. He drops a healing potion.
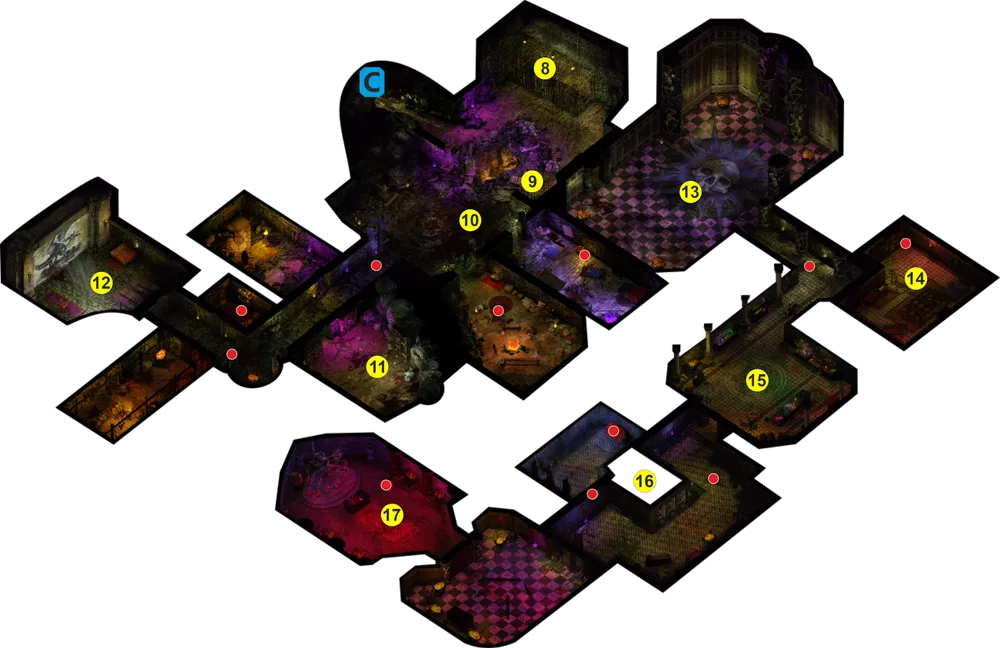
8 - prisoners; 9 - the mad blind one; 10 - corridor with cultists; 11 - insane cultist; 12 - Ziatara; 13 - Ritual Hall; 14 - Akanna's Room; 15 - Laboratory; 16 - Secret Room; 17 - Reliquary.
red dots - traps;
C - exit from the temple.
8. Prisoners. In the first room you enter, there will be cages with three captives. One of them is named Kherem. He will tell you that they are soldiers of the crusade who were sent here on an important mission but were captured. You can agree to free them unconditionally or demand in exchange his help in infiltrating the crusader camp. Kherem will accept the offer, saying that his uncle named Harm can lead you into the camp. After forming an agreement, the crusader will tell you that the key to the cages is probably with the tall