
Guide to Terraria for Beginners [translation]
This guide will be useful not only for beginners. Many advanced players do not know some of the secrets described in it. Check it out, you might be one of them too?
Spawn Point
The very first thing to do at the start of the game is to mark the spot where your character spawned. Upon subsequent reloads of the game world, your character and your friends' characters will spawn at this location (until other spawn points are assigned to them).
The spawn area has the size of 3 by 3 blocks (not 2 by 3 as your character is). When a character spawns in the game world, everything that was there before disappears in this 3 by 3 area. For example, if there was a wall of your house there, it disappears.
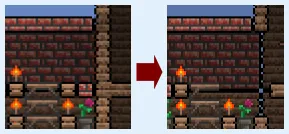
Figure 1. The destruction of the wall caused by the character's appearance in the game world.
Mark this place in any way convenient for you. You can surround it with dirt blocks or dig one block out from below. I usually chop the nearest tree and make a platform from three wooden blocks at this location.
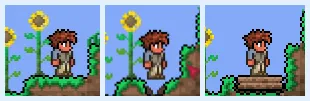
Figure 2. Marking the character spawn point.
First Steps
Chop down some trees and gather at least 100 units of wood. Immediately replant acorns at the site of the chopped trees so that you always have a stock of trees near your house.
When chopping trees, aim for the very base, otherwise, stumps will remain. It is inconvenient to build where stumps are. Additionally, you cannot dig blocks of dirt where a stump stands, and you cannot plant anything in that area.
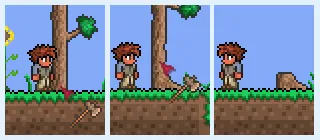
Figure 3. Tree chopping. From left to right: a) no stump will remain b) stump will remain c) the stump itself.
When planting trees, there should be two free blocks of flat ground on the left and right sides, and no dirt wall behind. Otherwise, the tree will not grow.
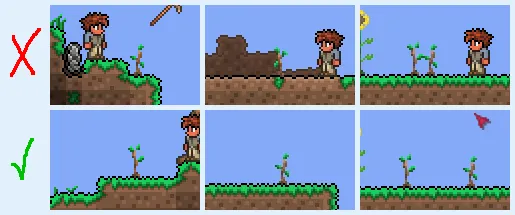
Figure 4. How to plant trees so they grow.
Now you can go explore the world.
What to Look for on the First Game Day
Explore the surface area, do not dig too deep. Continue chopping trees as much as possible because there can never be too much wood. Look for stone and ore on the surface; gather at least 100 units of stone and any ore you can find. You will need stone for crafting a furnace, and ore for crafting weapons and armor.
Kill all the slimes you encounter, except the purple ones - they are still dangerous for you. Surface slimes during the daytime are not aggressive - if you do not attack them, they will jump past you. It’s better to hit slimes with a pickaxe rather than a short sword.
While exploring the world, keep an eye on the color of the sky. It changes throughout the day: orange-pink at dawn, blue during the day, and again orange-pink at dusk. If the sky suddenly turns yellow-green - stop immediately and run back. This means that you have found a corruption zone. The monsters living there are still too dangerous for you.

Figure 5. The sky in the corruption zone.
Interesting Things You Might Find
Terrain
You might want to level the ground to make it easier to walk. Fill small holes, build bridges over large ones, dig hills. Don’t get too carried away with all this - you have more important things to do on the first day.
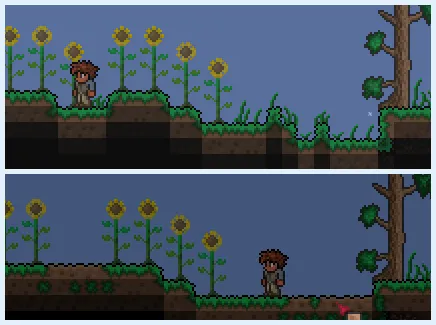
Figure 6. Terraforming.
Slimes
Slimes are a source of gel. Gel is needed for crafting torches, some potions, and other items. Collect as much gel as you can on the first day. It’s better to hit slimes with a pickaxe rather than a short sword. You can make a wooden sword; it’s a bit better than the one you start with, but I usually don’t make it because there will soon be an opportunity to craft an even better sword.
Water Bodies
If you come across a shallow lake, wade through it and do not waste resources building a bridge. At least on the first day, don’t waste them. Save them for larger bodies of water where there is a risk of drowning.
Where possible, explore the bottoms of water bodies. You can find dead goldfish there. Make sure to collect them; they are used to make soup.

Figure 7. Goldfish.
Caves
Caves often have pots in them. Break all the pots and collect everything that falls out. There may be coins, potions, and very useful throwing weapons at this stage.
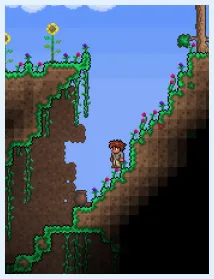
Figure 8. A cave.
Hills
It is easy to climb any hill. Use a pickaxe and wooden platforms. Beware of steep descents; do not jump down from them - you may fall and get hurt, especially if you do not have armor yet.
Ore
Collect all the ore you come across. If you are lucky enough to find silver or gold ore at the top of a hill, mark this spot with a sign. There may be a floating island in the sky above this spot, which you will also explore over time.
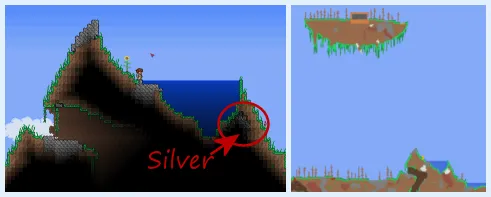
Figure 9. Silver ore on the surface - a sign of nearby floating islands.
Large Caves
This is a valuable find. Such caves are usually located inside a round hill - though their shape can be different. Large caves extend deep down to the second layer of the underground world. They have a lot of loot, but also many dangers. Often such caves are filled with sand or flooded with water, making them even more interesting objects to explore. They contain many pots, more ore is found, and there are also chests with various useful items.
Explore these caves. But before going down, make sure you have enough wooden platforms and torches. Do not go there at night, because zombies may spawn there and fall on your head from above. And do not go too deep - stop when you start encountering red and yellow slimes.
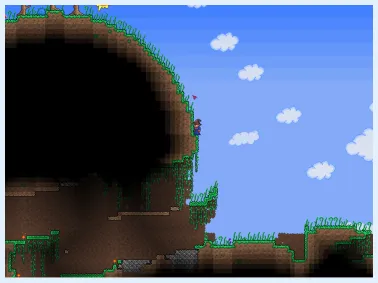
Figure 10. This is what a typical large cave that extends deep down looks like.
Corruption
If you find it - do not go there. You will definitely not survive on the first day and not on the second either. I already mentioned one sure sign that corruption is near - the change in sky color. The second is the change in music. As you get closer, you will see purple grass, trees, and stone.
The scariest thing waiting for you here is not the flying monsters, which can be killed fairly easily one by one, but the worms that live in the ground. They have many hits, it is difficult to dodge them, and they hit hard and multiple times. You will come to them when you have good armor and weapons.
Desert
The desert is a dangerous place, but you need sand. Firstly, it will serve you well as a weapon, because in caves you can drop it on the heads of walking monsters below and kill them in this way. Secondly, glass blocks can be made from sand. Sand will be useful if you need to reach the bottom of a deep cave, fill a water body or a lava pool. And finally, glass bottles for potions are made from it.
To start, collect at least 250 units of sand.
Dangerous flying monsters inhabit the desert. But they initially sit still on the ground, and only take off and attack if you approach them too closely. So it’s easy to avoid fighting them. There are also other stationary monsters that will shoot at you, but dodging their shots is not difficult.
Cacti deal 5-7 damage to a character without armor. Don’t run through cacti, especially at the beginning of the game. You can chop a cactus with an axe or break it by digging out the block it grows from.
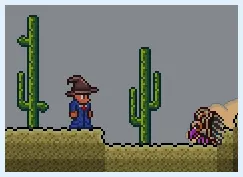
Figure 11. How close you can approach a desert vulture,
without disturbing it.
First Night
At sunset, when the sky turns orange-pink, it’s time to prepare for the nighttime residents' attack. They will come when the moon rises (at new moon - when it is about to rise).
By nightfall, you should have a shelter made of walls and a roof. It can be built from any materials. If it’s a temporary shelter rather than a permanent house, you can skip building the back wall.
Now it’s time for crafting. Make a workbench, a wooden hammer, and a furnace. Smelt the ore into bars. If you have collected enough iron, make an anvil.
If you have already found sand, you can make healing potions. Smelt the sand into glass, make some bottles, create an alchemy table, and brew some potions.
You have two options for what to do at night:
Dig down to find ore for crafting weapons and armor. It’s better to dig near the spawn point of your character or near the place where you plan to build your house.
Make a bow and arrows, hide in ambush, and kill monsters. Ideally, you need to obtain some shackles from zombies and two lenses from demon eyes.
How to Dig
Before you start digging down, make sure you have the following items:
Torches – 40+
Platforms – 80+
Wood – 150+
Gel – 15+
Healing potions - 3+
Pickaxe – 1
Hammer – 1
Sand – you can do without it, but it’s very useful to have at least 100 units.
The more torches, wood, platforms, and gel you have, the longer you can spend underground. If you found chests during the day, place them somewhere and leave anything that doesn’t fit in this list.
Dig a mine vertically that is 2 blocks wide until you see water or a cave below. Always keep a light source that allows you to see two blocks down so you don’t accidentally fall into water or a cave.
Monsters may appear in the mine. To prevent them from falling on your head, leave dirt blocks above your head - one block high per screen. Seal off the openings with blocks, as monsters may come from there.
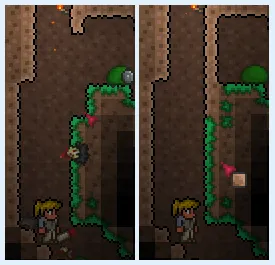
Figure 12. Safety measures in the mine.
Do not worry about how you will get back up - you have a supply of platforms for that. By the time your inventory is full, you will need about 50 of them to get back to the surface.
If you come across water, fill it with dirt or sand and continue digging. Explore caves, but avoid fighting strong monsters. Collect all the ore. If necessary, build tunnels.
You may want to dig horizontal tunnels to find ore in the dirt layer. There’s not much ore in this layer, but perhaps you’ll get lucky.
You can also explore large caves at night, but for that, you will need more wood and a large supply of dirt to block off branches from which monsters may come.
How to Farm Night Monsters
Stock up on stones. If you couldn’t collect them during the day, you can do some digging at night. Make a bow, arrows, and a structure like in the picture. Kill as many zombies and demons as you can. If you’re lucky, they will drop shackles and a couple of lenses from which you can make goggles. Shackles and goggles together provide 2 defense - like copper armor!

Figure 13. Hiding in ambush.
What to Craft at the Start
If you were digging at night, by the second day you’ll have some stock of ore, but it won’t be enough to make everything you need at once. You will have to choose.
Iron and Silver
An iron or silver pickaxe. It not only digs faster but also reaches one cell further than the copper one.
A bucket. You will need it sooner or later, and if you don’t have goggles, you can wear it on your head instead of a helmet.
Weapons. First a sword (broadsword), then a bow.
If you still have some iron bars left after this, make a chest for storage. Then a sawmill; it needs five bars. A sawmill is necessary to make a loom, then silk, and then a bed that allows you to change the spawn point of your character.
Copper
A chestplate, if you have enough bars for it. It gives 2 defense points, while a helmet and greaves give one each. Plus, the armor is cheaper than a helmet and greaves combined.
If you have to choose between a helmet and greaves, make the greaves. Because you can’t wear anything else on your legs, but you can use goggles and a bucket for your head.
Weapon or Armor
If you hit enemies effectively, they won’t have a chance to hit you. Therefore, I believe good weapons are more important than good armor.
Tools
If you plan to build a lot, it makes sense to invest in tools: a faster axe and hammer. If you don’t plan to - for now, stick with what you have, and later you will get the chance to make a universal tool from meteorite ore.