Siege of Dragonspear - walkthrough, part 6

The siege of Dragonspear Castle continues. Due to the incident at the Boareskyr Bridge, many in the coalition army began to wonder: are they on the right side? On one side is the descendant of the god of murder, Bhaal, and on the other — the Shining Lady, a paladin from the order of Astra. Are the motives of the hero of Baldur's Gate so pure, and are the methods of Kelyar Argent mad?
To boost the morale of the soldiers and prevent them from thinking that they are pawns in the hands of the "new Sarevok," the command has decided to keep you away from the coalition camp, entrusting you with the search for a secret passage into the castle.
After scouting the nearby area, you discovered the entrance to the caves beneath Dragonspear Castle. The events of the siege of Bridgefort by Kelyar's army revealed a weakness in her forces — despite the crusade hunting the hero of Baldur's Gate, the average crusaders do not know your description. Taking advantage of this, you decided to infiltrate the enemy camp.
**[Siege of Dragonspear - walkthrough, part 1](http://www.gamer.ru/baldur-s-gate/siege-of-dragonspear-prohozhdenie-chast-1)**
**
Siege of Dragonspear - walkthrough, part 2
Siege of Dragonspear - walkthrough, part 3
Siege of Dragonspear - walkthrough, part 4
Siege of Dragonspear - walkthrough, part 5
**
RETROSPECTIVE
It seems that this part is a continuation of the tenth chapter, and this section is meaningless, but there is one interesting event that I learned only now, at the very end, while replaying the beginning of the chapter. Therefore, I will describe it here, as a connecting link between the two parts.
Before exposing the traitor Malden Kola (see walkthrough part 5 - LK, p. 16), you can, with the help of Safana, steal the seal of Kelyar from him. By the way, the number of attempts is unlimited. With the seal, you can also expose the traitor (I believe this option was added for players who lost all leads to his name). The seal itself may still play an important role in future events.
WORLD MAP
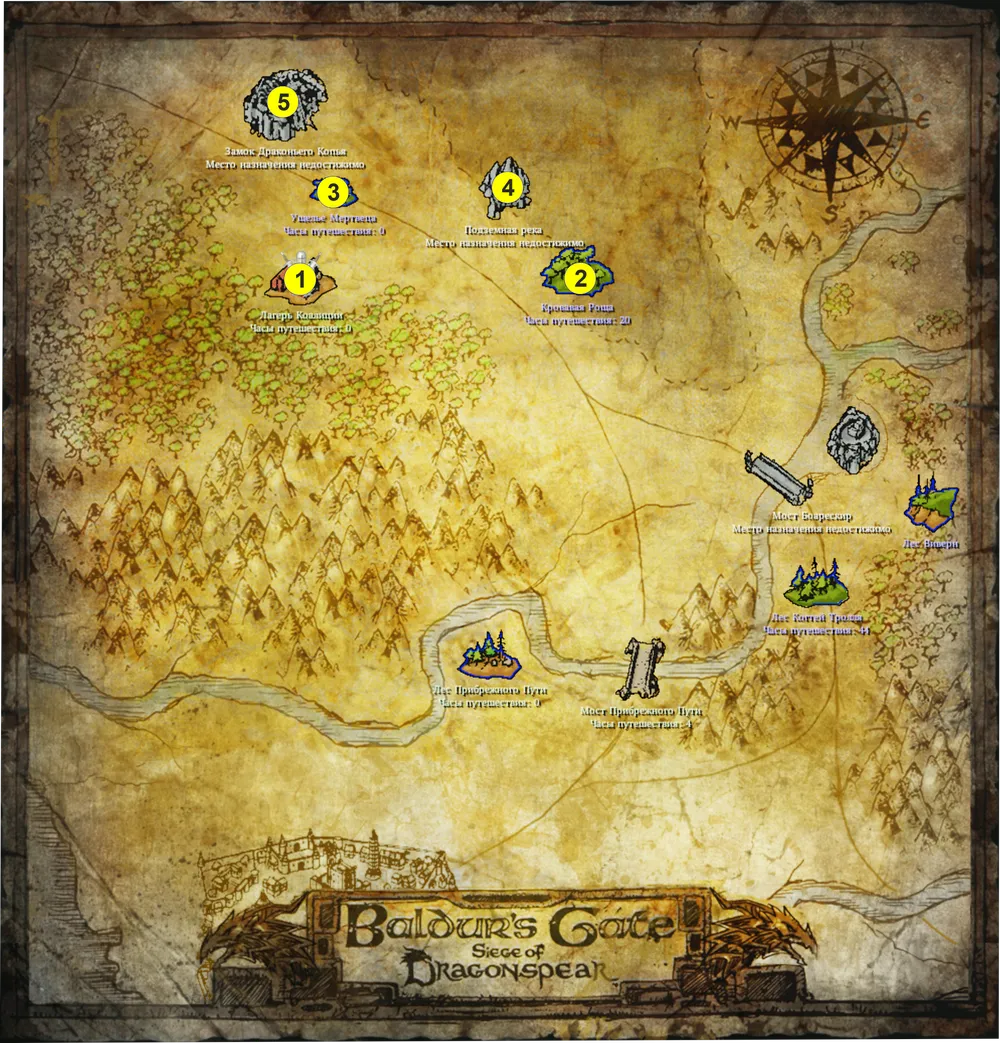
1 - Coalition camp; 2 - Bloody grove; 3 - Dead man's gorge; 4 - Underground river;
5 - Dragonspear Castle.
COURTYARD OF DRAGONSPEAR CASTLE
Having completed the reconnaissance of the area down to Dead Man's Gorge, you still have not found the daughter of the great duke Enter Silverhand (see walkthrough, part 5 - LK, p. 18). Remembering her early actions, you likely understood that She is overflowing with valor but lacks wisdom. Therefore, it is likely that she did not take the long route, looking for passages or secret caves, but literally charged towards the castle walls. Now it's possible to risk and, from Dead Man's Gorge, head straight for Dragonspear Castle.
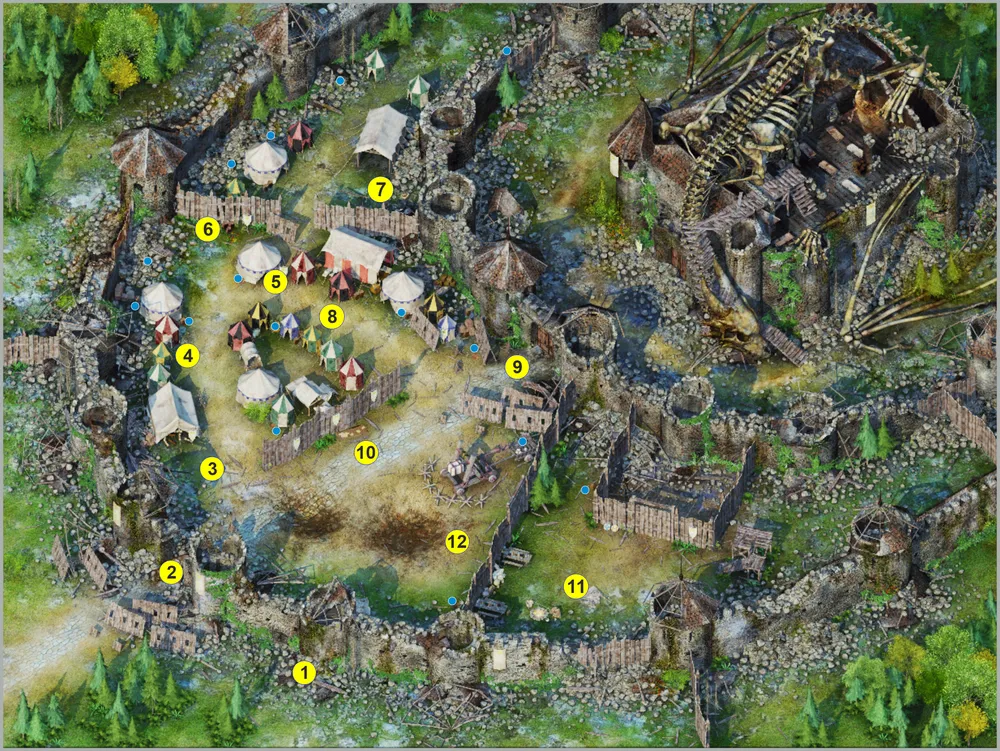
Castle Courtyard
1 - She; 2 - entrance guard of the castle; 3 - arguing crusaders; 4 - priest of the Red Knight; 5 - captain Dreon; 6 - recruits Nen, Pedro, and Cello; 7 - altar of the god Tempus; 8 - Zeyr and Beno Famari; 9 - gate to the inner courtyard; 10 - table with maps; 11 - troll tamers; 12 - officer Delend;
Blue dots - boxes and chests.
1. She. Coming to the area, you will notice the guard watching over the passage to the castle. Therefore, She hardly passed by the guards and is somewhere nearby. Indeed, if you walk along the walls to the east, you will run into her, cornered by an outside patrol. Rescuing She from the patrol, in dialogue, the hero will send her back to camp. She, in turn, will share one of her observations. The crusaders are hurriedly reinforcing the section of the western wall.
Upon returning to camp and reporting She’s return to Marshal Netherlok (see walkthrough, part 5 - LK, p. 10), you will receive 800 coins.
2. Castle Guard. The guards do not let anyone in without Kelyar's seal. However, since you already have it from the traitor (see above, retrospect), you can now enter the castle right here, through the main entrance.
Note: if you have already completed the quest with the traitor and did not receive Kelyar's seal, you will have to start the chapter by entering the caves beneath the castle. In this case, start reading this article from the second section — "Underground River."
3. Court. Above the entrance to the castle, you will meet a squad of crusaders, two of whom, Corinth and Valis, are arguing among themselves. Valis accuses Corinth of betrayal; according to her, he warned the village of Innisfall, which their squad was supposed to occupy the other day, costing the crusade supplies and recruits. Corinth, in turn, denies the accusation and believes the village was warned by a farmer working in the fields far from the village. Seeing the squad, he mounted his horse and rode off to the village. Their commander, Leoplas, is trying to sort out the situation. After talking to the commander, you can suggest two ways to resolve the dispute:
Convince Leoplas to resort to trial by combat. Then the commander will force Corinth to fight Valis. If Corinth wins, you won't find anything special on Valis's body, but if she wins, you'll be able to collect 20 arrows +1 and Corinth's longbow +2 from his body. In this option, you will not receive any rewards for the quest;
Offer your services in the investigation by questioning his subordinates.
In addition to the disputing parties, the squad includes: Damarr, Ravok, and Delton. After the dialogue with the commander, the squad will disperse. Now it's time to talk to each of the soldiers.
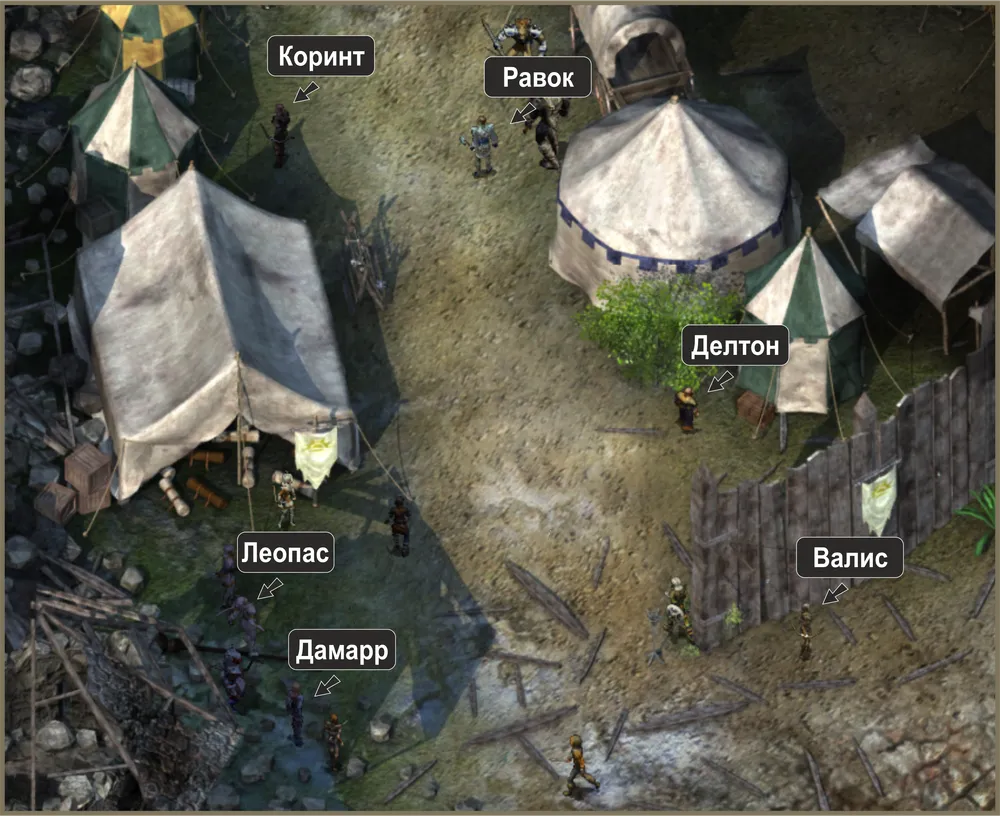
Leoplas's Squad
Damarr will inform that Corinth is not as devoted to the Shining Lady as everyone else in the squad. She allows the possibility he could have betrayed them, but isn't sure, since the accusing Valis hates Corinth and may go so far as to see him dead. She won’t reveal the reason for Valis's attitude towards Corinth.
Delton is doubtful about Corinth's betrayal, despite him joining the crusade for money. However, he will unintentionally mention Corinth's family living in Innisfall. He refuses to answer clarifying questions, stating only that Corinth is innocent. By the way, near Delton stands a box protected by a trap. Inside you will find two scrolls of spells.
Ravok considers Corinth a coward. When asked if Corinth could have betrayed them, he will answer vaguely that Corinth doesn't have a single "stone."
Valis will repeat her accusations against Corinth. She knows about his family in the village and claims to have seen him enter it an hour before the attack.
Corinth himself will deny the accusation, whatever you say. However, if the hero's charisma is 18 or higher, you can pressure him into confessing. Corinth was afraid that his loved ones would lose their possessions and possibly their lives, so he warned the village. After that you can blackmail him and demand a reward for his silence. He will give you his equipment: hide armor, a short sword, Corinth's composite longbow +2 (on a successful hit, the owner is bestowed with luck) and 20 arrows +1. If you demand more, you will get nothing at all.
After questioning the soldiers, approach the commander and inform him you’ve made a decision. He will summon his men to proclaim the verdict. As a result of the investigation, you can declare that:
There is insufficient evidence to accuse Corinth, and he should not be punished, let alone executed. Leoplas will get angry for the time wasted on you. There will be no rewards for the quest;
Valis is right; Corinth is undoubtedly guilty. In this situation, the commander will pronounce him guilty and then the crusaders will attack and kill him. You will receive 4,000 XP for the quest;
Corinth is innocent, and Valis is slandering him out of personal animosity. Then Leoplas will sentence her to death. You will receive 4,000 XP for the quest;
Both are guilty. With a charisma of 16 and above, the hero will manage to convince the commander of his righteousness. Leoplas will order both killed. You will receive 4,000 XP for the quest. If you couldn’t persuade him, there will be no rewards;
In the case that Corinth survives, after talking to him, he will reward you with his longbow +2 in gratitude, but only if you didn’t blackmail him. After that, he will leave the ranks of the crusaders. Moreover, if you succeeded in getting him to admit his guilt but didn’t reveal it, you will gain +1 to your reputation. There is a nuance: if in the final dialogue you choose the option: "Scram," then you won’t receive the bow or the reputation.
In turn, Valis will leave silently whenever she's not killed and there will be no further opportunity to talk to her.
Note: at the moment of conversation with the orc Ravok, you might provoke him into a fight and kill him. On his body, you will find a battle axe +1 and get 650 XP. In the trial by combat, Corinth will likely win, but you can intervene, aiding Valis with buff spells; no one will object.
4. Priest of the Red Knight. Not far from Corinth, you will encounter a priest named Tristian. He is a follower of the Red Knight and the one from whom you can get the symbol for trading with Waizab (see walkthrough, part 5 - LK, p. 13). To do this, you need to beat him in a game of Koronir, received from Mizhen. He will agree only if, in response to his bet, you offer 200 coins. You can play with the priest yourself if either intelligence or wisdom of the main character is 17 or higher, or ask one of your companions: Edwin, Nira, or Dinahair. If you lose, Tristian will hand over his symbol, a wooden figurine of a horse painted in a checkered pattern.
5. Captain Dreon. West of the priest of the Red Knight, you will meet Captain Dreon. He has the ring needed for Waizab (see walkthrough, part 5 - LK, p. 13). However, he will not engage with you, as he does not talk to recruits without uniforms. You can find the uniform in a chest behind the round tent, which is located near Tristian. After putting it on, inform the captain that you have a bunch of documents requiring his seal. He will complain about a lack of time, and at that moment, you can ask to borrow his ring temporarily to “put the seal on myself.” Dreon won’t object.
In the chest near the captain, you will find the crusaders' banner, which is also needed for trading with Waizab. Also, in the box opposite Dreon, across the road, you’ll find a chain +1 and chains for trolls.
6. Morning Report. North of Captain Dreon, near the fence, you will stumble upon three recruits Nen, Pedro, and Cello. Cello lies unconscious from drunkenness, and his companions are trying to bring him to his senses. When asked what they are up to, they will explain that Cello was supposed to present the morning report to Captain Dreon but is too drunk to do anything. If Dreon finds out about this, all the recruits will be punished. During the dialogue, they realize that the hero is a rookie, as they have not seen him in the castle before. Therefore, they will ask you to take a flask of wine and the morning report to the captain instead of Cello. When asking why they didn’t do it themselves, they will answer that the captain is not so strict with new faces, and he knows them already. To avoid risking their conspiracy, the hero, for better or worse, will agree to help, after which an empty flask will appear in the inventory.
You can fill the flask with wine right there, as there will be three barrels standing near the recruits.
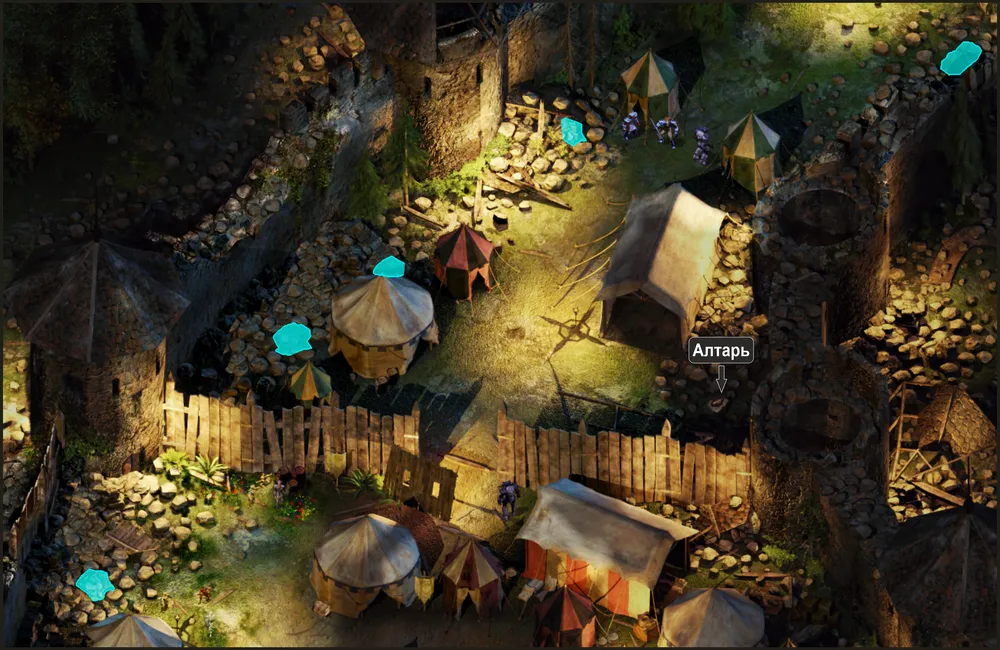
7. Flock of the Lord of Battles. Proceeding through the gap in the fence next to the recruits, you might notice a peculiar altar to the god Tempus, the Lord of Battles. Here, two recruits named Kyarvan and Quing are holding a prayer service. In dialogue, they will explain how they found a stone engraved with Tempus's symbol among the ruins. They made an altar from it and pray to him, asking for help in the upcoming battle. However, the lord of battles, they believe, remains deaf to all pleas. Whatever you say, the recruits will not heed your arguments; if you dare to suggest that this is due to Kelyar's depravity, they will attack the hero, and this may lead to a mass battle with everyone in the camp. The recruits believe that the problem lies in the absence of several shards of the engraved stone. Perhaps they can be found among the ruins along the castle walls. Also, the moral officer Delend may know something since he has studied the ruins. But that's not all; they also want the shards to be blessed by a priest of Tempus.
Stone Piles
The first shard can be found nearby, in this area, in one of the five stone piles, which, like any container, will be highlighted.
8. Zeyr and Beno Famari. Proceeding east of Captain Dreon, you encounter two characters. They seem uninteresting. The first, Zeyr, won’t provide useful information. The second, Beno Famari, in dialogue will mistake the hero for Kelyar’s preacher and will send the hero “far away from his eyes.” He seems to be a mercenary and does not share faith in Kelyar. The hero won’t learn anything else about him. However, if the group includes Korwin, she will recognize in Beno her ex-husband and the father of Rohma (see walkthrough, part 2 - on the campaign, p. 3). Addressing the hero, she will ask him to leave the castle and return to camp. Questioning her further, she will tell how she had killed him already, not just once, but five times. However, the Famari family has strong connections in the Lathander clergy, so he always returned back. According to her, she is afraid that, recognizing her, Beno will incite the crusaders against the heroes, as he knows all too well her loyalty to the Flaming Fist. But, it seems, in fact, she is just scared to talk to him, and, as usually, it hurts to stir the past.
If you approach Beno closely enough, he will recognize Korwin and speak to you. In dialogue, he will be surprised that Korwin has left the Flaming Fist and is now in Kelyar's service. Korwin will counter his remark, saying she has changed significantly since their last encounter and now only cares about Rohma, while the Flaming Fist and he mean nothing to her anymore. After that, Beno will inquire how their daughter is doing. At that moment, you can intervene and either defuse the situation by saying that she is doing fine or take Korwin's side and start condemning Beno for abandoning them. In the first option, the dialogue will end. In the second, angered, Beno will accuse Korwin of ruining his life. According to him, in her youth, Korwin was straightforward and bold, taking after her father, Adamara, and "duty" was more important to her than their relationship. In response, Korwin will tell him that she intended to change her lifestyle for the family, but he abandoned her when he found out about the pregnancy. Eventually, Beno will grow weary of this and decide to end the conversation, informing you that he has to go and prepare for battle. At this moment, apparently losing control, he will divulge some information about the crusaders’ plan. Kelyar intends to attack the coalition camp when she and her priest Hefernaan finish some business inside the castle.
The above dialogue with Beno will occur if you are wearing the crusader's uniform. Otherwise, there will be complications. Without the uniform on the hero and a charisma lower than 11, he won’t believe that Korwin has left the Flaming Fist and will decide to kill the heroes to earn gold for spies. After which, he will attack, along with two accomplices. Killing the mercenary first, his squad will scatter. By the way, the level of charisma in this dialogue does not provide a hundred percent chance to avoid a fight, so it is better not to offend the mercenary.
After winning, the commander of the crusaders will approach and inquire what has happened. To avoid revealing yourself and raising the alarm, tell him that the person you killed was an unscrupulous mercenary and a coward. Since ideological followers of Kelyar harbor a deep-seated disdain for mercenaries, the commander will reprimand you to not let such things happen again but will still grant amnesty to the heroes.
Note: the dialogue option where the hero sides with Korwin will only be available if, in the conversation with Safana at the coalition camp, you chose Korwin (see walkthrough, part 5 - LK, p. 1, note).
9. Gate to the Inner Courtyard. In the center of the northern wall, there are gates to the inner courtyard of the castle. They are guarded by four elite crusaders. Unfortunately, you will not be able to open this passage in any way. But you can check a chest nearby. Be careful; it is not only locked but also protected by a trap. Inside you will find a small shield, a longsword, a potion of heroism, and another crusader uniform.
10. Table with Maps. South of the gates to the inner courtyard, moving towards the castle exit, you will notice a table with maps on it. When attempting to take anything from it, a guard will stop you, and if you don’t back down, he will raise the alarm. To steal a map from the table, you need to use the skill to hide in shadows or invisibility magic. In this case, the invisible hero will easily steal it. This map is wanted by the merchant Waizab (see walkthrough, part 5 - LK, p. 13).
11. Troll Tamers. In the eastern part of the courtyard, you will meet a troll, troll tamers, and the crusader Sindret. In dialogue, she will explain that she is a healer and protects the tamers if a troll injures any of them. Currently, they have a problem; Gnargh, the regular keeper of trolls, has disappeared. The keeper had special shackles capable of binding and subjugating a troll. Therefore, Sindret will ask you to find and bring them from the camp. You’ve already found one example in a box near Captain Dreon (see above, p. 5).
After receiving the shackles, Sindret will order you to tame a troll nearby. If you refuse, she will threaten consequences for disobeying orders from her superior commander. With charisma 16 or higher, the hero will manage to convince her that he is actually a moral officer under cover, assigned by Kelyar to verify the loyalty of commanders and evaluate the morale of the army. If the suggestion is successful, you can take the initiative and command her to subdue the troll. Sindret will obey, and she, along with six soldiers, will attack the troll. The warriors will fight, while Sindret heals the wounded (though even with her support, some tamers may die). When the troll loses consciousness, everything will end. If you decide to tame the troll yourself, you should first talk to him. In dialogue, you can chat him up by talking about the essence of time (available to mage heroes), or if the hero is a warrior, threaten him with punishment; the troll will capitulate without a fight (you might encounter other options). Otherwise, you’ll have to fight. Be cautious in combat to avoid killing him (and do not use fire or acid damage). When the troll loses consciousness, the fight will end. After talking to Sindret, she will reward you with potions of might, magic resistance, heroism, clarity, and freedom. However, if the troll dies, there will be no reward.
In any case, you will earn 4,000 XP for the quest. Sindret and the tamers will leave.
Note: if you come to Sindret with a drow (Vikoniya or Baelot), she will not talk to the hero or give orders, as she does not particularly appreciate members of that race.
12. Officer Delend. Near the gates leading to the eastern part of the castle courtyard, the crusader officer Delend is stationed. Upon your first conversation with him, he will enquire who the hero is. Lately, many newcomers have appeared, and he can no longer remember their faces. He will then introduce himself as responsible for morale in the crusade and ask the hero what he knows about the mission entrusted to the crusaders. No matter how you respond, he will not be satisfied and will suggest you talk to others in the camp and learn more about their goals. After that, you should return and respond to the officer’s questions. If you pass the test, you will raise your ranking in the army, and as a sign of your new position, you will receive the "symbol of the enlightened crusader."
There are four characters with whom to talk on this subject:
Ravok (see above, p. 3), if he is still alive. The orc will explain that their camp was attacked by demons. They killed many strong warriors of the tribe, and the orcs managed to kill only three. The tribe's shamans stated that those killed by demons would not reach the ancestors and are forever trapped in hell. Therefore, witnessing the light of Kelyar, Ravok decided this was his chance to free the souls of his brothers.
Tristian (see above, p. 4). He was summoned by Kelyar herself when the crusade came to his village. At first, he resisted her, but she managed to convince Tristian of her righteousness and that she needed a follower of the Red Knight to defeat a united army of demons from the Nine Hells. Since then, he has been faithful to her.
Zeyr (see above, p. 8). He is literally obsessed with Kelyar. Her speech, pronounced in his village, impressed Zeyr’s heart, and now he will follow her anywhere without any doubt.
Sindret (see above, p. 11), if she hasn’t left. The healer will explain that she is a follower of the god Shevarash, the lord of vengeance. His servants focus on opposing the drow race. However, besides that, this god is also a patron of crusades. But it’s not the only reason she is there. The campaign is also a way for her to gain new knowledge about tactics, so that later she can return home and fight effectively for her people against the drow in Underdark. She holds Kelyar in respect and hopes to become as devout and strong as she is one day, to forever expel enemies.
To complete the quest, it is not necessary to speak with all of the above characters, which is convenient since two of them may disappear from the game.
Returning to Officer Delend, he will pose three questions:
Why was the crusade mobilized? Answer — to liberate the souls of the poor from the Nine Hells. You can get this answer if questioned Ravok or if your wisdom level is 16 or higher.
How will the crusade achieve victory? Answer — Kelyar’s holiness will protect us. You can get this answer if questioned Sindret or Tristian or if the intelligence is 16 or higher.
What is the heart of the crusade? Answer — Kelyar Argent. You can get this answer if you questioned Zeyr or if your charisma is at least 16 or higher. Additionally, when the hero is a warrior, you will be able to answer this question regardless.
Once you provide the answers, the morale officer will be thrilled and will hand over the promised symbol, which will turn out to be the crusade's ring (+3 to protection from demons). You will receive 2,000 XP for the quest.
Now, you can ask Officer Delend about the morning report for the captain (see above, p. 6). This time, he will make comments if the hero is not adorned in a crusader's uniform. You can convince him that you have a valid reason for being out of uniform if:
Your charisma is 16 or higher. Report that the commander is waiting for his report "NOW," and you didn’t have time to get ready;
Intelligence is 14 or higher. Say that due to the siege, there is not enough cloth in the castle, and the command has decided to abandon uniforms for rookies.
After that, Delend will ask whom the report is for. Answer — Captain Dreon. After which, finally, you will get the report.
Giving the report and the wine to the captain, talk to the recruits. In gratitude, you will receive a potion of absorption and a health elixir. You will earn 6,000 XP for the quest.
Lastly, ask Officer Delend if he has seen any shards of the stone of Tempus. When asked why they are needed, the hero will respond that the recruits want to create an altar to the god of battles. The officer will not like this, as in his opinion, recruits should not turn to gods bypassing Kelyar. You can convince him otherwise if one of your characteristics is 13 or higher:
Intelligence. Say that Faerûn is a land of many gods. The more divinity we attract, the better.
Strength. Say that Tempus is the god of strength. It is better if we can pray to him as often as possible.
Charisma. Say that it is essential to keep the recruits’ morale high.
If you succeed, Delend will hand over the second shard for the altar.
Note: if at the first dialogue, you introduce yourself with your real name plus mention the title — the hero of Baldur's Gate, the officer will obviously raise the alarm.
13. Closing Loose Ends. Ultimately, the courtyard of Dragonspear Castle was successfully scouted without revealing yourself. Unfortunately, you can’t get inside the castle from here. The elite guard does not let anyone through, neither with Kelyar’s seal (see above, retrospective) nor with the crusaders' ring (see above, p. 12). However, you can’t call the outing useless.
You managed to find and save She (see above, p. 1).
You gathered, although little, information about the plans of the crusade (see above, p. 8).
You found four out of five trophies for the merchant Waizab (see above, p. 4, p. 5, and p. 10).
The fifth trophy is the token of faith. It can be stolen from a character with the prefix "recruit" in their name. Unfortunately, the chance of obtaining this token doesn’t work on all recruits. More often than not, it was possible to steal from the recruit standing near Damarr (see above, p. 3).
Now, with five trophies and two stone shards of the altar in hand, return to the coalition camp. There, you need to tie up a few things: return the trophies to Waizab, bless the shards, and report back on She’s rescue.
For each trophy, you will earn 2,000 XP. The merchant Waizab will exchange the trophies for rewards:
Kelyar's seal ring — 250 coins;
Crusaders’ banner — 500 coins;
token of faith — pearl-white Yuon stone (1 health point every 5 rounds);
map with Kelyar's markings — 1,000 coins;
sacred symbol of the Red Knight — shadowspear +2 (5% chance to teleport to a random enemy and gain the ability “Incorporeality”).
After handing over the entire collection, as gratitude, she will add three potions: giant storm strength, magic resistance, and might.
Talk to Marshal Netherlok (see walkthrough, part 5 - LK, p. 10) and report that you found She. You will receive 800 coins as a reward. Better do this now, as there may not be another chance.
Nearby the marshal, talk to Mizhen to bless the stone shards of the altar of Tempus. She will accept two fragments, giving you back one named "Sanctified Shards". Also, you can return her tabletop game that she gave you earlier to play against the priest of the Red Knight.
Take the shards back to the castle to the recruits. In dialogue, they will ask where you found the priest of Tempus. Under no circumstances should you mention Mizhen from the coalition camp; the recruits will raise the alarm. Lie that a wandering priest blessed the shards. In this case, they will ask you to place the shards on the altar. After doing this, you will hear the voice of Tempus.
In dialogue, he will offer to undergo a trial by combat in exchange for his blessing. If you decline, the quest will end, and you will earn 6,000 XP. But if you agree, a sentinel of Tempus will appear. Defeating this sentinel, you will obtain a bloodied shield +2 (25% fire resistance, losing 50% health will give the owner +1 strength for 5 rounds).
At this stage, the affairs in the castle courtyard are concluded. Since there is no way to the basement from here, you will have to explore the caves beneath the castle.
Note: there are rumors on the internet that the sanctified stone shards can be exchanged with Tristian (see above, p. 4) for his symbol of the Red Knight or for 200 coins. However, no matter how many times I replayed this moment from various angles, I couldn’t find this opportunity.
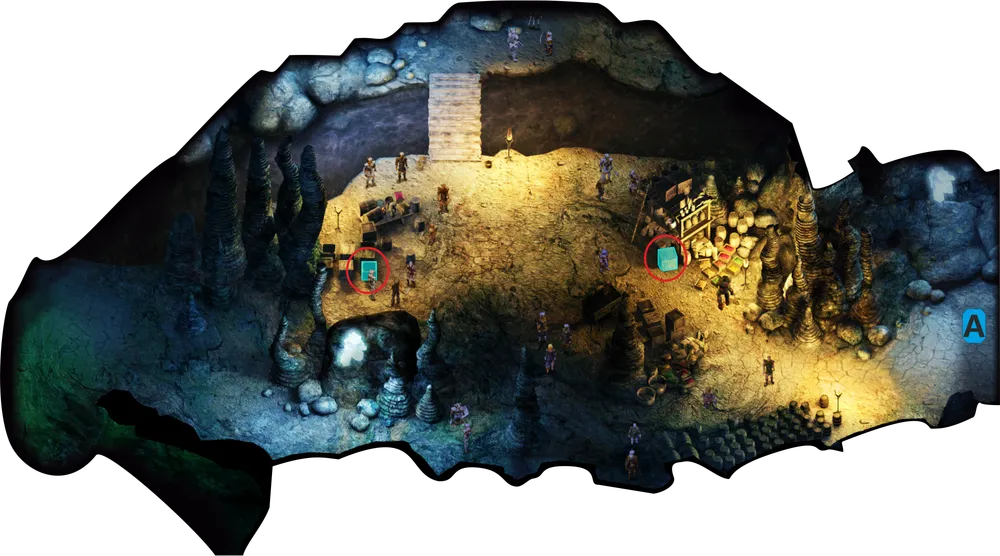
UNDERGROUND RIVER
The first area you will enter represents the entrance to a network of caves called "Underground River." However, before trying to penetrate there, you can look around.

Area at the Cave Entrance
1 - goblin squad; 2 - sacred tree; 3 - ruined tower; 4 - ogre camp; 5 - monster lair; 6 - camp gates; 7 - unusual travelers;
blue dots - places of interest; red dots - traps;
A - entrance to the caves.
1. Goblin Squad. Here, you will encounter a motley group of goblins led by Battux. They will demand payment for passage, 50 coins for each member of the group. In this situation, you will have a choice:
If you comply, you will spend that amount but receive 2,000 XP;
If you deceive them, convincing them that you are a mercenary of Kelyar, for example by demonstrating Kelyar's seal (see above, retrospect), you will earn 2,500 XP;
If you kill them, you will earn 1,265 XP and find two healing potions, a heroism potion, an improved healing potion, a spear +1, and 542 coins on their bodies.
Note: if M'Khiin is in the group, events will unfold differently. Noticing her, they will insist on M'Khiin joining them. They believe a goblin should only be in the company of peers. She, in turn, will refuse, but since words aren’t enough for goblins, she will have to use her spirit-calling talent and unleash them on the goblin leader. This will impress his subordinates, and they will offer M'Khiin the position of their new leader. Her second refusal will offend them, after which you can intervene, choosing one of two options: give them 100 coins or provoke them into a fight and kill.
2. Sacred Tree. To the northwest stands a large solitary tree. On your way to it, you may encounter a wyvern, an orc squad, and bears. Upon reaching it, you will find two druids, Hostera and Jamven, entangled in magical roots. In dialogue, they will ask for help. You can free them using spells that release from restraints (including dispel magic or Ottilus’s elastic sphere), or by striking them with a sword, but carefully, so as not to kill the hostages. Once freed, the druids will tell you how they fell into the trap. Until recently, they were part of a circle of druids led by an elder named Ferrusk. But now he has gone mad and is experimenting with mutations and performing dark rituals that endanger nature. They will then ask for help to stop him. If you agree, they will tell you their plan. The enemy is hiding in the caves near the roots of this sacred tree. Using the tree, the dark druid spreads his corruption. The druids will give you an enchanted acorn and ask you to plant it at the roots. It will cleanse the tree of evil, and nature will gradually return to normal. Additionally, the druids promise to help you break through the guard at the entrance to the underground river.
3. Ruined Tower. To the east of your arrival point, you will stumble upon the ruins of a tower, overgrown with mushrooms and shrouded in strange mist. Inside the ruins, you will meet a dying myconid. He will try to speak to the hero, but the hero won't understand his speech, after which the myconid will die. If M'Khiin is in the group, she will hear the voices of the dead myconids telling her that there is a corpse in the tower to the north. A little further from the myconid, you will find him and 14 coins.

Myconid Graveyard
After looting the body, the elder will appear, accompanied by three red myconids. They will be angry with the hero; if Jaheira is in the group, you will find out that myconids use the tower ruins as their graveyard and the heroes have invaded and desecrated it. Regardless of how you respond, the myconids will attack. You will earn 6,000 XP for the quest, and upon vanquishing the "fungi," you will receive 1,910 XP and find a trophy, a myconid cocoon, on the body of the elder.
Note: there is a "bug" whereby after the myconid dies, the quest does not get added to the log, and the body with coins does not appear; in this case, neither the elder nor the trophy will be available. I don’t know what causes this and how to fix it.
4. Ogre Camp. North of the ruined tower lies an ogre camp. Approaching this camp, you will hear its inhabitants arguing over who should be the chief. The main candidates are Arbing and Cheski. The wife of the previous chief, Murs, is trying to reconcile these two while keeping power for herself, but for ogres, her word means nothing anymore. In dialogue, when addressing Murs, you will find out that their tribe lived in the caves, but with the advent of crusaders, the ogres were forced to leave. In addition, their chief — Slag — was captured. After listening to the story, you can fight for the title of chief for yourself or on behalf of Murs. The two other candidates will not be pleased with this, and they will start a fight. You must fight the rivals for the title alone and without magical tricks; that’s the law of ogres. Therefore, lead your companions away from the camp or disable the AI (the button at the bottom right corner of the screen looks like a lamp). Once you win, talk to Murs. She will recognize you as the chief (if you fought for the title for yourself) or thank you for helping (if you acted as her champion) and ask you to find her husband Slag. Moreover, as the new chief, or in thanks for your assistance, you may demand the ogres’ support in the ongoing fight against the crusade. Murs will agree.
Tip: since in the battle for the chief's title, you must fight alone and cannot use attacking magic, characters who are not warriors may face difficulties. In this case, you can employ trickery and direct only one of your companions into the camp; for example, Minsk, Dorn, or Khalid. He will speak as the main hero but will fight himself. For full confidence, you can preliminarily load your champion with potions and protective spells (it seems that the law of ogres does not prohibit them).
5. Monster Lair. North of the camp, you will find the remains of people. Here, an ankheg will attack you, or hidden ones if you arrive at night. After defeating the monsters on the remains, you will find potions and that very medallion belonging to Mizhen, which she had mentioned significantly earlier, back on the Boareskyr Bridge (see walkthrough, part 3, p. 1.1). Returning the amulet to the priestess, you’ll receive 1,000 XP and 500 coins. Additionally, you will hear her story about how, in childhood, parents thought she was a boy (What?), later, she realized that, in fact, she (what a twist!) is a girl and changed her name. In memory of this, she engraved the initials of both names on opposite sides of the medallion.
If previously you learned from the head of the guild where their hideout is (see walkthrough, part 5 - LK, p. 15), you will notice it, hidden, in the rock. Be cautious, as it is protected by a trap. Inside, you will find gems and the crossbow "Harold" +2 (on hit, 15% chance to inflict the "Doom" spell).
6. Crusader Camp. After scouting the vicinity and securing the locals' support, you can attempt to infiltrate the caves.

Gate to the Camp
In the center of the area, there is a sort of checkpoint for the crusaders. The gates are guarded by five guards and a cyclops. You can penetrate in two ways:
show the previously acquired seal of Kelyar (see above, retrospect), or steal a similar one from the cyclops itself. But keep in mind that this time you will only have one attempt. In case of failure, a fight will ensue;
storm the camp. You will have to fight all the camp inhabitants. In this case, the creatures summoned by the druids (see above, p. 2) will assist you. After killing the cyclops, don’t forget to pick up Kelyar's seal.
Note: if you received Kelyar's seal just now, from the cyclops, you can return and explore the courtyard of Dragonspear Castle. I recommend doing this before proceeding to this area; otherwise, there may not be a chance.
7. Unusual Travelers. Inside the camp, you will discover a duo resembling Minsk and Dinahair (see walkthrough, part 2 - PDTUB, p. 11). Righ and Julann, travelers from far-off Rashemen. Even if you broke into camp fighting, they will not attack but will show suspicion. You can only engage in conversation with them if your previously mentioned companions are present in your group. Julann will mention that during their travels, they met a highly engaging priest, Hefernaana (see walkthrough, part 5 - LK, p. 7). In exchange for their extremely valuable magical knowledge, the priest persuaded them to collaborate with the crusade. The crusade, in their opinion, pursues noble goals. You will not be able to convince them otherwise, so your options are as follows:
kill both of them. In that case, your reputation will decrease by one point, and you will earn 6,000 XP for their death. On their bodies, you will find various items, including a dragon's sword +3;
leave them be; perhaps another opportunity will arise to prove your point later.
Before leaving, you can speak separately with Righ. As it turns out, this pair contrasts with Minsk and Dinahair; Righ is the most level-headed while Julann has quite a "peculiar mindset." In conversation, Righ will ask Minsk for advice on how he manages to stay calm so long with his protégé. You, in turn, can encourage him, saying: "You are an excellent bodyguard, and Julann won’t survive without you." Or sow disappointment, answering: "Unlike Minsk, you weren't lucky with your ward — in her journey, Julann has long strayed off the path. Therefore, you will never see your home while she is alive."
After finishing your business, you can descend into the depths of the caves.

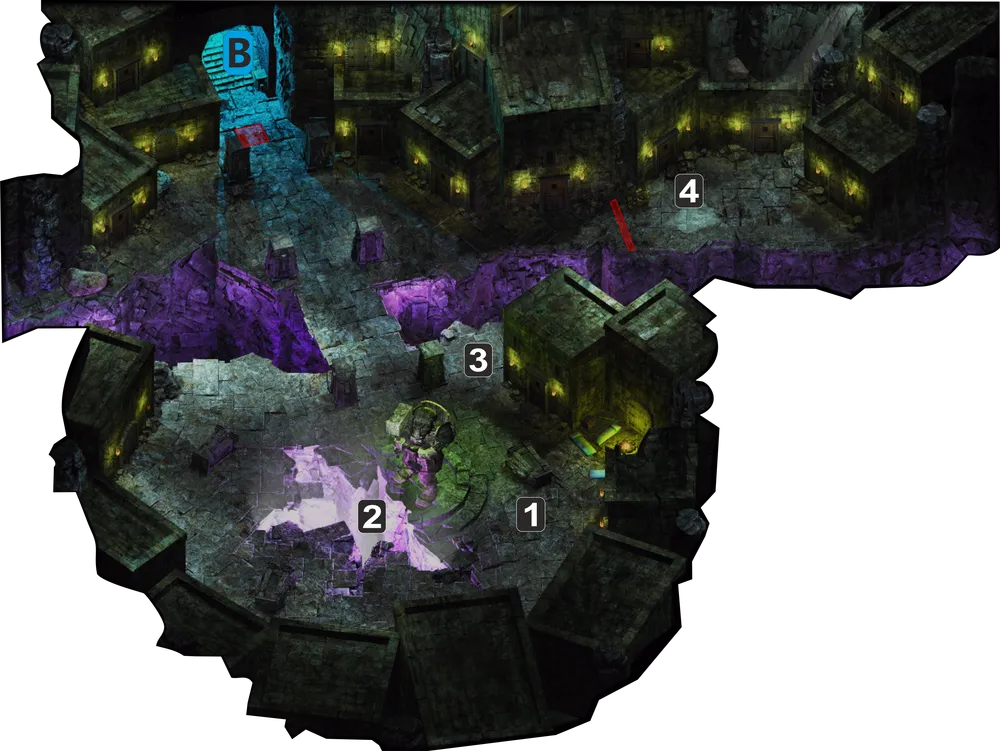
Underground River
8 - crusaders’ storage; 9 - druid Ferrusk; 10 - sick crusaders; 11 - young drow; 12 - hooded man; 13 - gates to Kanaglim; 14 - sahuagin; 15 - alchemist; 16 - ghosts; 17 - wirmlings; 18 - squad of drow; 19 - arcanist mage; 20 - ettin ghost; 21 - guard;
red dots - traps; blue dots - places of interest;
A - exit to the surface; B - entrance to the abandoned city; C - entrance to the ghost cave; D - entrance to the wirmlings’ den; E - passage to the elevator.
8. Crusaders’ Storage. Descending into the caves, the first room you find is set up as a storage. The manager there is Ladl. If you ask him for work, he will ask you to move 20 bags of grain from a crate next to it to the empty crate "by the river." The crate "by the river" is located in the western part of the storage, easily recognizable as it is the only container without a lid. When you place all the grain in the right box and return to the manager, he will ask you to move everything back as it was. When you do this, Ladl will explain the reason for his request: too many fidgety recruits have appeared, eager to show themselves. His work requires such youngsters to be kept out of the way, and to prevent them from getting in the way, Ladl employs this kind of task to humble them. For the responsible execution of his orders, he will gift you a consciousness concentration potion and a potion of clarity. You will earn 12,000 XP for the quest.
Storage
The red circles indicate the boxes for the task from Ladl.
A - exit to the surface;
9. Ferrusk. To the west of the storage, on the southern bank of the Underground River, stretches a kind of "mushroom forest." In the eastern part of this forest, there is a room with a stone circle and roots from the previously encountered sacred tree (see above, p. 2). Near the doors, the dark druid Ferrusk will greet the heroes and warn them that it is dangerous in this area since his "creations" dwell everywhere. He will refuse to help avoid conflicts with them. The druid has an agreement with the priest of Kelyar named Hefernaan. The dark druid helps the crusaders to safely enter the caves. In return, the priest has provided him with a service. What that service is, the druid will not disclose. No matter what you say, you will not be able to convince Ferrusk to provide protection from his monsters or deceive him by lying that you are serving the crusade.
After the dialogue, the druid will enter the chamber, and if you talk to him again, you can question him further about what he is doing in the caves. Regarding his motives, he will not reveal anything, but if the hero's charisma is 16 and above, you can convince the druid of the crusaders’ criminal plans to open a portal to the Nine Hells and flood the world with demons. Although the druid has stepped onto the dark path, he will not be pleased with this fact and will promise to sever ties with the crusaders. As proof of his loyalty, he will gift you an Ankeg amulet, capable of summoning these monsters five times.
Additionally, you can interrogate the druid about his colleagues on the surface whom you freed earlier (see above, p. 2). He will tell you how, with the help of the priest Hefernaan and his followers, he expelled the others from the circle, who did not recognize his authority. After that, he will ask you to deal with them completely.
The subsequent events may develop as follows:
Agree to fulfill his request. Killing the druids, you will find the Root of Problems club +1, 40 shocking darts, 40 ice +1 projectiles, spear +1. In addition to trophies, you will need to take the heads of his former colleagues for the dark druid. The acorn you received earlier from the druids will become cursed and can no longer be planted at the roots. Returning to Ferrusk will earn you potions of freedom and healing;
Promise nothing to the dark druid but approach the roots of the sacred tree and plant the enchanted acorn you were given earlier. This will displease Ferrusk, who will summon ankegs for assistance and attack. After defeating him, you will receive a club +1, bone armor (-1 to charisma but immunity to backstab damage). You will also find a healing potion against “mold” disease. In gratitude, the druids at the sacred tree will gift you the Root of Problems club +1. Your reputation will increase by one point.
Regardless of the outcome, you will earn 12,000 XP for the quest.
10. Sick Crusaders. South of the entrance to the dark druid's lair, you will encounter a group of crusaders who have contracted a strange infection. In dialogue, they will tell you that during a patrol they got stuck in some mold. Their skin has become soft and covered with blisters, after which their bodies went numb, and they can no longer get up. Two of them have already died, and their bodies have completely dissolved. They will further ask you to find a druid living nearby (see above, p. 9).
If Ferrusk is still alive, when addressed to him, he will require a myconid cocoon in exchange for his help. You should already have one (see above, p. 3). After yielding it to the dark druid, you will receive a potion. By the way, in dialogue, you can offer money for the potion; he will set the price at 2,000 coins. However, instead of a potion, he will then require that same cocoon.
If you previously killed Ferrusk, the potion is already in your possession.
Hand the potion to the crusaders, and they will heal (except for one), and, in gratitude, will give you Kelyar's seal (potentially, you will already have three). Additionally, the manager of the storage, Ladl (see above, p. 8) will give you a couple of potions in reward for helping his people, earning you 6,000 XP.
Note: if you stumbled upon the bug in the ruined tower, unfortunately; you can only obtain the potion by killing the dark druid Ferrusk. Also, here's another interesting point: as with the traitor (see above, retrospective), you can use Safana to steal Kelyar's seal from them (you should steal from the one leading the dialogue). There is no limit to the number of attempts. You can also just kill them to take the seal. However, in this case, the quest will remain uncompleted.
11. Kael and Umar. West of the ailing crusaders, you will encounter two strange young drow, who are attacked by an ankheg (in actuality, the monster will ignore the drow and attack only the heroes). Once the monster falls at your hands, they will thank you for the rescue and go their way.
Note: a peculiarity may occur during this encounter; both the drow and the ankheg will be hostile to the hero and to each other. The pair will likely die quickly in battle. You can pick up the drow emblems from their bodies. Whether it is a game bug or a planned rare probability is unclear. In this case, if you are not satisfied with the result of fortune and want to replay the encounter, load a save from before you entered the caves of the Underground River. As practice has shown, it is at the entrance to this area that the fate of the young drow will be decided.
Tip: it may be better to ignore this point now and return later for the quest.
12. The Hooded Man. Proceeding north to the bank of the Underground River, you will encounter a squad of red myconids. Defeating them and heading to the edge of the river bank, you will notice that familiar “capuchin” you previously met in the duke's palace (see walkthrough, part 2 - on the campaign) and at the Boareskyr Bridge (see walkthrough, part 4 - BM, p. 6). In dialogue, he will express disappointment in the hero. While the Shining Lady is already preparing for her triumph, Bhaal’s child flutters underground like a worm. No matter how you respond to him, he will continue speaking in riddles, only hinting that he himself seeks more power and does not know whom to choose: the child of light or the child of death. He will also mention that indeed many more forces are involved in this confrontation than it appears on the surface. He claims that Kelyar has welcomed a snake into her fold, which weaves its plans behind her back. Finally, the mysterious “capuchin” will advise the hero to be careful in their reconnaissance of the castle.
13. Kanaglim. Nearby the meeting place with the hooded man, you will stumble upon large gates in the rock. Upon attempting to approach them, a [dragon spirit](/games?search=dragon spirit) named Halataflower will appear. In dialogue, the dragon will warn you that it is the guardian of the entrance to Kanaglim. Whoever dares to enter — dies. At any of your questions, Halataflower will respond not directly, but rather in what seems to be an allegory, only hinting that someone controls her.
After the dialogue, you may risk and walk past the ghost to the gates. The dragon will speak again. Halataflower will be pleased that the hero has shown courage and decided to pass through. When asked why she let the hero through without a fight, she will say that her spirit is controlled by some "master." He ordered the dragon not to let outsiders into Kanaglim, but did not instruct her to kill. Halataflower does not particularly care for her master and tries to sabotage his orders by looking for loopholes in their interpretation. Finally, you may promise to free her.
Kanaglim
1 - dark mages; 2 - fountain of Nephenfa; 3 - imprisoned lich; 4 - goblin treasure;
B - exit from Kanaglim.
13.1. Dark Mages. Upon entering Kanaglim and crossing the stone bridge, you will arrive in the southern area of the lost city. Here, you will notice a strange crack emitting eerie light. At the edge of the chasm, a poor soul will be standing, backed by dark mages conducting a dark ritual. At this moment, you can either stop them or watch what happens next. If you stand aside, you will notice how the necromancers, through their ritual, send the soul of a victim into the crack, and the empty body turns into a zombie. Afterward, another captive will come in place of the victim. Moving further, in the southeast corner, you will encounter the leader of the dark mages, the necromancer Kerriun. Approaching at a sufficient distance, you can overhear her conversation with a nameless colleague. From it, you will infer that Kerriun intends to turn the warriors besieging the castle into an army of undead using her ritual after the crusaders face defeat. Meanwhile, her opponent is against this plan, fearing their patron Hefernaan will be furious. But Kerriun is unperturbed by this and, threatening to feed the disobedient mage to a ghost dragon, will force him to follow her orders.
After the dialogue, the necromancers will finally notice outsiders and will attack. Kerriun, being the master of the dragon Halataflower, will call it to her side. This can become a significant problem, so I recommend focusing efforts on the head of the necromancers. By inflicting enough damage on her, she will lose control over Halataflower, and it will switch sides, making it much easier to defeat the enemies. For her death, you will earn 5000 XP, for quest completion in destroying the dark mages 12,000 XP, and for freeing the dragon's soul 32,000 XP. As for loot, you will find a protection amulet +1, a mantle of the evil archmage, three fire resistance robes, two cold resistance robes, a mantle of an adventurer, a magic ring, a staff of fire, two staffs of frost, a staff of fear, two staffs of paralysis, a mace-staff +2, scrolls of spell (greater pestilence, chaos, raise undead), healing potions, and other minor items.
Before getting your peace, the spirit of the dragon will reveal that the mages served a dark being named Hefernaan; in her opinion, he is not human at all. Regarding Kelyar, the mages mentioned her only once, in a disdainful tone. They said she was a puppet in the hands of their master. The dragon will not know any more useful information. Before finding peace, Halataflower will ask you to convey a message to her old friend Daeros that she has not abandoned him and is waiting for him at the plane of Fugu for as long as she can.
In the chest by the fire, near where you met Kerriun, you will find the ritual notes of Hefernaan. You can give them to Julann (see above, p. 7), as proof of their foul intentions regarding their friend the priest. She will show skepticism towards the authenticity of the manuscript. The events may unfold in different ways:
If previously you spoke with Righ and planted doubt in his mind regarding his charge, at this point you can incite him against Julann. She will perish, and Righ, devastated by his actions, will head back to Rashemen to recount what has transpired and await judgment. Finally, he will hand over his dragon's sword +3.
If in the conversation with Righ you encouraged him, he will persuade his charge to believe the hero's words.
If Dinahair and Minsk are in the group, they will convince Julann of the hero's arguments themselves.
If the main hero is a mage, he may theoretically prove the effectiveness of the ritual described in the manuscript. After this, Julann will believe the hero.
If the hero's intelligence is 18 or higher, you may persuade her by saying: "Try to think logically. I have seen this ritual! Why would I lie?" Why intelligence and not charisma? A mystery.
If you succeed in persuading her, they will cease collaborating with the crusade and return home. As a token of gratitude, they will gift you a dragon's sword +3. The hero's reputation will rise by one point. However, in the case that none of the listed methods are available, this pair will join the crusade. You will earn 6,000 XP for the quest.
13.2. Fountain of Nephenfa. If Nira is in the group, upon approaching this area, she will have an epiphany. As it turns out, last time Nira misunderstood Adoy's words (see walkthrough, part 5 - CR, p. 1); Nephenfa is not a mountain but a fountain, and it is right before you, glowing from this chasm.
As you approach the edge of the chasm, the ghost of Adoy will appear. At this moment, Nira finally realizes that her friend has truly died. However, he has enough magical powers to bind his spirit to her mind to warn her. After the unruly mages were hunted down by the red wizards, who call themselves the order of the eight staves, they captured him and brutally killed him, exposing him to vivisection. In the end, he will ask Nira to find the few remaining unruly mages and help them to hide. After his return to the land of the dead, Nira will be overtaken by fear. No matter what you say to her, she will decide to postpone this problem and remain in the hero's party to assist with the crusade.
Note: If you arrive at this location for the first time alongside Nira, the events of sections 13.1 and 13.2 will occur simultaneously, interrupting each other. This can be slightly confusing.
13.3. Imprisoned Lich. If you have "observational points" remaining (see walkthrough part 2 - TEP, p. 6), you will notice a sphere to the right of the bridge, inside of which a shadow is imprisoned. By using a charge, you will call forth a lich named Jhadrot. The lich will be overjoyed to be unexpectedly freed from the "far world" and will announce his plans for revenge against his offenders. You may let him go, and as a reward, he will gift you a ring of regeneration, or attack and kill him. The fight will be extremely challenging. However, since Jhadrot is a lich, the "secret revealing stone" (see walkthrough, part 3, p. 12.7), if you have it, can help you during the fight. Upon defeating the lich, you will be able to collect the ring of regeneration and cloak of sorcery mastery. You will receive 22,000 XP for his death.
In the case that you have spent your last charge on freeing the lich, at this moment the quest "Vision of Zaviak" will end, and the points will be lost.
Later, near the exit from Kanaglim, the spirit of the "Endless Watcher" will approach you. The ghost will not be pleased with your freeing the lich. He has guarded this prison for centuries, and the hero intervened, freeing "true evil." After that, he will attack the hero. Defeating the watcher is tough, but eventually, Jhadrot will come to help you and, in one swing, eliminate the ghost. The watcher will leave behind an Astral crossbow +2. You will earn 5,500 XP for the quest; if you manage to kill the ghost yourself, you will earn 9,000 XP.
If the lich is dead, in conversation you can inform the watcher of this news. With charisma equal to 15 and above, the spirit will be pleased and gift you his Astral crossbow +2; otherwise, he will not believe you and attack. Naturally, in this case, the lich will not come to your aid.
13.4. Goblin Treasure. In the eastern part of the abandoned city, you will encounter a horde of undead, including the extremely dangerous skeleton warrior and shadow spirit. Eliminating enemies, in one hideout you will find rare scrolls of spells: minor spell reversal and summon minor air elemental.
You will only find the second hideout if M’Khiin is with you. Inside it, you will discover various gear for goblins: a staff, mantle, armor, and axe. When trying to take them, the spirit of Kruntur, lord of the klandak'Dekanter, will speak to you. He will threaten retribution if you try to rob his treasure. But M’Khiin will not be frightened, she will state that the spirit is merely a whispering ghost and is no threat. However, the armor cannot be worn by the shaman unless she gives up her gift. Therefore, you can persuade her to accept the armor or refuse it. You may also leave the decision to M’Khiin; in this case, she will decline to take the armor.
Remaining a shaman, M’Khiin will be able to use the mantle and the staff. If she becomes a warrior of goblins, she will take the axe and armor.
Note: in reality, when receiving the armor, M’Khiin will not change her class, the "shaman's dance" ability will not disappear, but while wearing Kruntur's armor, she will not have access to it. However, it will be impossible to wear the mantle.
The southern shore of the Underground River has been explored; you can now move on to scout the northern part.
14. Passage to the Southern Part of the Caves. Head north from the crusaders’ storage, across the bridge. You will enter a room connecting the storage and the southern part of the caves.
Note: Once you cross the bridge to the northern bank of the Underground River, Nira, if she is in the group, will address the hero and ask for help. She is increasingly tormented by Adoy, and she is on the verge of a nervous breakdown, thus she asks to distract her with conversation. You can ignore her request and leave her to face him alone, or try to divert her with various topics. This will not help her much, and Nira will resort to a radical method - kissing the main hero. At that moment, you will have the choice to brush her off or not resist. As it turns out, this did not work either, only entertaining Adoy and making him even more active. In the end, Nira will ask you to find a way to rid her of her pesky friend as she wants to talk to the hero about much, but is too hesitant due to the outsider in her head. Strangely enough, this dialogue will occur even if you have already visited Kanaglim (see above, p. 13.2) and Nira’s problem is resolved. Additionally, if Vikoniya is in the group, she will request to not linger here. After which she will tell a bit about her story. Once she had to constantly survive; the cult she served demanded too much of her. One day, she could no longer endure it. Vikoniya left her homeland and renounced the faith of Lolth, the queen of spiders, in favor of Shar, the mistress of the night. But the cult won’t simply leave her alone; therefore, there is a risk of running into hunters in the underground depths. Finally, if Safana is in the group and you previously promised her a poem (see walkthrough, part 5 - LK, p. 1), she will address the hero asking if she is ready. Responding affirmatively, you can read her the poem you were given by the bard Voghiln. Or you can improvise your own. In any case, Safana will say she likes it; however, the kiss will be given later. If you use Voghiln’s poem and confess to this, she will become interested in the bard’s “talent.”
14.1. Sahuagins. Ascending the stairs and entering a room, you will be stopped by two sahuagins, Floss and Gurgle. They do not allow anyone to pass, as in their view, this place now belongs to them. You can provoke a fight and kill both. Or, play on their curiosity, saying you are running away from something terrible; they will become interested and head towards the crusaders’ storage, where they will fall at their hands. On their bodies you will find a gem, valuable ring, two simple spears, two heavy crossbows, and bolts for them. You’ll earn 4,000 XP for killing the sahuagins.
However, you can also attempt to resolve the matter peacefully. In this case, in exchange for passage, they will ask you to tell an interesting story. You may choose to tell them about the hero's struggle with Sarevok or the current conflict with Kelyar. The story of Sarevok will please them, allowing the hero to pass and gifting you a wand of water elemental summoning. They will receive the story of Kelyar with indifference. They will allow you to pass, but won’t gift you anything. You will receive 1,000 XP for the story about Kelyar.
14.2. A Mysterious Shadow. If you have remaining “observation points” (see walkthrough part 2 - TEP, p. 6), you may spot yet another unusual shadow in this room. Applying a charge to it, you will summon a rakshasa (a cat-like humanoid race) named Vidyadhar.
Vidyadhar
He will not be pleased to be summoned against his will but will inquire how the hero managed it and generally why he acted so. No matter which answer you choose, the hero will relay the story about the points received from Zaviak. The rakshasa will find the tale amusing and give the hero a chance to escape if he solves a riddle: "Soldiers sleep in the winter but awaken in the spring; they carry their spears backward, yet effectively cause pain. In formation after formation, they conquer fields; their uniforms gleam in yellow all around, yet they are always ready to return home and protect their queen. What army is this?" The correct answer is "bees." In gratitude for the entertainment, Vidyadhar will gift the hero a Heart of Modron amulet (+2 defense and damage against chaotic), advising him to be careful with summoning in the future. If you answer incorrectly or refuse to humor Vidyadhar at all, he will attack.
Killing the kitty is practically impossible, as rakshasas have immunity to both ordinary and weak magical weapons, so you can only wound them with +3 weapons. Yet with Vidyadhar, even that will not be enough. He will be using spells like mirror image, red fire shield, shadow door, and protection from magical weapons. All of this makes him invulnerable to any spell and damage, including weapons +3. Therefore, to defeat Vidyadhar, you must have the scroll of