Siege of Dragonspear - walkthrough, part 3

Captain Shael Corwin and her right hand, Corporal Bens Duncan, are maintaining order in the expedition that has emerged from the Gates of Baldur. The recruits of the Burning Fist, unaccustomed to discipline, learn hard lessons in the first days of the march to the north.
The victims of the crusade slow the journey. Many desperate men and women have filled the Coastway. They all tell tales of fields betrayed to fire, granaries looted, and family members called to serve in the crusade. Nevertheless, many believe that these hardships are a necessary sacrifice for the greater good. Strange is it that even those harmed by the actions of Keylar Argent speak of her with admiration. Some claim that the Shining Lady is a holy messiah, serving not one but all religions, all gods.
Is it possible that Keylar Argent's intentions are righteous? Or perhaps she misleads people for her own goals, as Sarevok did?
**[Siege of Dragonspear - walkthrough, part 1](http://www.gamer.ru/baldur-s-gate/siege-of-dragonspear-prohozhdenie-chast-1)**
**
Siege of Dragonspear - walkthrough, part 2
**
RETROSPECTIVE
I didn't want this section to appear systematically. But a new fact, suddenly discovered, couldn't be ignored.
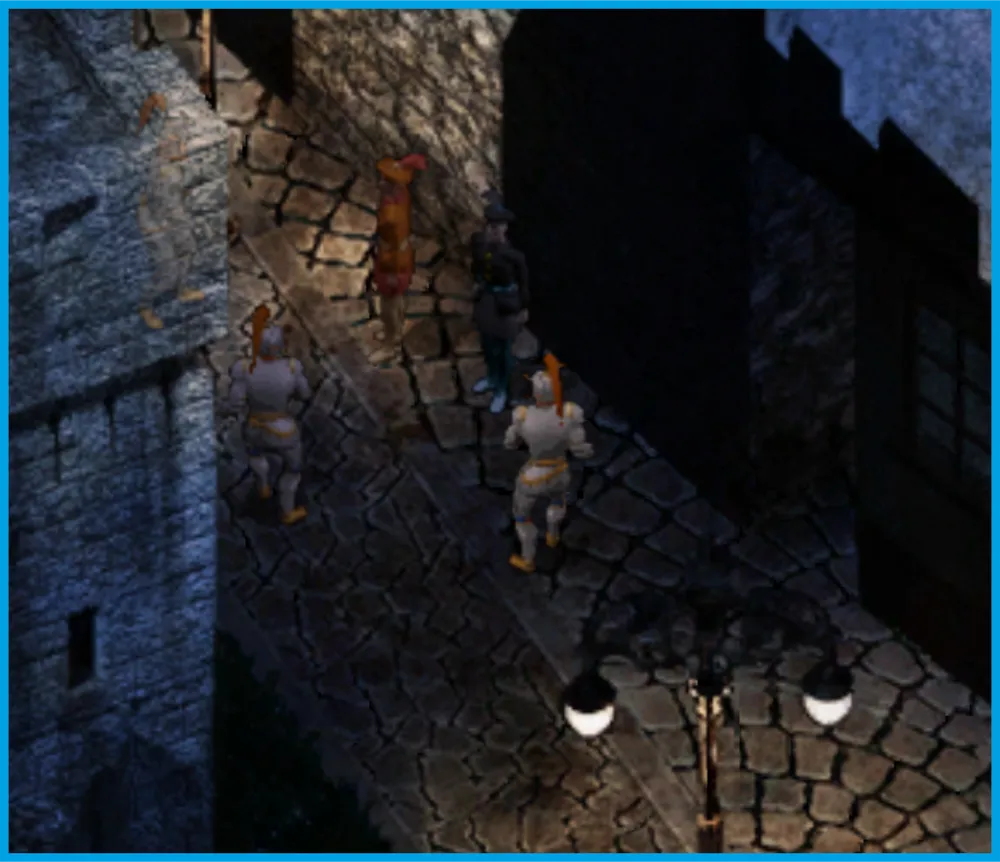
It turns out that if you come to the area of the Flaming Fist castle at dark, (see walkthrough part 2 - ZPC). Go up the street on the right from the entrance to the castle, you will reach a dead end where three guards threaten two young men, Rolf and Kiran, who claim to be the sons of influential noblemen. In dialogue, the young men will ask you for help and offer a 'whole purse of coins.' In this situation, you can:
- Leave everything as is. In this case, the guards will beat the noble offspring and disperse. There will be no reward;
- Agree to the offered purse of coins. In this case, there will be a fight with the guards. After the fight, you can pick up three sets of equipment (helmet, armor, shield, and sword) and 36 coins;
- Request two purses of coins. In this case, there will be no fight, oddly enough. The guards will decide to retreat and find an easier target;
- Not agree to the offer but ask about what is happening in more detail.
It turns out that these two have violated the curfew. However, the guards plan not to arrest them but to beat them and take their valuables. Meanwhile, Kiran behaves extremely provocatively and arrogantly, apparently believing that the guard won't dare to carry out their threats. Once you learn this information, you can either leave them to the guards or reproach them for their disrespect towards the Flaming Fist but not let them be harmed. The guards will retreat.
After resolving the situation, talk to the young men. In dialogue:
- If you agreed on the purse of coins, you will receive a random sum, approximately from 40 to 75 coins;
- If you agreed on two - from 80 to 150;
- You can demand nothing from them. Rolf will give you a random gemstone;
- Threaten them and demand all the money they have right now. You will receive 200 coins.
WORLD MAP
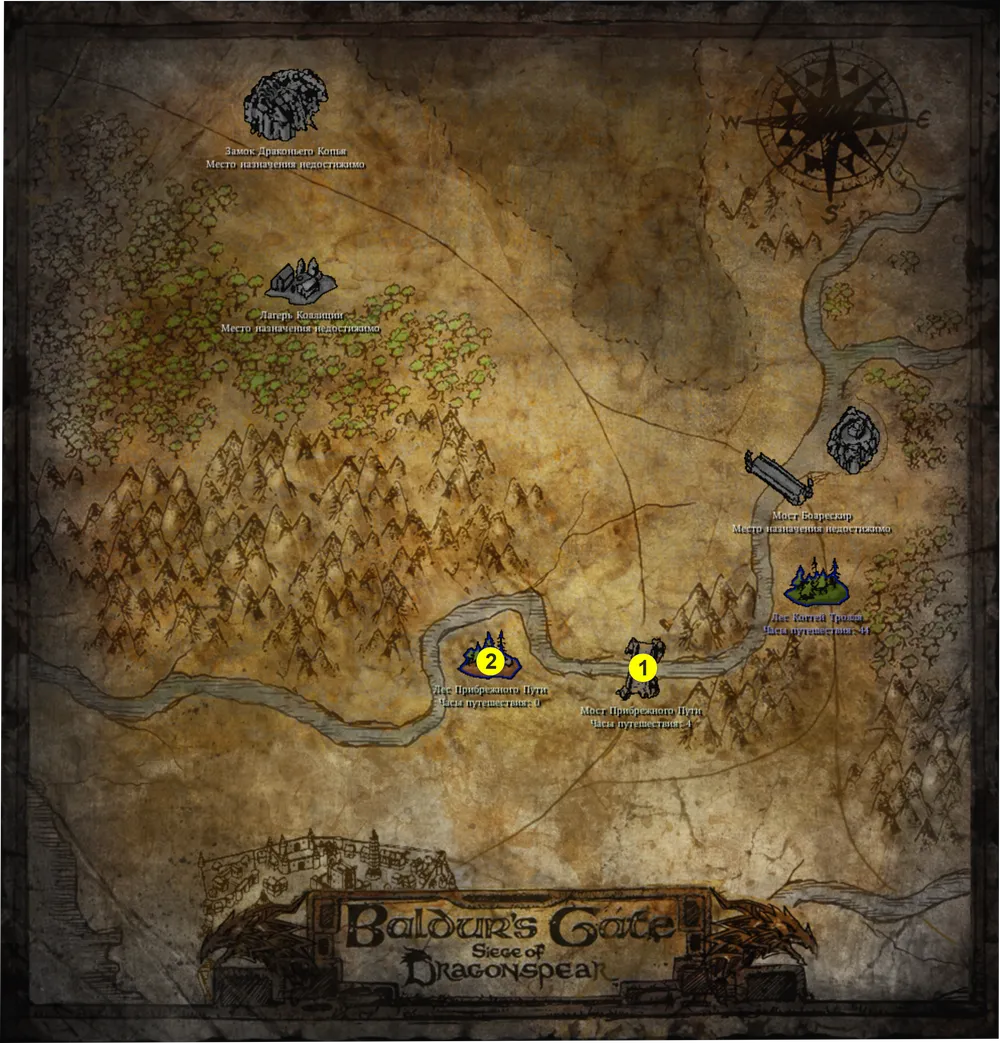
1 - Coastway bridge; 2 - Coastway forest
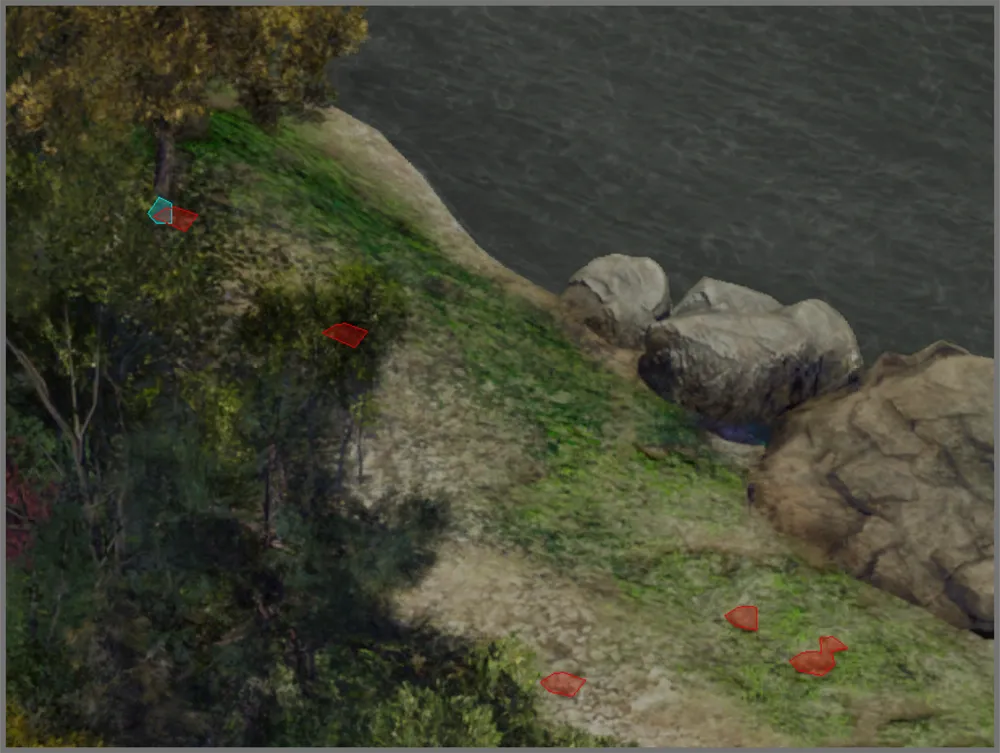
COASTWAY BRIDGE
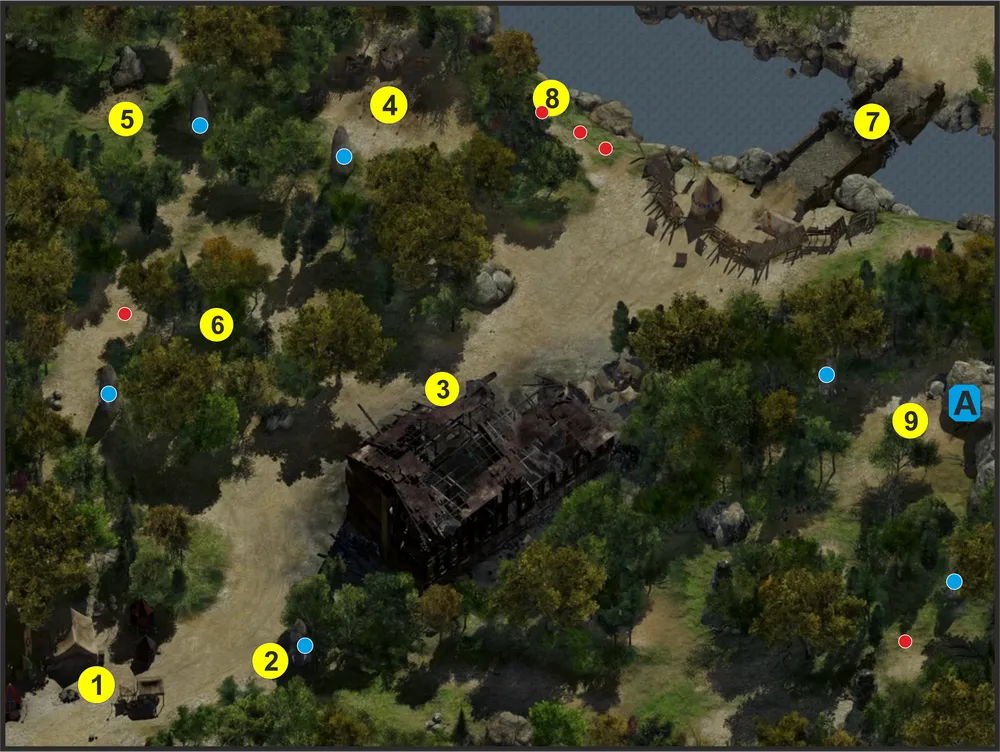
Red dots - traps; Blue dots - stones 'Singing Menhirs'; A - entrance to the excavations
1. Camp. The chapter begins in the camp of the Burning Fist, set up on the road not far from the Coastway bridge. The main character decides to go further for reconnaissance while the main army rests and prepares to cross the bridge.
In the camp itself, you can speak with several characters and additionally recruit companions.
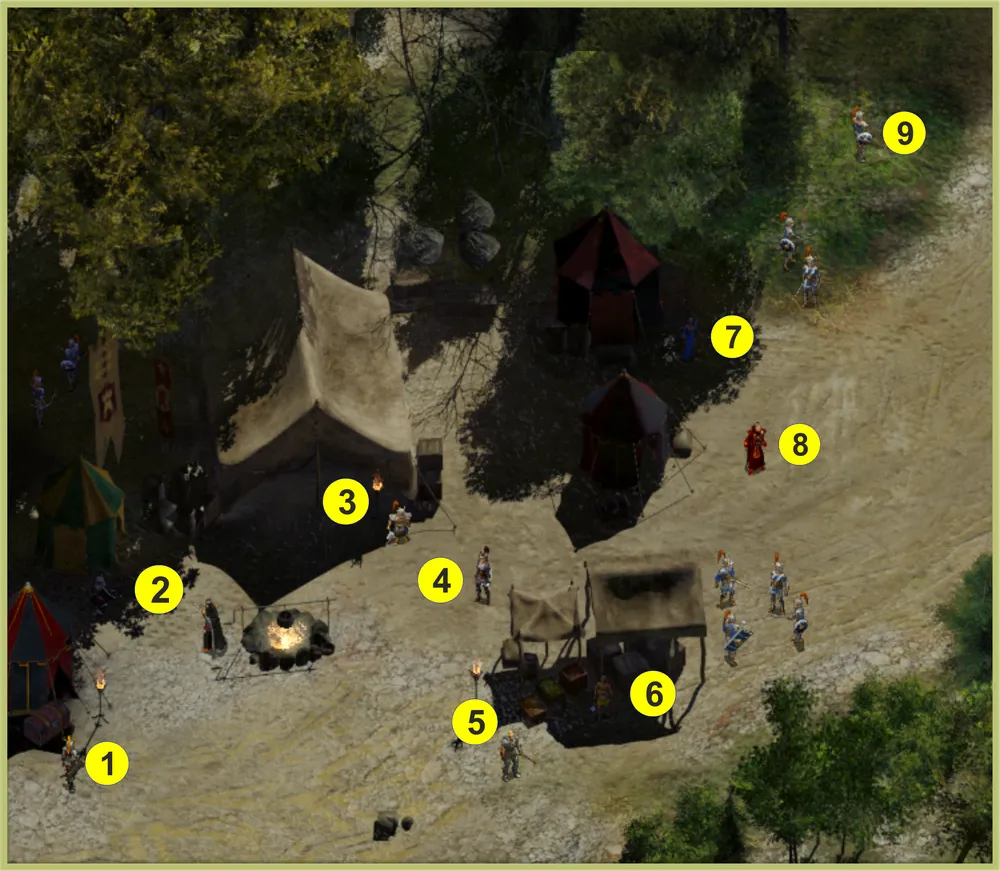
1 - Mizhena; 2 - Pfaug and Patrescus; 3 - Faird; 4 - Captain Corwin; 5 - Raifus and Glint; 6 - Belegarm; 7 - Soralis; 8 - Edwin; 9 - Brielle;
1.1. Mizhena. She provides temple services. In conversation, she might ask you to find her amulet, which she lost during a skirmish with crusaders on the way to this area. This occurred at the eastern outskirts of the forest. The chest next to her is the same as the one in the Dukes' palace (see walkthrough part 2 - DG p. 2). All your supplies will still be in it.
1.2. Pfaug and Patrescus. A group of adventurers who joined the campaign. They could previously be encountered at the end of the seventh chapter (see walkthrough, part 2 - in the campaign, p. 4). If they have not been re-recruited before, an old acquaintance Vikoniya Devira will be near them.
If Vikoniya is in your party, then in conversation, Pfaug will demand her back. However, she will be against it and will drive him away from the camp.
1.3. Faird. He is a peculiar 'camp innkeeper'. He sells drinks and rents out 'rooms' in a large tent set up nearby.
1.4. Captain Corwin. You already know her from the previous chapter (see walkthrough, part 2). In conversation with her, she will ask to join your party as a full companion.
1.5. Raifus and Glint. You may have met Raifus at the end of the seventh chapter (see walkthrough, part 2 - in the campaign, p. 1). He will be with companions who are currently not part of your party, besides the companions you created at the beginning of the game and detached from the party. Apparently, they have stayed in the city and will no longer appear in the game.
Glint is a gnome, a cleric-thief by class. He moves around the camp, occasionally stopping near Raifus. Officially, he has not joined the campaign but has tagged along at his mother's advice to safely reach Waterdeep and check on relatives. He will join you as a companion if you invite him.
1.6. Belegarm. A quartermaster of the Burning Fist. You can buy a lot from him, from weapons and armor to magical trinkets, potions, and so on. He was already encountered at the end of the seventh chapter (see walkthrough, part 2 - in the campaign, p. 2).
1.7. Soralis. A mage responsible for the mystical defense of the camp and consults commanders on magical matters. She will not trade anything or provide magical services to the hero.
1.8. Edwin. He will wander into the camp shortly after your arrival. He is a 'red mage of Thay'. Edwin is running from the crusade of Keylar. He will join you if you invite him. However, Edwin does not get along with Minsk and Dynaheir, so you cannot take him in your party if those two are in it.
1.9. Brielle. The camp sentry. After receiving orders to report on the situation, she will briefly describe the area ahead.
During the first rest in the camp, the hero will have a dream...
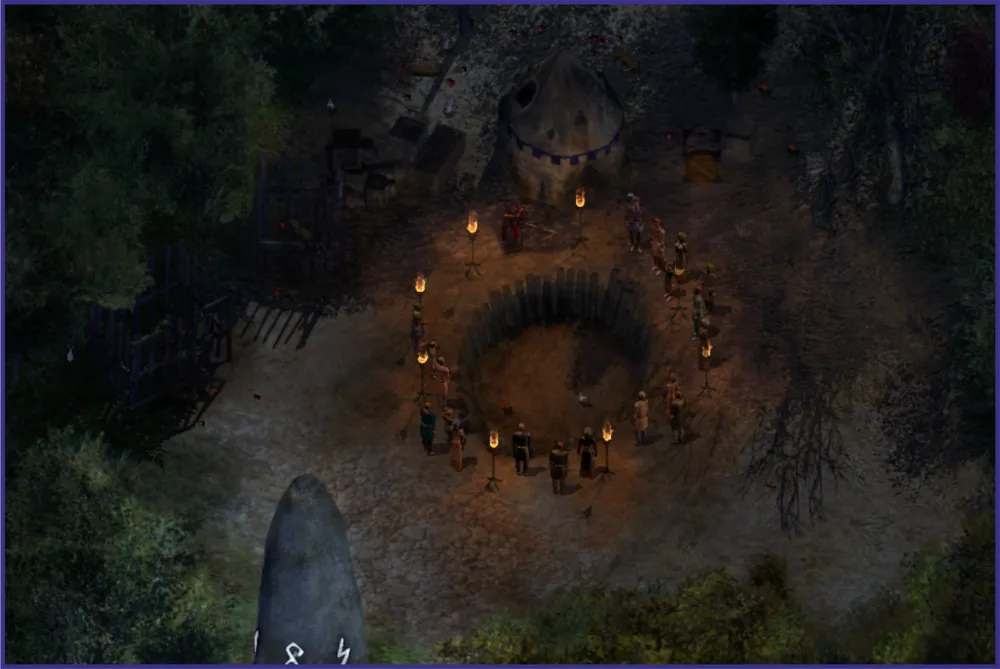
2. Bard Prin. Exiting the camp directly opposite it, you will meet a girl singing to a strange obelisk covered in runes. If you ask her what she is doing, you will learn that the stone responds with singing. She discovered this accidentally while wandering the area composing a new song. She will also tell you that there are several such obelisks in this area. However, she is afraid to go around them all due to dangers in the forest. If you agree to find them, the bard will ask you to report back on your findings.
After the conversation, activate the nearby 'menhir'. If you try to sing (or hum a tune), one of two things will happen: with charisma no lower than 16, you will activate the menhir; but if charisma is low, something bad will happen - for example, an enemy will appear, or the hero will take magical damage, or you’ll have to answer a riddle ('the wind blows ...').
In this area, there are five more menhirs (see map above).
Tip: rushing headlong after the other obelisks is not the best idea. Find them gradually as you explore the location, to have the opportunity to close the quest with the most positive outcome.
3. Burnt inn. Going up the road, you will stumble upon a burned building and meet several interesting people:
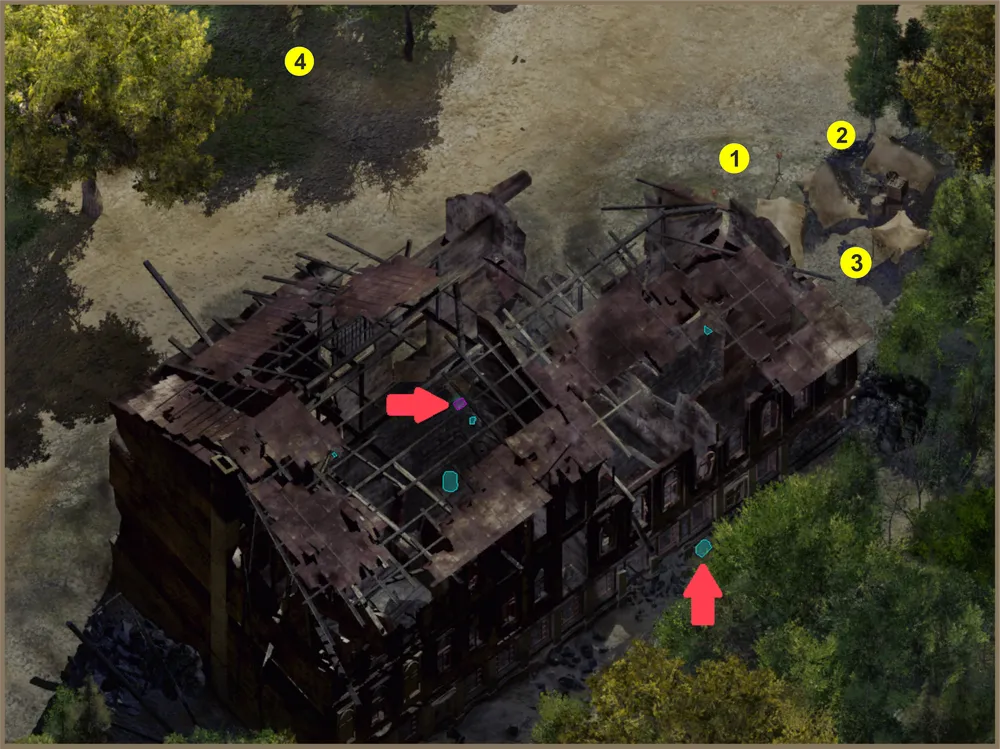
1 - Takos and Vessanal; 2 - Herod; 3 - Teleria; 4 - The caller;
Red arrows - family valuables.
3.1. Takos and Vessanal. Probable owners of the inn. Vessanal will be depressed and refuse your help. But Takos will tell you that the crusaders burned the inn, and three of his most precious family relics - a cloak, a mirror, and a shield - are missing. You can promise him that you will find them. After which, search the ashes. In it, you will find two of the three family relics. The Hand Mirror of Gentrus, hidden under an unsecured floorboard inside the tavern, and the Cloak of the Watch of Beluir inside a tattered chest next to the southern wall of the burned building (see map above). However, the shield really has vanished and cannot be found that easily. Therefore, we will return to this issue later.
3.2. Herod. He is a merchant running from the crusade. You can purchase two rare rings from him: night vision and lockpicking +25. Additionally, Herod will tell you that five refugees have gone missing from the camp, and that the mage Teleria appeared right before the disappearances began.
3.3. Teleria. Ask her about the disappearances, she will invite you to meet her in a glade to the northwest.
3.4. The caller. Opposite the burnt inn, you will meet a person calling out to spectators about incredible fights in the Dark Pits located to the north. This is right on the way to Teleria’s glade.
After finishing your business, we head along the path starting behind the caller to the north.
4. Dark Pits. Here you will meet the mage Baelot. He is trying to entertain the crowd of onlookers. However, his fearsome beasts are actually just chicks, rats, and squirrels. The crowd will not be charmed by this spectacle, so Baelot will try to liven up the situation by throwing a goblin named M'Khinn into the pit. M'Khinn will not take kindly to this and, using his special ability 'Summon Spectral Guardian', will compel the summoned guards to attack him. Eventually, the crowd will disperse, and you can invite Baelot and M'Khinn to your group. But lose -2 to reputation for each of them while they are in your squad with you. You will also earn 3000 XP for adding the goblin to your group.
Dark Pits
The goblin is a shaman, so he may come in handy shortly with the riddle of the singing menhirs. Speaking of them, there is another such obelisk next to the pits.
Also at the pits, you will see a wild dog in a cage. If you click on the cage to free the dog, it will lead you to the remains of a forgotten adventurer, where you will find gems and coins.
Finishing things up in the pits, let's continue along the path west to the glade where Teleria waits.
5. Glade of Stone Statues. Upon arriving there, you will discover that the missing refugees have been turned to stone, and Teleria is responsible for it. According to her, she is an 'exquisite sculptor', and these are her works of art.
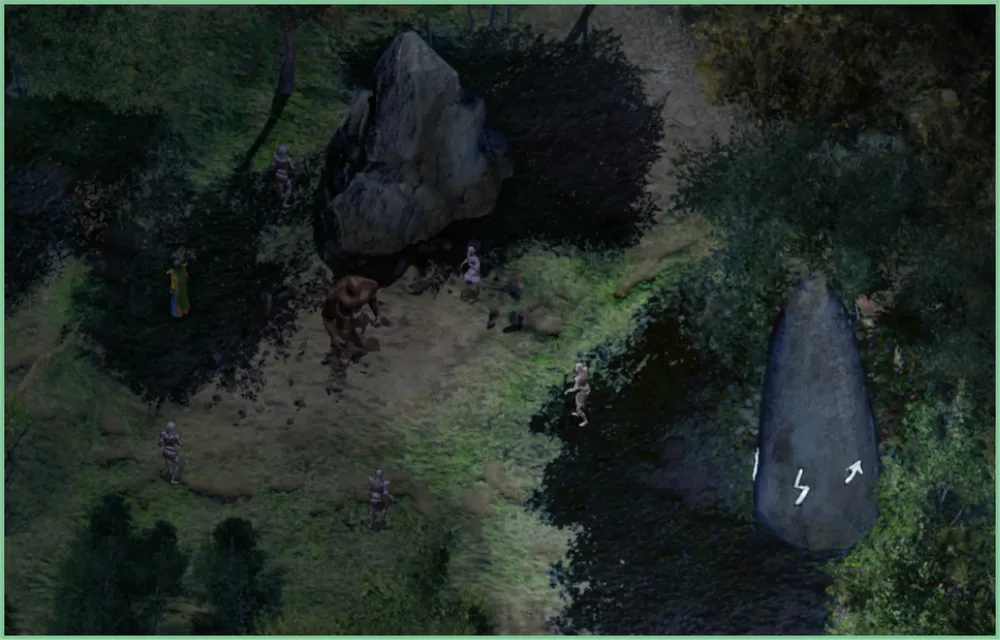
Glade of Stone Statues
You will have three ways to solve the matter:
- You can attack Teleria and her ally - a small stone golem. You will earn 2800 XP for defeating the pair and find a rogue's mantle, a scroll of protection from mundane projectiles, a statuette 'stone ally', and five scrolls 'from stone to flesh' on Teleria's body.
To heal the refugees, you simply need to use the obtained scrolls on them. They will provide you with some rewards, including a healing potion, an invisibility potion, a scroll of unlocking, and a Staff of Fire. Then, when you return to Herod, he will offer you 1000 coins as a reward. If you refuse, you will instead receive +1 to reputation.
- You can offer to help Teleria gather her collection (if you’ve already solved the puzzle of the obelisks, do not admit it to her, otherwise she will attack you). Teleria will tell you she needs a 'soldier in armor' and a 'handsome nobleman'.
You will find the suitable 'soldier in armor' in the camp of the Burning Fist (see above p. 1.9). Just send Brielle on a flower gathering mission at Teleria's glade, where Teleria awaits her. But be aware: if Corwin is in your group, she will not allow you to do this, so you will have to detach her from the party during this time.
The 'handsome nobleman' will be Vessanal in the refugee camp (see above, p. 3.1). Tell him that you found a chest with his family crest in Teleria's glade.
When you return to Teleria, she will be pleased with your work and reward you with the statuette 'Stone ally'. However, when you return to the refugee camp, Herod will no longer be there, so you will lose the merchant.
- You can buy the golem from her. For this, in dialogue, you must ask: 'What are these statues?'. Then show interest in her golem by saying: 'Did you create the golem too? It's magnificent!'. The next step is to inform her that you are ready to buy it. Teleria will set a price of 1000 coins, but with charisma of 14 and above, you can haggle down to 800 coins. Once you hand over the money, the golem will head to the camp of the Burning Fist (in reality, you will not meet it there), and Teleria will leave the area. In this case, you will not receive the statuette 'stone ally' and five scrolls 'from stone to flesh'. Therefore, to uncursed the refugees and close the quest, you will need to buy the necessary scrolls from Belegarm (see above, p. 1.6).
Note: if you raise Safana's theft skill to 70 points, you can steal from Teleria the scrolls and statuette before the dialogue at the glade.
Additionally, on the glade, there is another singing stone.
You can also see, using 'scrying points' (see walkthrough part 2 - TEP, p. 6) yet another shadow. Using the points, you can summon the material world 'watcher' named Gaut. However, only the main character mage can negotiate with him, or he will attack you. If you defeat him, you will earn 6000 XP. This creature loves magical artifacts. Being a mage, you can entice him to the Dragon's Reach castle, telling him that there are plenty of mages and magical items there. He will be tempted by this and set off on a journey.
6. Dead Goblins. South of the glade of stone statues lies a 'forest knoll' with the bodies of goblins. If you have taken M'Khinn into your party, the opportunity arises to summon their ghosts. The goblin ghosts will tell you that in a 'scrap for loot' they killed each other. After which, they will attack you. After you inflict enough damage, they will beg for mercy. You can banish them or pull information about their hidden 'loot' (in dialogue, let M'Khinn decide their fate).
Near this place, there is yet another 'singing menhir', guarded by spiders. Be cautious; the area is also littered with spider traps. Use a thief to navigate around them.
7. Bridge. Approaching the bridge, if Edwin is in your group (see above, p. 1.8), he will initiate dialogue about Keylar Argent, in which you can uncover the reasons for his fleeing from the crusade.
It turns out that he and three other 'red wizards of Thay' decided to join the crusade. They were not concerned about Keylar's intentions; however, it is rumored that she pays generously for magical talents. When faced with her directly, two of the mages immediately sided with her, but Edwin and his companion Rowena refused to bow down and submit. One of the crusade's lieutenants considered this an insult and killed Rowena on the spot. After that, Edwin vowed loyalty to the 'Shining Lady' but later fled at the first opportunity. Now he seeks vengeance for his companion.
When you approach the bridge, one of the crusaders defending it recognizes you and runs to report to the senior mage at the other end of the bridge, named Javis. He will panic and blow up the bridge. Subsequently, a fight will ensue between you and several crusaders who have not crossed to the other side: Barakh (berserker), Elwood Dausser (mage), Ivann (fighter), Kerra Tinbasher (fighter-priest), Semya (druid), and Twelve Fingers (ranger). Winning the battle is not necessary. About a minute later, Keylar Argent herself will appear and order her troops to cease fighting. Then she will express a desire to talk to you and tell her plan - she wants to free all people taken by demons and sent to the Nine Hells during the Dragon's Reach Wars. Regardless of how you conduct the dialogue, you will not come to an agreement.
After your conversation, all remaining living enemies will gather together and await arrest. If you wish, you can attack them at this moment, and all nearby soldiers of the Burning Fist, who arrived at the sound of the explosion, will assist you. Overall, you can earn over 8000 XP for the fight and find a bunch of equipment on the bodies: several fire arrows, several +1 ammo, a +1 composite longbow, a +1 dagger, several stunning darts, and much more.
8. Goblin Stash. Previously, you learned about the goblin stash to the northwest of the bridge (see above, p. 6). Upon arriving at this location, you will find it buried under a tree. Be cautious, traps are set around. In the stash, you will find, among other junk, a short bow 'Destroyer' +1.
The goblin stash is surrounded by traps
9. Dungeon. Returning to the camp, near Bard Prin, there is a path leading east into the thicket. Here you will encounter the entrance to a cave. At the entrance, you will see that dwarf Daran has been attacked by zombies. After you help him eliminate the threat, you will learn that Daran was hired by dwarf clergy to combat dangers in the excavations, but there were too many undead. He retreated, while his employers remained inside. The dwarf plans, after resting, to enter the cave again to help them. However, if you press him, he may mention that one of the clerics had a chest, and its contents might be far more interesting than the survivors.
By the way, the last two obelisks 'Singing menhirs' are located west and north of this entrance. The one north is also guarded by spiders. Now you know the location of all the stones.
10. Story of the Stones. Before engaging in battle in the dungeon, I advise you to resolve Bard Prin’s quest. Before activation, ensure that Baelot and M'Khinn are in your party (see above, p. 4). Baelot has a charisma of 16, which will allow you to activate the stones without consequences. The shaman will be useful after activation to achieve a happy ending to the quest.
Note: instead of Baelot, you can use Safana, as she is 'very charming, even for a stone'.
Activating the stones is not permanent, so you need to move around the entire area activating the menhirs at once. After their activation, a ghost of the bard named Krommus will appear and tell you how the mage Artifeon killed him and trapped his voice in the menhirs. But with his voice restored, Krommus will call forth the spirit of Carlin. If you have the shaman with you, she will recognize the bard's ghost as her beloved. As a token of gratitude, Krommus will allow you to search his grave, and you’ll earn 6000 XP.
Later, when you return to Prin and tell her the ending of the story, she will reward you with the Echo flute.
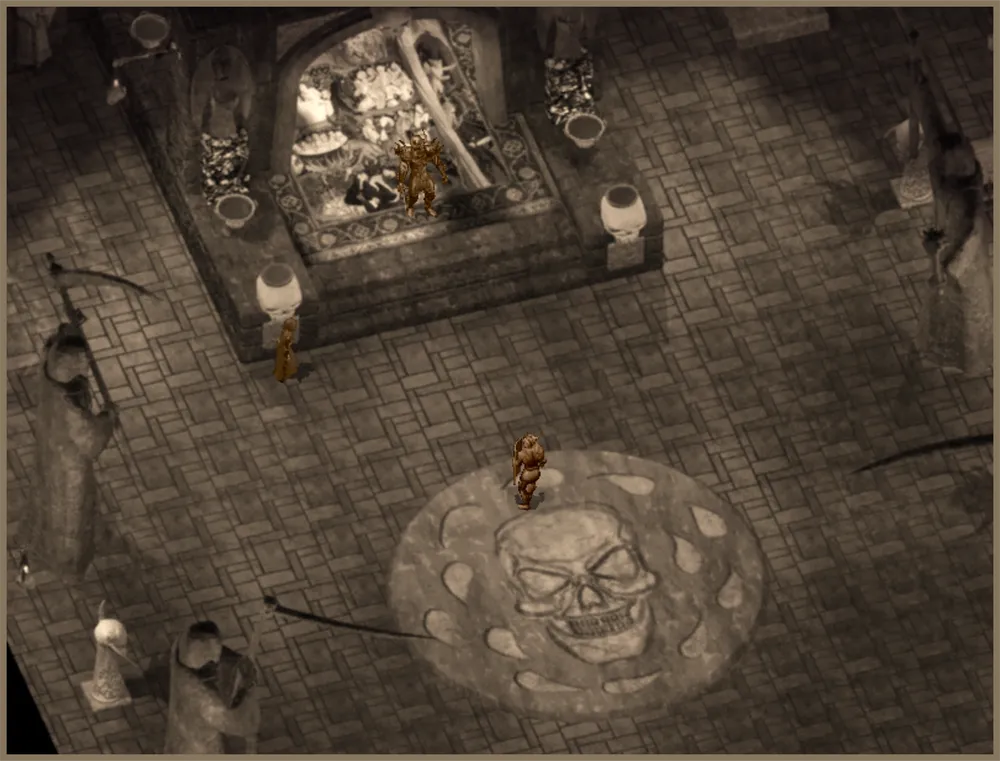
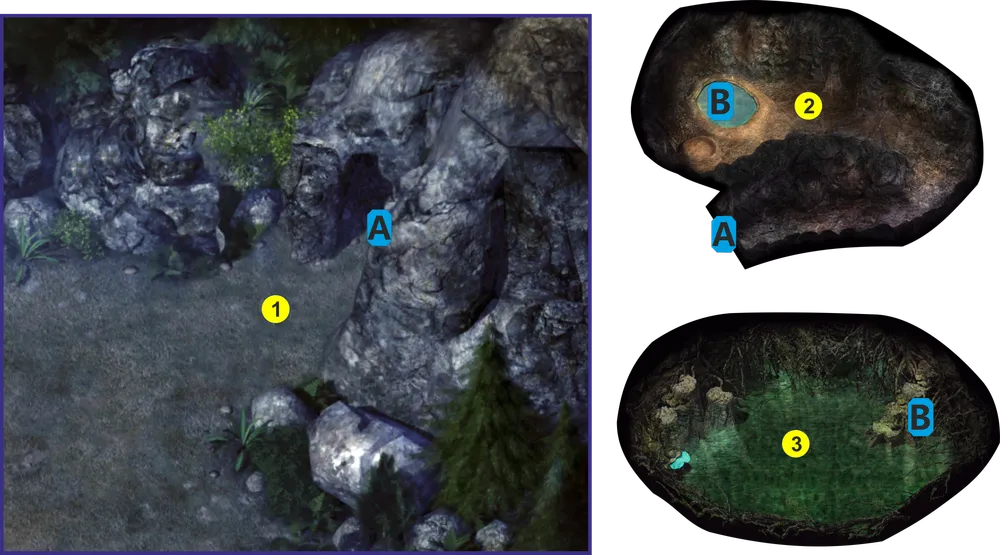
11. Dwarven Excavations. Before heading into the cave, stock up on antidotes, as you will often have to deal with undead. Upon entering the cave (see the area map, marker A), you will enter a network of tunnels excavated by the dwarves.

1 - Brother Deepwyn; 2 - Abandoned camp; 3 - Tomb of Krommus; 4 - Entrance to the crypt;
red dots - traps; blue dots - points of interest;
A - exit to the surface; B - entrance to the crypt.
11.1. Brother Deepwyn. When you get inside, you will find Brother Deepwyn and three dwarf priests fighting a large group of zombies, one of whom will drop the amulet 'Keeper of Secrets Under the Mountain'. After the battle, Deepwyn will tell you that he and the other dwarves were mining ore when they burst into a large hall containing books and undead. He will then tell you that his colleague Gurn Cold Heart presumably died during the first attack, but they could not find his body. Therefore, he will ask you to return his remains. Now you can return to Daran (see above, p. 9) and tell him that not all his friends have died. He will join Deepwyn in the dungeon.
Note: if any of the dwarves die while fighting the creatures and zombies, they will drop additional Keepers of Secrets under the Mountain amulets. You must pick them up; otherwise, they may disappear from the game and this will cost you one of the branching paths of this quest.
11.2. Abandoned Camp. When you reach the dwarves' abandoned camp, you will find a giant named Semal battling the undead. After the fight, he will tell you he mourns the loss of his 'little friends'. If you tell Semal that some dwarves are still alive, you will earn 3000 XP, and Semal will head to Deepwyn. If instead you kill Semal, you will earn 6000 XP.
Also, in the camp you will find a locked chest. This is Cold Heart's chest; it can only be opened with a key.
11.3. Tomb of Krommus. You will only discover this tomb if you have talked to Krommus during Prin’s quest (see above, p. 2). Inside the tomb, you will find the bard's hat, Krommus's caplet, Tangled Strings. Beside the tomb on the ground, you will find a +1 battle hammer.
11.4. Entrance to the Crypt. After finishing your business and checking all points of interest (see excavation map), having gathered all the dropped Keeper of Secrets under the Mountain amulets, head to the opposite side of the entrance to the cave (see excavation map marker B).
12. Crypt of the Undead. This crypt contains many rooms filled with enemies and secrets. The first room you will enter is a small library. Here you can search the bookshelves and find extremely useful books and two random scrolls.
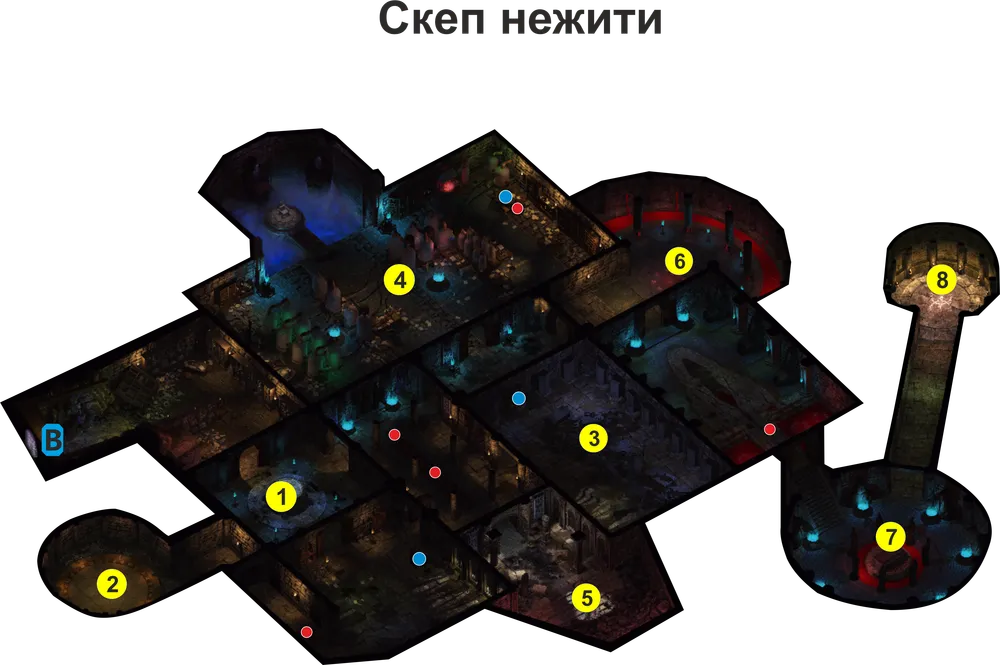
1 - Chalice; 2 - Unstable portal; 3 - Tomb; 4 - Laboratory; 5 - Locked room; 6 - Pillars of the Seasons; 7 - Ritual room; 8 - Hoard of phylacteries;
red dots - traps; blue dots - scepters; B - exit from the crypt.
12.1. Chalice. Passing into the next room, you will enter a small hall with a stone chalice filled with water. When you investigate it, you will see that it has four slots for scepters and one is already inserted. The other three will have to be found in this area (see the crypt map). One is situated nearby. Going through the door in the northern part of the room will lead you to a large area filled with enemies. Here on a round table lies a scepter.
12.2. Unstable Portal. From the room with the first found scepter, go north to the hallway, the entrance to which is sealed with a trap. At the end of this hallway, the door is guarded by two fire skeletons. Destroying the latter, proceed through the door. You will enter a room with a ritual pentagram and a portal in its center. Fire creatures - Fire Mephits (420 XP), Fire Salamanders (2000 XP), or Small Fire Elementals (400 XP) will occasionally spawn here by the portal and attack you. If your tanks in the party have decent fire resistance, this is a place where you can easily 'farm' some XP.
12.3. Tomb. Returning back to the chalice, go east. You will enter a room with traps between columns. It has three doors. The southernmost is locked and cannot be opened by any means. To the right of it, the door leads to a tomb with sarcophagi along the walls. When you enter this room, you will be confronted by the undead - bone bats, ghosts, mummies, shadowed souls, zombies, and many others. After defeating all, on the bodies you will find 'Essence of Clarity'. Also, in one of the sarcophagi, you will find another scepter for the chalice (see above, p. 1).
Returning to the room with traps, we go through the remaining door.
12.4. Laboratory. Going through the door in the hallway, you will encounter a bronze sentinel. Upon defeating him, you will gain 5000 XP and the Troll Decapitating Sword. The entrance to the laboratory is located in the middle of the corridor on the north wall. When you enter the laboratory, you will be met by yet another mass of undead - skeletons with blades, shadows, skeleton archers, torn skeletons, creatures, zombies and more. Some creatures will be in the front part of the room, and some in the rear, so if you attract them to yourself, you can split the battle into two parts. Subsequently, when you search the room, you will find a priest's mantle and the key to the chest. It unlocks the chest in the abandoned camp (see above, p. 11.2). You will also find a Silver Scepter, 'Essence of Clarity', a 'failed phylactery', and 'notes on a failed experiment' in this room.
Also, in the laboratory, there is a large throne. Investigating it, you will discover a lever, which when pulled will open a door in the room adjacent to the tomb (see above, p. 12.3).
12.5. Locked Room. Now, with the door opened, you can return to the previously locked room. Inside, you will encounter a handful of skeleton archers. After defeating them, you will find five anti-magic arrows, a magical garment of electrical resistance, a +1 battle staff, and scrolls of shimmering dust, great restoration, and Protection from Evil.
12.6. Pillars of the Seasons. Returning to the entrance of the laboratory, continue down the hallway. You will enter a circular room. Four pillars here represent a puzzle. You will need to activate them in the correct order to open a nearby door leading to the remaining part of the crypt. On the first activation, you will receive its description. From left to right, you will see that the pillars represent autumn, spring, winter, and summer. If you press a pillar in the correct order, you will hear a click. If you press one in incorrect order, five elementals will attack you, with the element corresponding to the season of the pillar you mistakenly activated (i.e., autumn will produce lightning elementals, spring will create earth ones, winter will produce ice ones, and summer will make fire ones).
Clues regarding the activation sequence of the columns can be found in the library (see above, p. 12) on the shelves. The books obtained there will inform that the pillars are activated in the following order (numbering in parentheses is their position from top to bottom): winter (third), autumn (first), summer (fourth), and then spring (second).
Once done correctly, the door will open. Proceed through it, defeat the enemies, and move further across a small bridge.
12.7. Ritual Room. Cross the bridge, and you will enter a round room for rituals. When you open the door to this room, you will witness an unnamed lich turning Gurn Cold Heart into a likeness of himself; it will also turn out that the two were working together. Apparently, Cold Heart deceived the dwarves into coming to the vault to release the unnamed lich and gain similar immortality for himself. You will have two ways to continue the quest:
- You can fulfill a task for him. He will ask you to bring him five Keepers of Secrets under the Mountain amulets. Previously, you could have already obtained at least two of them while navigating through the dwarf excavation (see above, p. 11). To acquire the remaining three, you will have to kill Deepwyn (see above, p. 11.1) and his priests. If you have checked all those places but still have not found the amulet, it likely relates to one of the dwarves dying when you first entered the excavation site, and the amulet he dropped not being picked up and disappearing. In that case, you will only have one choice - attack Cold Heart.
When you return to the lich-dwarf, he will be delighted with your work and will reward you with the Hammer of Dread +2 or agree to help the coalition against Keylar Argent. However, if the hero's strength and charisma are 18 or higher, you might have the chance to earn both rewards. To do this, you must meet several conditions. First, do not be rude to the lich and do not press him; at the right moment, choose the line: 'it was hard to obtain'. When the lich directly asks what the hero wants, demand both rewards (strength check). At first, he will not go for it, threatening to punish you. You, in turn, will say you know the value of the amulets (charisma check). Following all conditions will get you your way.
- You can kill Cold Heart. In this case, do not attack him right away. Instead, you should return to Deepwyn (see above, p. 11.1) and tell him what you learned. At first, he won't believe you, so you will have to convince him by showing him the diary of Cold Heart from the chest or enlisting the support of the rescued giant Semal. This will prompt the cleric to grant you a gemstone named Revealer of Secrets, which can deal significant damage to liches. The gemstone only has three charges, but if they run out, you can return to Deepwyn for a recharge.
When you attack Cold Heart, he instantly becomes invulnerable. Additionally, he will set red and blue fire shields, making dealing melee damage injure the attacking heroes. To defeat Cold Heart, first use the gemstone given to you. It will strip him of much of his protection as well as inflict a small amount of damage. Then you can quickly kill him, after which he will disappear and drop the Ancient Key.
12.8. Hoard of Phylacteries. As Cold Heart is a lich, death from weapons will not stop him. To ultimately kill him, you need to do more: destroy his phylactery, which you will find in the Hoard of Phylacteries, opening the secret passage with the key received. In this room, there will be six. The phylactery of Cold Heart is the second from the left.
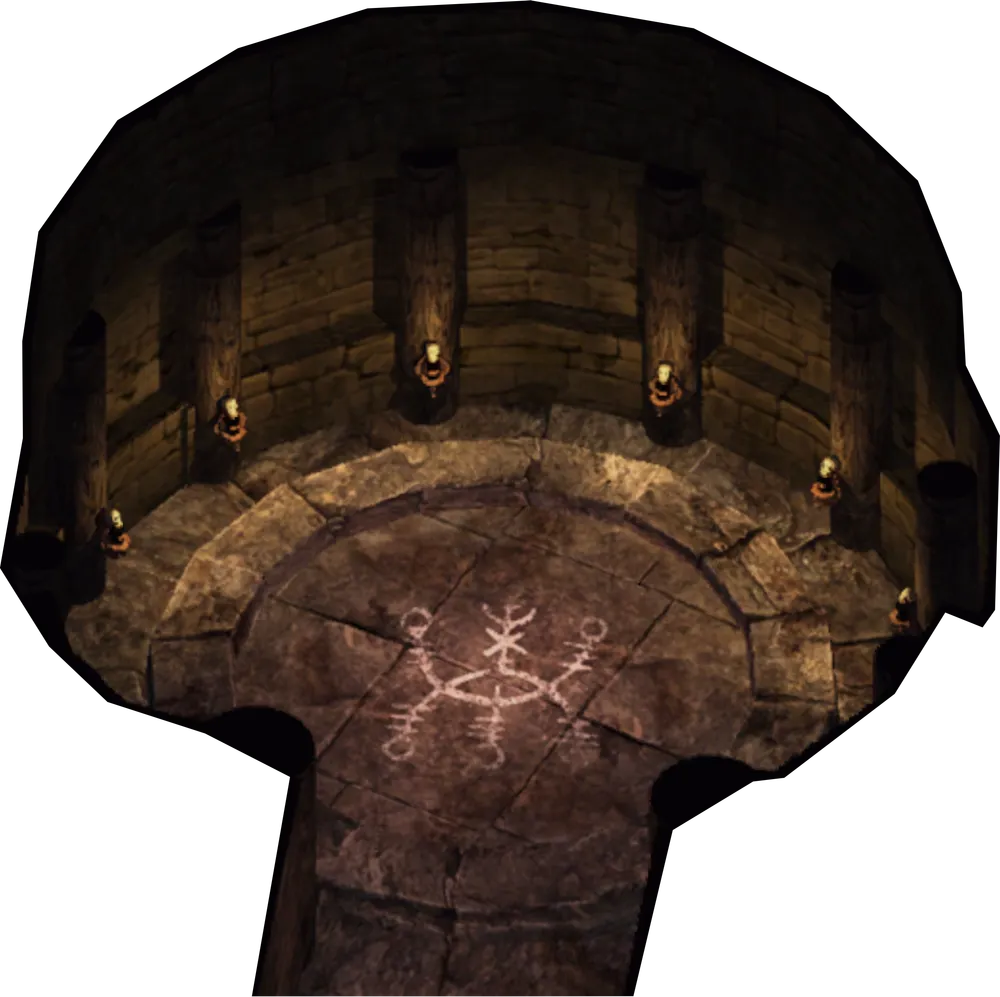
Hoard of Phylacteries
To destroy the phylactery, you need to take it to the unstable portal (see above, p. 12.2) and throw it inside this portal. Cold Heart will almost certainly be resurrected while you navigate through the area, so be vigilant and hurry; the charges in the crystal are limited.
After throwing the phylactery into the portal and killing the lich's physical form, you will earn 22,000 XP, plus 3000 XP for every party member. Then, when you return to Deepwyn, he will gift you the Helm of Dumaton and a scroll of Greater Restoration. After which, you will be able to hire dwarves for the campaign against Keylar Argent.
Tip: there is a fairly simple way to kill the dwarf-lich. After obtaining the Revealer of Secrets gemstone, before talking to him, send one of the heroes with fire resistance to the entrance of the portal room. With five people, defeat the lich, open the storage, and take the phylactery. Then switch to the character near the portal room, pass to the portal ignoring enemies, and activate it; the phylactery will be destroyed, and the lich will not resurrect. The game does not seem to allow checks for the distance between the character activating the portal and the one who has the phylactery in their inventory during this episode.
12.9. Activation of the Chalice. Now that the main errands are done and all the scepters are found, you can activate the chalice (see above, p. 12.1). Placing them in the slots, you will earn 3000 XP, and the chalice will clear, allowing you to peek into it, spying on one of three people - Imoen, Keylar Argent, or the Hooded Man (see walkthrough, part 2 - in the campaign). You will see a brief scene about the chosen person and gain 500 XP. But one viewing will cause the waters of the chalice to become murky again. To clear it for further viewings, you will need 'Essences of Clarity' (see above, p. 12.3 and 12.4).
All business in the dungeon is completed. You can return to camp.
13. New Plans. Upon returning to camp, you will meet the treasurer Ofillius (see the walkthrough part 2 - DG, p. 8). Driven by guilt, he caught up with your party to repay a debt. However, he will still not have your money, instead, he will gift you a golden bust of the hero of the Gates of Baldur.
In addition to the treasurer, Corporal Duncan will appear in the camp. After finishing with the treasurer, talk to him. In dialogue, a decision will be made to head east to another crossing. The corporal will leave to give orders to pack up the camp and mark the optimal route on the map. Meanwhile, we can depart the location. Before traveling further, however, it is necessary to explore the forest west of the camp.
14. Coastway Forest. While 'the army is busy gathering', you can visit another location in this chapter, namely the Coastway Forest (see the world map, p. 2).
Tip from Vanga: before you go, stock up on weapons, ammo, and spells dealing fire damage. You will need them in future adventures.
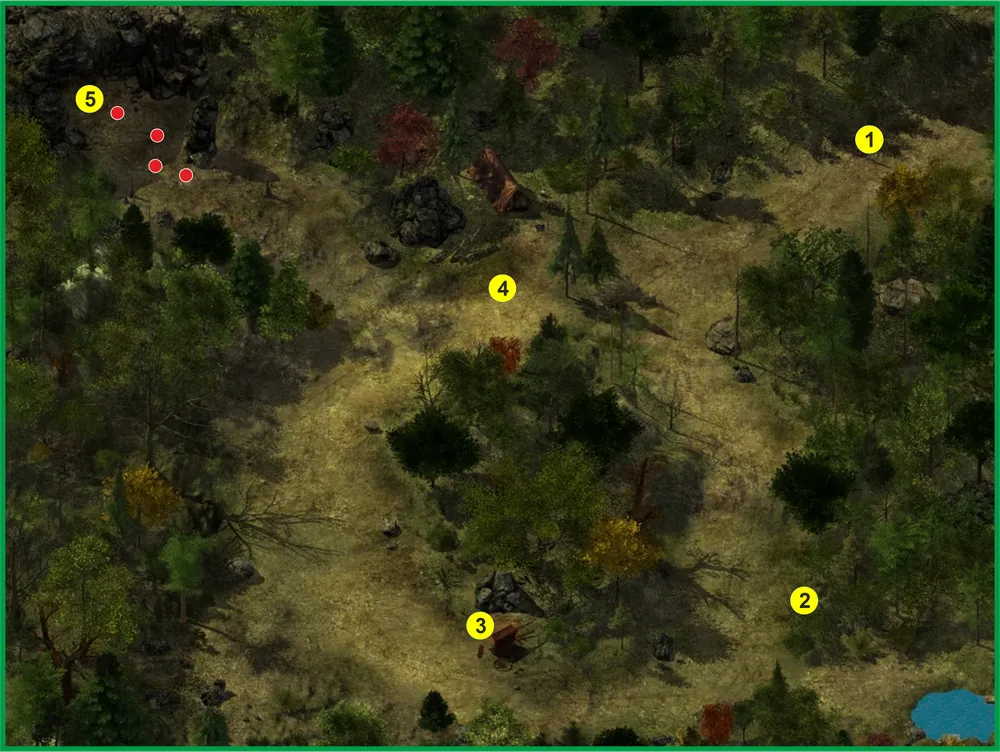
1 - Skii; 2 - Raasad; 3 - Upside-down cart; 4 - Vampire hunters; 5 - Vampire's cave;
red dots - traps.
14.1. Skii. When you enter the forest, you will immediately run into Skii (see walkthrough, part 2 - DG, p. 7). She will kill a couple of crusaders. In dialogue, she will explain that she caught them trying to poison the rations of the Burning Fist before heading back to the camp.
14.2. Raasad. Following the path toward the south direction, you will meet Raasad (see walkthrough, part 2 - ShkZhT, p. 2). Upon asking him what he is doing here, Raasad will tell you that he had a change of heart and followed you to join the party. However, something is bothering him, though he will not admit to what.
14.3. Upside-down Cart. Moving west, you will encounter a large group of orcs, led by a leader. After battling with them and inspecting the area, you will find the bodies of two individuals who were traveling in the cart. They will have a precious dagger +1 and potions. You will also find a treatise of the crusaders that indicates these two were seeking information on Keylar Argent.
14.4. Camp of Vampire Hunters. In this camp, you will meet Ikros and Isabella, vampire hunters. They will inform you that they are tracking a vampire and have chased him into a cave to the west, but he has set traps along the path leading to it, and they cannot approach the entrance. Additionally, one of them will have the shield that was lost by Takos (see above, p. 3.1). You can demand the shield back, then a fight will begin. If you agree to help, the hunters will ask you to return to their camp at night. At night, after speaking with them, a vampire named Tsolak will appear and intervene in the dialogue. However, Isabella will prevent you from speaking; you will have to make a choice:
- You can take the side of the vampire and attack the hunters. First, you need to attack Ikros immediately before he can activate his protective spells (including Red Fire Shield, Minor Spell Reversal, Shield, and Stone Skin), then focus on Isabella. For them, you will receive 3400 XP and find a Traveler's Robe, 40 darts, a +1 Long Sword, a paralysis staff, and a wooden stake. The stake will not be needed, as you sided with Tsolak.
After the battle, the vampire will approach you and thank you for your help, promising to send his messenger. You will meet the messenger later in a random place (There’s a chance the messenger will appear in the hunters' camp right after the dialogue with the vampire and subsequent rest). He will give you a troll bloodstone, and you will also earn another 9000 XP.
Note: if you attack Ikros and Isabella during your first encounter with them, you will not be able to collaborate with Tsolak. You can only kill him.
- You can side with the hunters and attack Tsolak. You will likely defeat him quickly, but instead of dying, he will turn into mist and summon ten terrible wolves to cover him. Tsolak will return to the cave. Isabella will give you a wooden stake to finish him off.
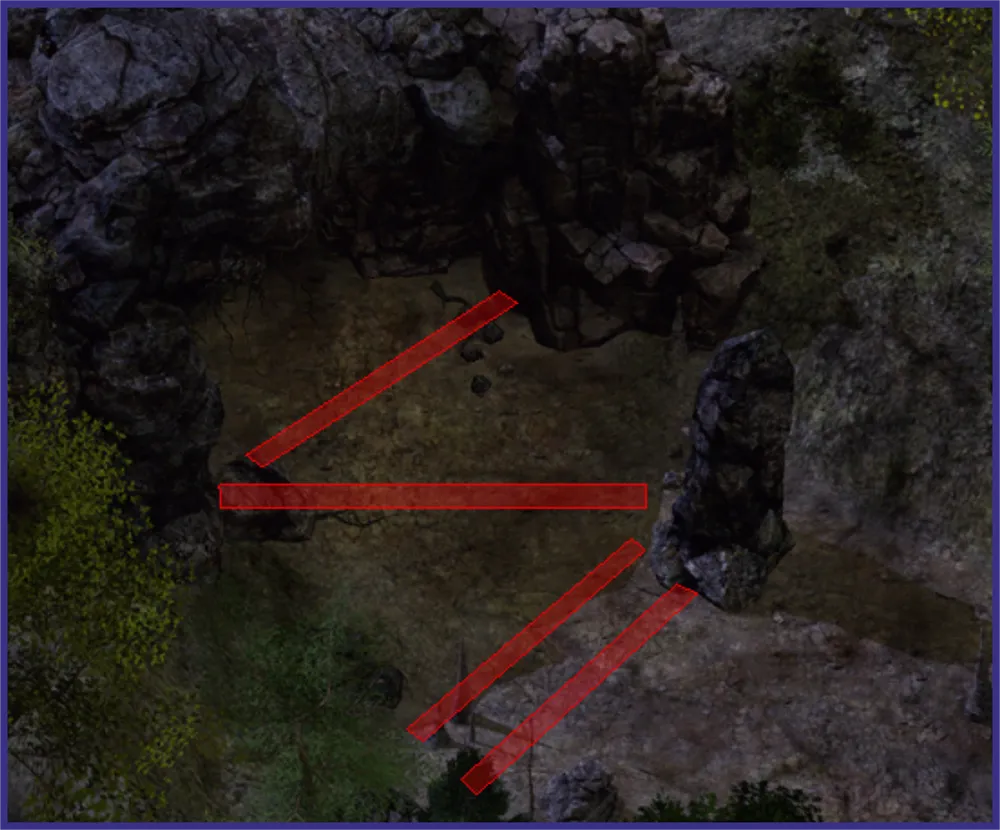
Traps at the entrance to the cave
14.5. Vampire’s Cave. This cave is currently the home of the vampire Tsolak; if you have already encountered him, he will regenerate in his coffin. You simply need to click on him to use the stake, thereby killing Tsolak. After dealing with Tsolak, search his coffin; you will find boots with half speed and Tsolak’s scroll. The footwear may come in handy later. The scroll will indicate that Tsolak was working for someone named “L”.

Vampire's Cave
Then, upon returning to the hunters, you will receive the reward of the Shield of Sun’s Catch +2 and 250 coins, also earning another 9000 XP.
Note: if you did not speak to the hunters or killed them, the vampire will sleep in his coffin during the day and leave it at night. Should the hunters die, you can take one of their stakes and kill the vampire by coming to the cave during the day.
In either case, you will receive the Shield of Sun’s Catch +2, the last lost relic of Takos (see above, p. 3.1).
Tip: before dealing with Tsolak, if you rest in the cave, there is a high probability that you will be attacked by vampiric wolves (worth 2000 XP each), which makes the cave a good explorable location for XP.
15. Unexpected Adventure. In case all places in the forest have been visited, on the way back to camp at night, you will encounter an unknown area, unmarked on the map.
Cave of Trolls
15.1. Entrance to the Cave. Following the path east, you will come across the entrance to the cave, where a fight is raging between a group of orcs and two trolls. There are no allies here, so you must fight everyone.
With the trolls, there's a caveat: when their health is nearly depleted, they fall unconscious and become invulnerable to any damage except fire and acid. Hence, fire-dealing weaponry will come in handy. If you don't finish off the troll, its health will recover after some time.
15.2. Cave. Upon entering the cave, near a water body, you will find a group of trolls. Use fire to kill them, then inspect the area. Near the body of one of the deceased individuals, you can find a precious gem, a precious ring, and a book about the Dragon's Reach Castle. In the crater near the water body lies the skin of a snow wolf. The body of water is also not simple. Hidden underwater is a secret passage into the secret area of the cave. A character with infravision can see the passage, and it doesn't necessarily have to be innate; if you previously bought a ring from Herod (see above, p. 3.2) or have a suitable spell, these will also help spot the entrance.
15.3. Secret Area. After going through the found passage in the water, you’ll arrive in a small area where you will have to battle another group of trolls. After winning, among your loot, you will find a special sling +2 that grants a saving throw bonus for halflings. In one of the corners, you can search a container to find precious gems.
Nothing more interesting remains; you can rise to the surface and leave the location.
16. On the Road Again. When you return to camp, go to the burnt inn and speak with Takos regarding his family relics. You will have several options to complete the quest:
- If you tell Takos you will keep the items for yourself, he will attack you but can be easily defeated, earning you 50 XP but losing reputation;
- If you return the relics, Takos will reward you with a unique dart +2 and you will gain 3000 XP. If you complain about the meager reward, he will allow you to keep one of the family relics.
Business in this area is done; time to continue on your journey.
From the compilers.
*We remind you that this walkthrough was made in collaboration with the esteemed nemsik. Please consider this factor when composing the next non-wiki. We hope that our joint work meets your expectations.*
To be continued...