Siege of Dragonspear - walkthrough, part 5

Signs of a recent presence of the crusade are visible along the road to the castle of Dragonspear, but true servants of the Shining Lady are few and far between. A few crusaders, whom you saw from afar, invariably retreated at the first opportunity.
As the expedition marches on, fatigue begins to take its toll. Quarrels often flare up in camp. Your reputation as the hero of Baldur's Gate protects you from petty squabbles and angry outbursts... or perhaps what happened at the Boareskyr Bridge is another reason why few are willing to contradict you.
These thoughts retreat as you see the banners of Waterdeep, Daggerford, and the Flaming Fist at the edges of the coalition's siege camp. The castle of Dragonspear is near, as is the day of reckoning with Kaelar.
**[Siege of Dragonspear - walkthrough, part 1](http://www.gamer.ru/baldur-s-gate/siege-of-dragonspear-prohozhdenie-chast-1)**
**
Siege of Dragonspear - walkthrough, part 2
Siege of Dragonspear - walkthrough, part 3
Siege of Dragonspear - walkthrough, part 4
**
RETROSPECTIVE
It turns out that interesting facts were missed in the previous part. I myself, I confess, did not notice one at all. Despite some dead-end branches, the game boasts impressive variability in completing quests. Others I again took for trivial moments and did not pay attention to.
So, besides the capitulation or breakthrough of the siege of Bridgefort (see walkthrough, part 4 - BM, p. 6), there is a third path - treachery. It is available if you received a quest from Harm to infiltrate the fort (see walkthrough, part 4 - BM, p. 2). After this, once in the courtyard of Bridgefort, speak to one of the guards at the fortress bridge named Mari (see walkthrough, part 4 - BM, p. 5, courtyard plan). In dialogue, order her to lower the bridge. At first she will refuse, calling the hero crazy. Then lie to her that it is urgent to counterattack and there is no time to explain the reason. A charisma of 16 or higher is needed for success. Mari will believe the hero and lower the bridge. When the entrance to the fort is open, the protagonist will go out onto the bridge first and a dialogue will take place with the head of the crusader army, Bargestra. Under no circumstances should you tell him your real name; report that you were following Harm's orders and use a fictitious name. Harm himself will confirm your words, after which Bargestra will let the hero and his companions go in peace. Nevertheless, your reputation will drop by two points.
The ensuing events will unfold as in the case of capitulation, the only difference being the report from the scouts of the Flaming Fist. In it they will report that the crusaders obtained great loot, and all the inhabitants of Bridgefort were sent to the castle of Dragonspear for 'enlightenment' and recruitment into the crusade. Jaheira, if she is in the party, will express her discontent, as everything she and her husband fought for over the past few weeks has gone up in smoke.
Another point worth noting is the mark of Bhaal, the god of murder and the father of the protagonist, which was burned onto the bridge during a vision (see walkthrough, part 4 - BM, p. 6).

Mark of Bhaal
It will turn out that this is not just a visual effect; it will have repercussions for the hero in the near future.
And the last point relates to Khalid (see walkthrough, part 4 - BM, p. 5). If you managed to recruit him into the party and did not hasten to move further north, he may at any moment approach the hero and ask for a favor. Due to all the chaos of the siege, he and Jaheira have not been able to celebrate their wedding anniversary. Even if the hero already knows that they arrived at the bridge on the Harpers' assignment, Khalid will explain that he was not lying about the anniversary. He will ask to find him the web of a giant spider. This strange request will be explained in his story.
Before meeting Jaheira, he had never left the city and knew nothing of the wilderness. Jaheira taught him everything he knows: how to track animals, identify plants, and much more. But during their first outing into the forest, she taught him one trick - how to heal using webbing. In memory of this event, he wants to weave a beautiful silk thread from it and make a necklace from it.
You may have already obtained webbing in the spider nest (see walkthrough, part 4 - HB, p. 3). When the webbing is in your inventory, he will approach the hero and take one strand, but will claim he has changed his mind about making the necklace, as the time is not right.
WORLD MAP
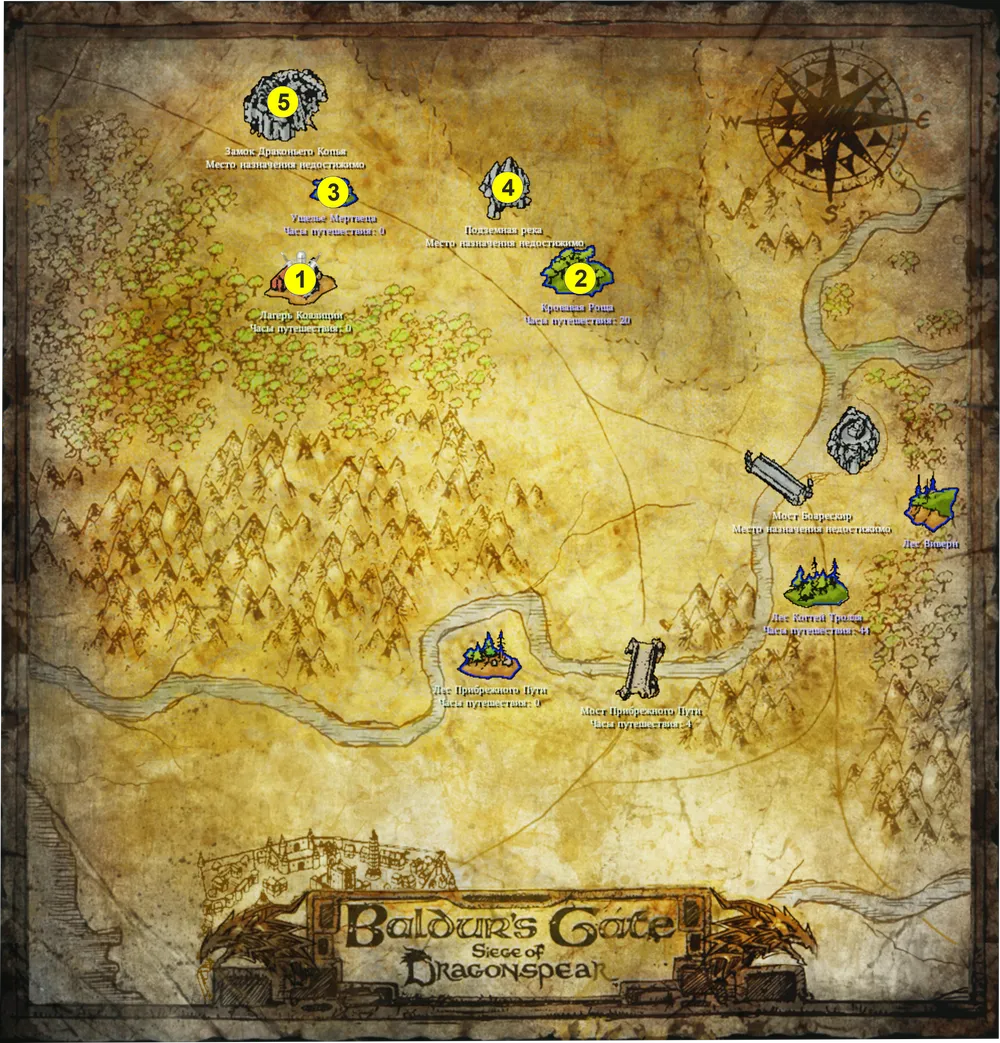
1 - Coalition Camp; 2 - Bloody Grove; 3 - Dead Man's Gulch; 4 - Underground River;
5 - Castle of Dragonspear.
COALITION CAMP
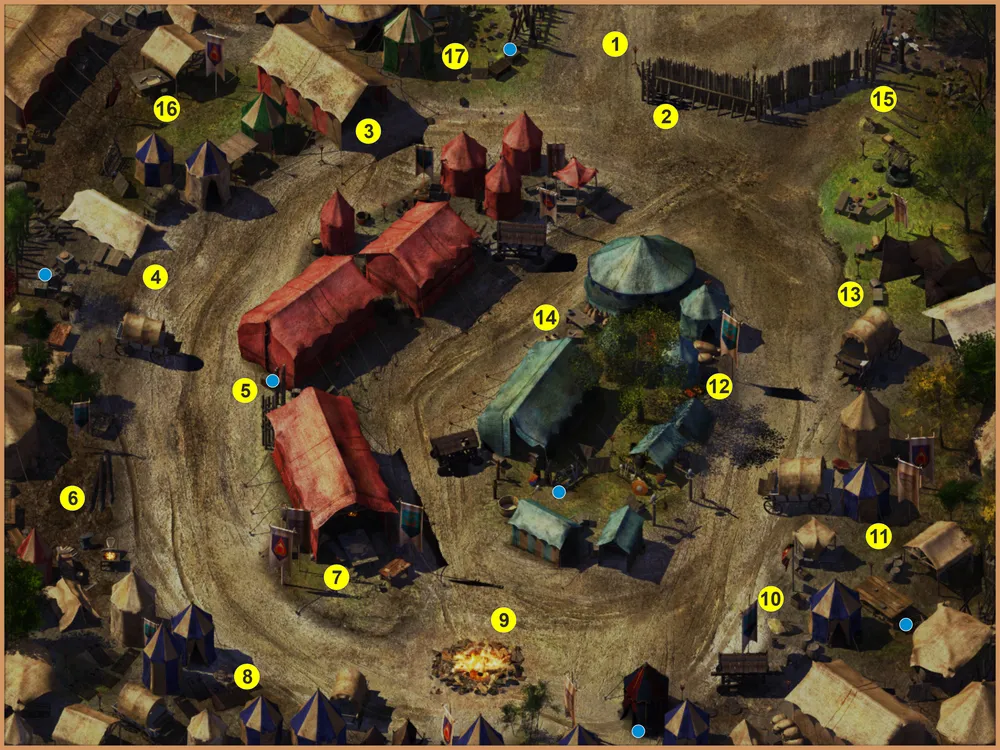
1 - entrance; 2 - sentry Helvdar; 3 - Belegarm; 4 - vigilante Halasant and recruits; 5 - Simonetta Tuedjd; 6 - forge; 7 - mess tent; 8 - infirmary; 9 - bonfire; 10 - marshal Netherlock and Mizhena; 11 - djinn Nazram; 12 - militia Sempek and Damius; 13 - trader Waizab; 14 - general Stonehand and Prichard Gardenson; 15 - thief Rinvis; 16 - Malden Kol; 17 - Torsin de Lenci and Fosse Dagdip;
blue dots - crates and chests.
1. Entrance to the camp. As soon as the party arrives at the camp, at the entrance you will meet the marshal of the army of Baldur's Gate named Kirill Netherlock (apparently, the main forces of Baldur's Gate arrived before the party of the protagonist). He will warn that the hero of Baldur's Gate does not expect a warm welcome, as rumors have spread about what happened at the Boareskyr Bridge (see above, retrospective). Now many perceive the hero as the new Sarevok. After that, the marshal will invite you to participate in discussions of future plans. The commanders are gathering in a large red tent to the south.
In this camp, there is no separate area where all the familiar characters reside; they will be scattered throughout its territory. For example, if Corwin and/or Glint are not in your party, they will be here, near the entrance.
Note: while strolling around the camp in the company of Safana, she may start a dialogue and remind the hero about what they agreed upon earlier (see walkthrough, part 4 - LKT, p. 7, note). But before accepting the gift, she will ask whether the hero is in a relationship with anyone else. In this case, you can:
Admit that you already have someone (a list of names available to your hero will appear);
Respond that your mind is now only on war and there is no time for romance;
Assure Safana that no one except her interests the hero.
Choosing the last option, she will ask what gift you have prepared for her. No matter what you choose, in the end, jewelry or a gem from those in your inventory, Safana will be pleased and, in return, will 'give a kiss.' After which she will ask the hero to compose a poem in her honor. By the way, it's possible to do without a gift at all; then the dialogue branches with the kiss will not occur, and the conversation will immediately move to the request for the poem. If Vagiln is in the party, after the dialogue with Safana he will offer his services as a skald to write the poem. If you agree, a manuscript will appear in your inventory that can be copied into the journal.
2. Helvdar. Near the barricade at the entrance to the camp, you will stumble upon a drunken dwarf guard named Helvdar. Asking him what the reason is that made him take to the bottle, he will tell you how he lost his lucky charm - a stone from Mithral Hall during the march. Since then, luck has abandoned him, and he has been regularly facing all sorts of troubles. At first, minor, such as spilling a mug of ale on his beard, then more serious, losing his pay in card games. According to him, if this continues, he will most likely meet his end in the coming battle. During the dialogue, he will notice another misfortune, his boots have worn out. At this moment, he will have an idea: his patron god - Martammor Duin, whose symbol is a shoe and a mace in front of him, so if he gets a new pair of trendy boots, maybe luck will return to him. You can support his 'iron logic' or ridicule it. Nevertheless, he will ask you to find decent leather, preferably from a bear, as he cannot leave his post. After obtaining the leather, it should be delivered immediately to the Flaming Fist's quartermaster Belegarm for him to make Helvdar the desired footwear.
3. Belegarm. The quartermaster of the Flaming Fist is located not far from the entrance to the camp. You have encountered him before in campgrounds in previous chapters (see walkthrough, part 2 - on the march, p. 2). He will still sell goods. Additionally, the guard Helvdar has asked you to order shoes made of bear leather from this character when you obtain it.
4. Training recruits. Further along the road, you will notice a group of recruits being drilled by vigilante Halasant (vigilante is a military rank in the Waterdeep army, a sort of equivalent of drill sergeants). In the dialogue, she will lament that these six from Daggerford are not accustomed to the discipline and training that is characteristic of Waterdeep soldiers. When asked if she can bring them into shape, Halasant will respond that she has plenty of other duties. She would gladly send them back to Daggerford, but every soldier is accounted for in the coalition, even those as useless as they are. You will not be able to persuade her to devote more time to them, but taking their training upon yourself is quite feasible. She will agree and ask you to inform her when you finish with them. The vigilante will check what they are good for after your training.
The recruits are lined up here in two ranks. After the dialogue with the vigilante, they will disperse around this place and occupy themselves. As mentioned earlier, there are six of them: Klovista, Danain, Taield, Morlis, Hester, Garrold. What you teach them will depend on what class your hero is and which companions are currently following him. For example, a warrior hero will give each advice on close combat depending on the features that each of the recruits manifests. While the main character, a mage, will recognize magical potential in Garrold and direct him to training with battle mages. Companions who can assist in training are:
Klovista - Glint;
Danain - Safana;
Taield - Jaheira;
Morlis - Dorn;
Hester - Viconia;
Garrold - Dinahair or Edwin;
In the event of success, vigilante Halasant will be thrilled with the results of your methods and will award you the commander's chainmail +3 (+1 charisma, all allies in sight gain immunity to fear and loss of morale). For completing the quest, you will earn 6,000 XP.
Note: Not far from the recruits, you will find Faerd, already familiar from previous chapters with his 'roadside inn' (see walkthrough, part 3, p. 1.3).
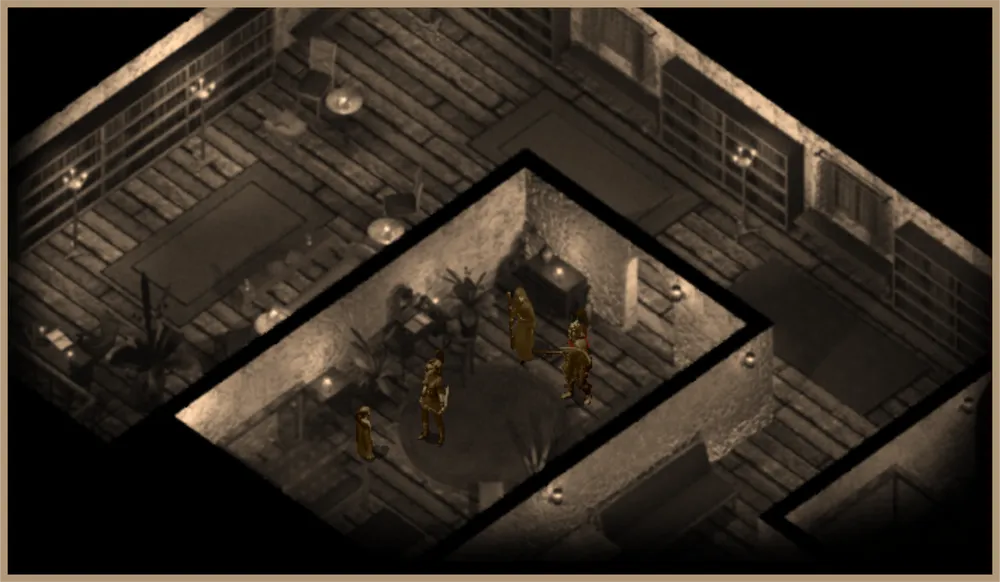
Another dream...
5. Simonetta Tuedjd. Near the junction of two red tents, you will meet a veteran of the Waterdeep troops - Simonetta Tuedjd. Asking what her duties are in the camp, she will tell you that she is here as a tactical and troop management advisor. Simonetta has been retired for quite some time and, due to her age, cannot fight, but her commanding experience is very valuable, which is why the command summoned her to the expedition to the castle of Dragonspear. She will then ask the hero what he thinks about wars. Regardless of your answer, her reaction will be the same. Then, she will ask you to inquire among others in the camp about their attitude toward the current war and report to her on what you find out, as, according to her philosophy, one must not only know one's enemy but also understand the minds of one's allies.
To complete this quest, you need to ask three characters. From those met earlier, the first is Belegarm (see above, p. 3). He will tell you that such a large-scale campaign is the first in his career; before this, he was a quartermaster only in small Flaming Fist expeditions. Besides this, Belegarm is obsessed with the history of the north, especially the wars of Dragonspear, and will provide a brief historical report on how the Flaming Fist had already fought demons from the Nine Hells as part of a similar coalition. Therefore, he is glad to have been summoned to this campaign and to have become a participant in a significant event.
The second is vigilante Halasant (see above, p. 4). According to her story, this campaign is far from the first in her career. She joined the coalition voluntarily because she is a patriot of her city and will always stand to defend it. She envisions the upcoming battle as difficult and bloody, and assumes that the coalition will suffer heavy casualties. When asked why, with such experience, she holds such a low rank in the army, she will respond that she herself refuses further promotion as commanders are only occupied with strategies, moving wooden soldiers around on a map. And those like her engage with the soldiers, supporting the army's morale, and are always in the thick of events. This is what she likes most about her work. However, in the course of the dialogue, she will confess that this campaign is still unlike any other she has participated in, as many loved ones and friends of coalition soldiers have been recruited into the crusader army, including her close friend - Tristian. And this causes her concern. But for her, duty above all, and she says she will pursue her cause to the end, no matter what.
6. Forge. Across from Simonetta Tuedjd, across the road, is the forge. There you will meet the blacksmith Jegg, already familiar to you from the previous chapter (see walkthrough, part 4 - BM, p. 5.5). She still sells equipment, and if you have any trophies left, she can forge something useful from them.
Note: If you capitulated or even betrayed the defenders of Bridgefort (see above, retrospective), Jegg will not appear in the camp forge.
7. Command. The coalition headquarters is located in a red tent, at the entrance of which you can see three large banners with coats of arms: Baldur's Gate, Waterdeep, and the Flaming Fist. There you will find Torsin Cedric de Lenci, better known as Torsin de Lenci (represents Waterdeep; Torsin is apparently a title), marshal Kirill Netherlock (the leader of the regular troops from Baldur's Gate), and general Heytar Stonehand (head of the militia from Daggerford). You will catch them in an argument, in which general Stonehand accuses the allies of inaction. In response, Torsin de Lenci will reproach the general for bringing the smallest number of soldiers compared to other cities and has no right to demand actions which may result in numerous casualties among the allies. When asking what they are discussing, the commanders will not respond. They will first start reproaching the hero for what happened during the vision at the Boareskyr Bridge (see above, retrospective). This event undermined the combat morale of some coalition soldiers and dampened the desire to serve under the son of Bhaal. Therefore, the commanders will advise the hero to stay away from the camp for a while; it would be better to go on reconnaissance and check a certain piece of information.
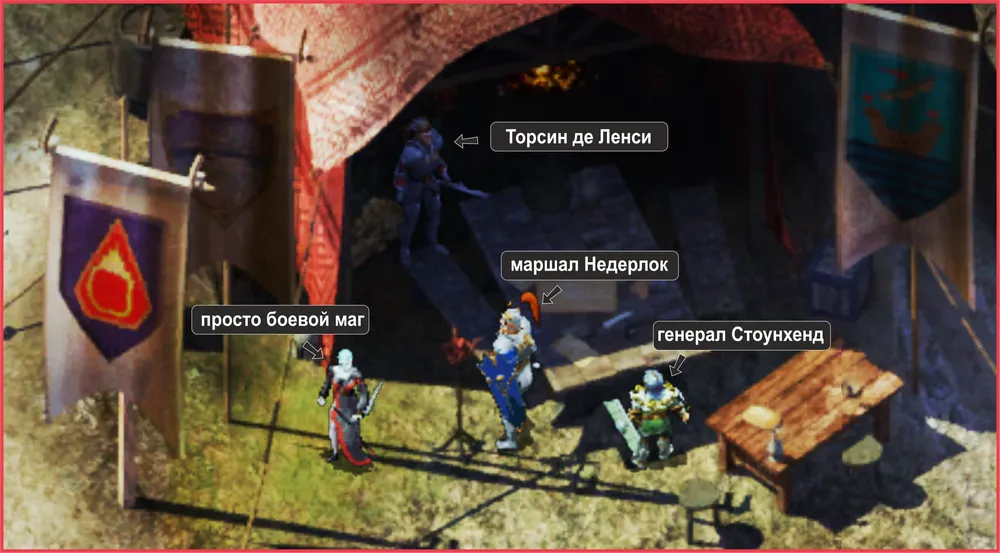
Coalition commanders
To the command, intelligence has reached that Kaelar's troops are supplied through secret caves beneath the castle of Dragonspear. The entrance to them, it turned out through the torture of one of the crusade soldiers, is located behind the Dead Man's Gulch. But that's not all; it also became known about one of Kaelar's priests named Hefernaan. He is located in the basement of the castle of Dragonspear. Who he is and what he is doing for Kaelar could not be ascertained. But she treasures this priest. Thus, the task is to infiltrate through the caves into the basement of the castle and learn more about him. The commanders will also warn that all their forces are focused on the siege, so they will not be able to send a rescue expedition for you. If something goes wrong, you are on your own.
Finally, Torsin de Lenci will direct you to the dwarf Fosse Dagdip, whose tent is near the entrance to the camp. She is an engineer and is working on something that may help in the upcoming battle. After the dialogue, the leaders will go their separate ways.
8. Infirmary. Not far from the commander's tent is the field hospital. In charge there is a priestess named Theodosia Immartired, or simply - Dosya. She will complain that the infirmary is overflowing with patients, as a very strong infection is spreading in the camp, and it is urgent to find a cure, otherwise the entire campaign could be at risk of failure. After which she will ask if the hero or his companions have knowledge of medicine and will request them to examine the patients, as she is in despair and does not know what to do. It may not be appropriate to ask the priestess the question,