Siege of Dragonspear - Walkthrough, Part 7

Steel and magic are still fighting in the distance, but you have thwarted Keilar's attack on the siege camp. It is time to unite the forces of Waterdeep, Daggerford, and Baldur's Gate to battle the Radiant Lady.
The walls surrounding the ruins of Dragonspear Castle are teeming with militia. Among them are Keilar's most loyal lieutenants, men and women with excellent training, ready to sacrifice everything for their leader. Defeating them and infiltrating the castle won't be easy, but that is your task at hand.
**[Siege of Dragonspear - Walkthrough, Part 1](http://www.gamer.ru/baldur-s-gate/siege-of-dragonspear-prohozhdenie-chast-1)**
**
Siege of Dragonspear - Walkthrough, Part 2
Siege of Dragonspear - Walkthrough, Part 3
Siege of Dragonspear - Walkthrough, Part 4
Siege of Dragonspear - Walkthrough, Part 5
Siege of Dragonspear - Walkthrough, Part 6
**
RETROSPECTIVE
Unfortunately, I've missed quite a few minor but interesting events. The first one is related to the cure for infection (see walkthrough, part 5 - CR, p. 8) and the merchant Vaizab (see walkthrough, part 5 - CR, p. 13). Namely, you probably already know that the merchant has connections with the thieves' guild (see walkthrough, part 5 - CR, p. 15), so after receiving the medicine (see walkthrough, part 5 - CR, p. 7), you can choose not to give it to the priestess Dosa but sell it on the black market through Vaizab. For the medicine, you will receive 250 coins and lose one reputation point. However, with this option, the quest involving the illness cannot be closed, so, in addition, you won't be able to complete the task for Simonetta Tuedj. Even the most skilled thief (including Safana, with a 250+ theft skill) cannot steal the medicine from the merchant, and killing the merchant is impossible. By the way, it’s still worth robbing Vaizab, as she has two potions of expert thievery (+40% to thieving and lock-picking skills).
In addition, I missed one nuance regarding the reward from Dosa for the medicine (see walkthrough, part 5 - CR, p. 7). The reward, the morning star 'Martyr's Morning Star' +2 and +1 to reputation, will be received if you give the potion unconditionally. However, in the dialogue, you can demand a reward for your services. In this case, she will offer three potions of superior healing. If you agree, you will receive them, but you will lose one reputation point. If you demand more, she will refuse to deal with you, the quest will close, and you won't receive any rewards. Closing the quest in this way, Dosa will refuse to answer your questions about herself at Simonetta Tuedj's request, hence this situation will prevent you from completing Simonetta’s quest. But you can freely sell the medicine to merchant Vaizab.
And lastly, regarding the idea of giving medicine to Dosa, then stealing it back and selling it to Vaizab (essentially exchanging the reputation point for 250 coins), I must disappoint you, as stealing the vial from the priestess, just like from the merchant, is impossible.
The second event is related to the reward from Mijena for her amulet (see walkthrough, part 6 - PR, p. 5). The first time you return her amulet, do not question Mijena, just say: 'Glad to help, but I must go.' After that, you will receive a reward, and the quest will be completed. But if you talk to her again, an option will be available: 'When I returned your amulet, you mentioned a story related to it. What is it about?'. Mijena will reveal her 'heartfelt' story, after which she will give the reward for the second time. I do not think this is a mistake, rather a desire to share her views.
Another event that I did not notice is related to the lift guards (see walkthrough, part 6 - PR, p. 21). With a charisma of 13-15, even with Keilar's seal, the hero may face difficulties persuading them. In this case, to get them to let you pass, after showing the seal, tell them your real name. Then the sergeant will ask: the same name as the hero of Baldur's Gate? Reply that it's just a coincidence, after which you'll be allowed through. However, if your charisma is lower (below 13), you won't be able to negotiate with the guards at all.
And finally, the information regarding fighters from the thieves' guild (see walkthrough, part 5 - CR, p. 15). If you made an arrangement with Rinvis for military assistance, then during the battle in the camp (see walkthrough, part 6 - camp defense), a group of thieves will act alongside the scouting squad. The differences are not immediately obvious. You can understand if they have arrived or not in a conversation with Andrus. Listing the available squads, her phrase about the 'special unit' will include an additional line: 'how romantically they named the group of thieves and murderers.' Since both scouts and guild fighters hit enemies from the shadows and then disappear again, seeing the difference in numbers is not easy, if it exists at all.
CAPTURE OF THE CASTLE
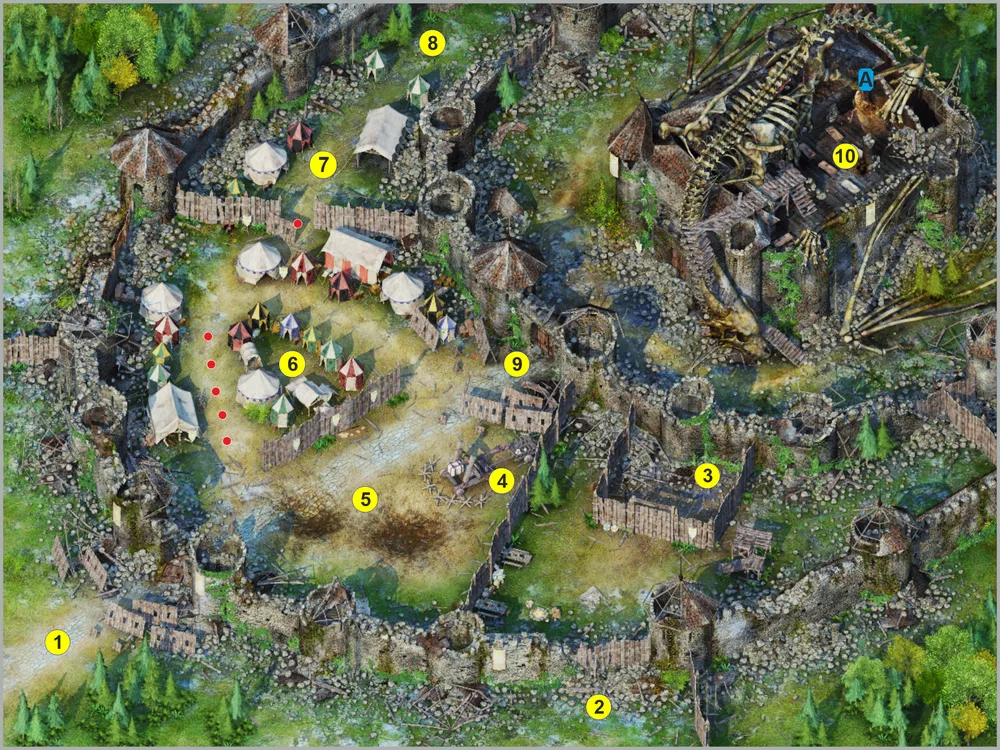
1 - coalition army; 2 - breach; 3 - troll pen; 4 - catapult; 5 - army of crusaders; 6 - Ashatiel; 7 - cover unit; 8 - prisoners; 9 - gate to the inner courtyard; 10 - castle;
red dots - traps;
A - entrance to the castle.
1. Coalition Army. Upon reaching the castle walls, you will encounter the coalition army led by commanders (see walkthrough, part 5 - CR, p. 7). Additionally, besides regular soldiers, the army will include:
Mijena (see walkthrough, part 3, p. 1.1);
Helvdar (see walkthrough, part 5 - CR, p. 2);
a squad of recruits prepared by you (see walkthrough, part 5 - CR, p. 4);
a brigade of ogres led by Murs and Slag, if you had made arrangements with them earlier (see walkthrough, part 6 - PR, p. 4);
priestess Dosa (see walkthrough, part 5 - CR, p. 8), if she survived during the defense of the coalition camp (see walkthrough, part 6 - camp defense);
stone golem, if you bought him from Teleria (see walkthrough, part 3, p. 5);
witch Soralis (see walkthrough, part 3, p. 1.7);
mage Dakh Hensley.

Coalition Army
The crusaders have blocked the passage into the castle with a one-way barrier and are firing at incoming assailants through it. At this moment, Torsin de Lensi will approach the hero and ask to report on your progress in the caves beneath the castle. Say that you have placed a barrel of explosives. Torsin will be pleased and order mage Dakh Hensley to 'remotely' detonate the charge. It turns out that the hero successfully placed the barrel right under the entrance to the castle. As a result, the explosion will destroy all the crusaders guarding the passage, including the mage supporting the barrier. The coalition army will move into the castle courtyard...
2. Breach. In the case that you failed to place the barrel of explosives or, for some reason, decided to hide this from Torsin, you will have to find an alternative way to breach the castle's defenses. Here, the information previously obtained from Ski (see walkthrough, part 6 - DZD, p. 1) can be useful. The section of the wall that has been hastily patched with wooden beams is located a bit further from the place where the restless daughter of the duke was rescued.
On your way to this location, you will encounter dwarf Fosse (see walkthrough, part 5 - CR, p. 17) accompanied by two soldiers named Lagg and Almur. In the dialogue, Fosse will ask for help in dealing with the archers near the wooden barricades so that she could blow them up. After finishing the dialogue, move along. Near the designated area, you will encounter six crusader archers armed with bows and crossbows. Once you eliminate the threat, Fosse will place and detonate the beams, thus opening a passage into the eastern part of the courtyard. Lagg and Almur will hold the breach. To assist them, three Waterdeep soldiers will arrive.
Now you can penetrate into the castle courtyard.
3. Troll Pen. Inside, you will come across a squad led by Gnar the Big-Bag. They guard the troll pen. In the dialogue, Gnar will demand the hero to state a password. With a charisma of 15 and higher, you can lure the troll guards to the breach, where they will be 'met' by Waterdeep soldiers. Otherwise, you will have only direct combat left.
After victory, you will have the opportunity to free the trolls from the pen; they will rush to the main courtyard to take revenge on the crusaders for their imprisonment.
4. Catapult. After opening the gate to the central part of the courtyard, the catapult commander Held Morann will speak to you. He is obviously panicking and does not understand what is happening. Taking advantage of his confusion, the hero will order to fire at the passage to the castle. Held, without much question, will give the command. The catapult's projectile will destroy the squad of crusaders holding the passage, and the way for the coalition army will be opened.
Note: if you freed the trolls, they will be the first to reach the catapult. In this case, Held Morann, noticing the monsters, will reflexively order to open fire from the catapult, forgetting to aim at the trolls first.
5. Battle. Bursting into the castle courtyard, the army will confront the main forces of the crusade. Depending on past events, among the enemy soldiers there will be:
Leopa's squad, which may be missing up to three fighters (see walkthrough, part 6 - DZD, p. 3);
Beno Famari, if he hasn't died by your hand earlier (see walkthrough, part 6 - DZD, p. 8);
officer Delend (see walkthrough, part 6 - DZD, p. 12);
Righ and Julann, if you failed to prove to them Heferna's corruption (see walkthrough, part 6 - PR, p. 7);
mage-archanist Strank and water elementals, if you let him pass in the underground river (see walkthrough, part 6 - PR, p. 19);
adjutant Delgar Manch, if you surrendered Bridgefort to the crusaders (see walkthrough, part 5 - retrospective).
The best way to survive in battle is to stay away from it. The coalition will handle everyone in the courtyard quite independently. But if you decide not to stay on the sidelines, then a good option would be to arm the characters with ranged weapons and throw projectiles from behind the backs of soldiers. Using skills and spells is not recommended, as rest is not available until the end of the siege.
Note: if you managed to poison the water and/or food in the castle (see walkthrough, part 6 - PR, p. 27 and 28), you may notice that some crusaders periodically succumb to the 'fear' effect.
Tip: if the passage to the courtyard opened with the help of the barrel of explosives placed in the caves, you can bypass the battle along the southeastern wall and penetrate into the eastern part of the courtyard to free the trolls. Extra fighters won't hurt.
6. Ashatiel. When the main forces of the crusaders are crushed, Torsin de Lensi will approach you. He will inform you that the central courtyard is occupied, however, new forces are constantly advancing from the camp in the western part of the courtyard. Therefore, before breaking into the inner courtyard, you need to stop the flanking attacks. After the conversation, head towards the tents to the west, but be careful, the southern path is littered with traps.
Southern Path
On the way, you will encounter a squad led by Keilar's 'right-hand' named Adras Ashatiel. In the dialogue, she will challenge the hero to a duel. You can refuse, and then she, with her squad, will attack. In this situation, it is better to retreat back to the coalition army; the enemies will follow you and fall into a trap.
If you agree to fight in a duel, you will be transported, opposite each other, to a small clearing between the tents. Ashatiel possesses spells: Shatter, Stoneskin, Ray of Enfeeblement, Secret Word, Minor Globe of Invulnerability, Magic Missile, Blindness, Flame Arrow, and Command. She carries throwing daggers and a mace with a shield +2. A warrior can help with a Sword of Spell Shattering +2 (see walkthrough, part 4 - yawning pit). The mage should prepare dispel spells (Spell Pierce, Shatter, or Dispel Magic) and powerful fire damage spells (Aganazzar's Scorcher, Fireballs, and Flame Arrows). Upon victory, the remnants of the crusade will retreat to the north. As trophies, on Ashatiel's body, you will find: a small shield +2, a rogue's cloak, a golden belt (3 points of protection against slashing damage), a cloak of protection +1, a mace +2, gauntlets of class 5, and a ring of freedom of action.
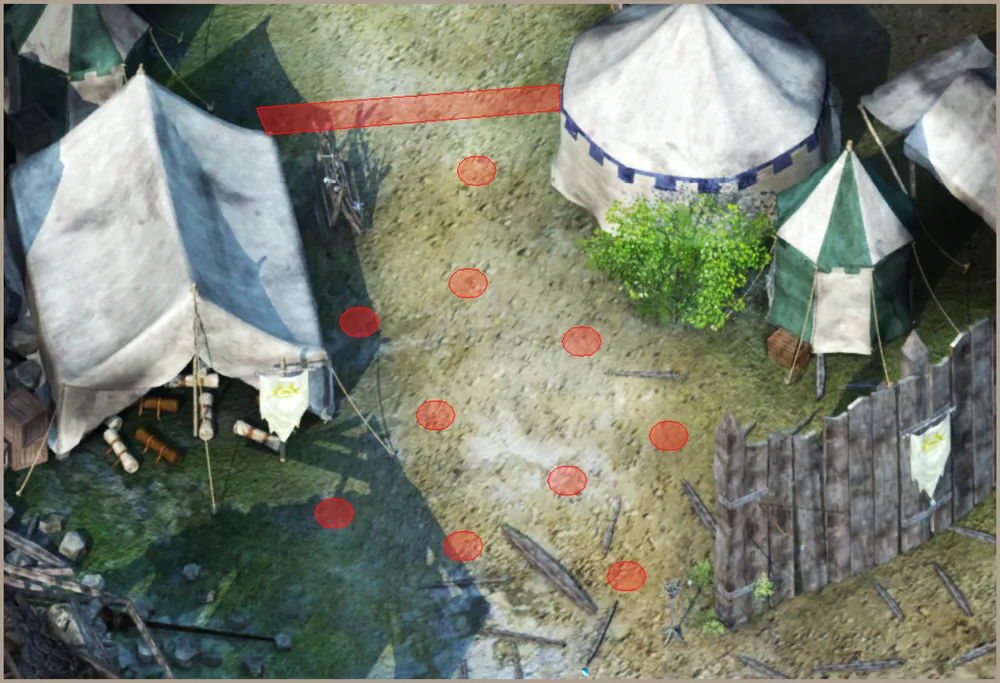
7. The Crusaders' Retreat. Following the fleeing crusaders, behind a wooden fence, you will encounter a squad covering the retreat. It consists of: Alexandria (priest), Aks Poet (barbarian), Blue Beard (fighter), Chloe (assassin), Dram (mage), and Tas (fighter). Additionally, if you surrendered or betrayed Bridgefort (see walkthrough, part 5 - retrospective), the squad will include Bargestr and Oloneiros. The passage to the northern part of the courtyard is protected by a trap.

Covering Squad
Chloe's position, hidden in the shadows, is marked with a red circle
A winning tactic will be the possibility to retreat back and impose combat in the narrow passage between the fence and the lower (from the fence) round tent. Heavily armored allies and summoned creatures will block the enemies' advance while archers and mages bombard them with projectiles. Another option is to lure them into the central courtyard to the army. However, the enemies will be reluctant to pursue the heroes, making this method potentially take significant time.
Upon victory, you will find: a dagger +2, a battle axe +2, a longsword +2, a spear-staff +2, a morning star +1, a heavy crossbow +2, a sling +1, a wand of heavens, a wand of frost, a traveler's cloak, a cloak of protection +1, and healing potions.
8. Prisoners. After eliminating the squad covering the retreat, go along the fortress wall to the north. On the way, you will encounter hostages threatened by two dogs. Their owner, named Therli, is nearby, and upon seeing the heroes, she will attack along with her pets. After eliminating the threat, on the body, you will find: a longsword +1, a medium shield +1, plate armor +1, and a simple helmet.
Among the surviving prisoners will be an individual named Urold. He will thank you for saving him and ask if the hero has seen his daughter Mijena. The hero will reply that he last saw her with the coalition army. Urold will rejoice at the good news and mention Tempus, the lord of battles. At this moment, you can incite a fight with him by saying that Tempus does not approve of weaklings who have been captured. For his death, you will receive 420 XP. If you release Mijena's father peacefully, you will receive 5,000 XP.
9. Gate to the Inner Courtyard. After dealing with the retreating crusaders, return to the main forces. Approaching the gate leading to the inner courtyard, you will see Keilar standing on the gallery. She will try to leverage her last weapon—charisma. Addressing the coalition army, she will attempt to convince the soldiers of her righteousness. However, after a brief verbal sparring with the hero, she will give up her attempts and teleport into the castle.
After the dialogue with Keilar, Fosse will approach the gates and set another explosive charge. As soon as the gates fall, the army will rush to capture the castle itself. Before you proceed, you can talk to Torsin and discuss the situation. He will be standing not far from the passage to the castle, at the head of the battle mages.
10. The Castle. Climbing the stairs, you will notice a sort of infirmary. Dosa will be present here, if she survived earlier. She will still offer temple services, still at the price of one coin (see walkthrough, part 6 - camp defense). Additionally, as a large part of the territory is conquered, there will now be an opportunity to rest.
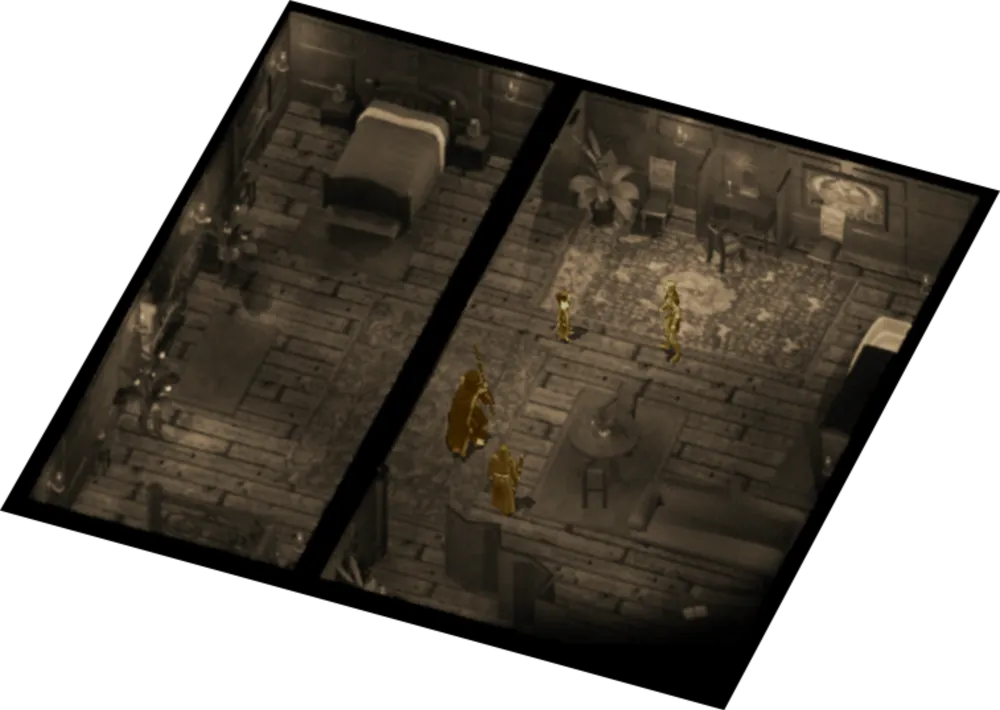
Another dream...
Once you finish your business, enter the castle.
Note: during the events on the Coastal Path bridge, the hero could summon an 'observer' named Gaut and (as a mage) send him against Dragonspear Castle (see walkthrough, part 3, p. 5). However, there is no sign or mention of him. Perhaps the monster did not reach its target.
11. Interiors. Once inside the castle, do not rush to descend into the basement; first, search the rooms. In the chests, boxes, and on the shelves, you will find many useful items: 40 acid arrows +1, 40 ice arrows, 40 arrows +3, two potions of storm giants, two potions of clarity, five potions of superior healing, five potions of fire protection, a potion of magic resistance, a potion of magic shielding, and spell scrolls: enchanted weapon, protection from fire, resistance to fear, chaotic orders, freedom of action, protection from poison, and protection from fire. Be careful; on the desk lies a cursed scroll of stupidity.
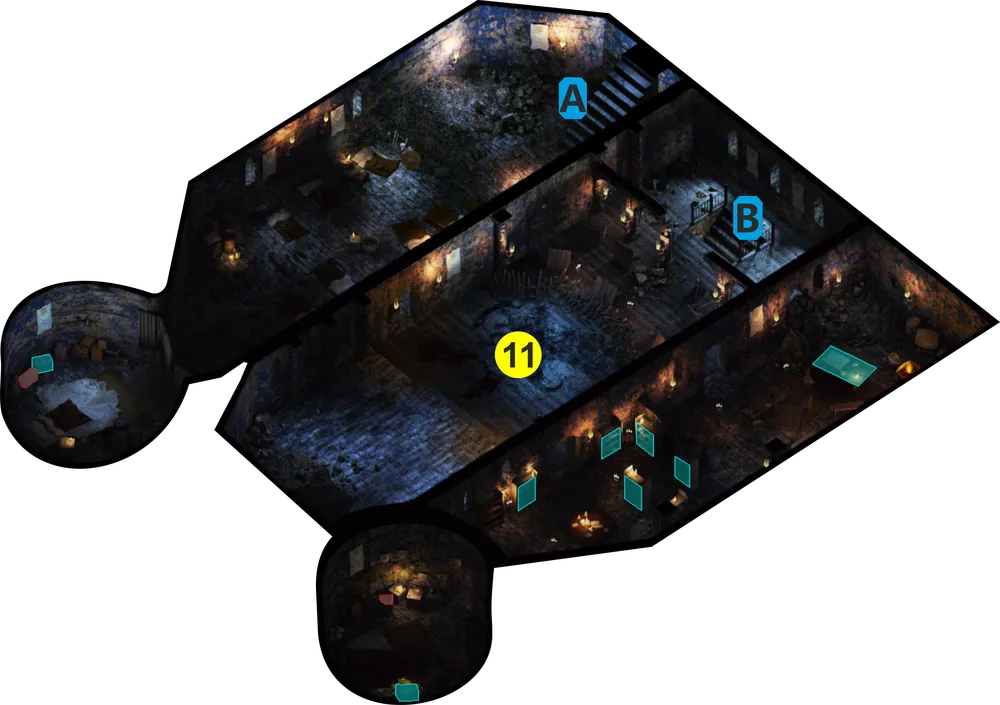
A - exit from the castle; B - descent into the basement.
In a small library, on the shelves, you will find various books, among them will be a book titled 'Visages of Evil.' It contains extremely useful information.
After finishing your search, descend into the basement.
Note: if you failed to find Ski (see walkthrough, part 6 - DZD, p. 1). Then you will meet her near a table on which lies a cursed scroll. She will tell how she was captured and forced to comply and cooperate with the enemy, performing 'unpleasant' tasks. But later, during the crusaders' retreat, a stranger in a hood saved her.
12. Locked Door. And again, the familiar basement. If you previously searched it completely (see walkthrough, part 6 - PR, p. 25), you will find nothing new. So go straight to the locked door.
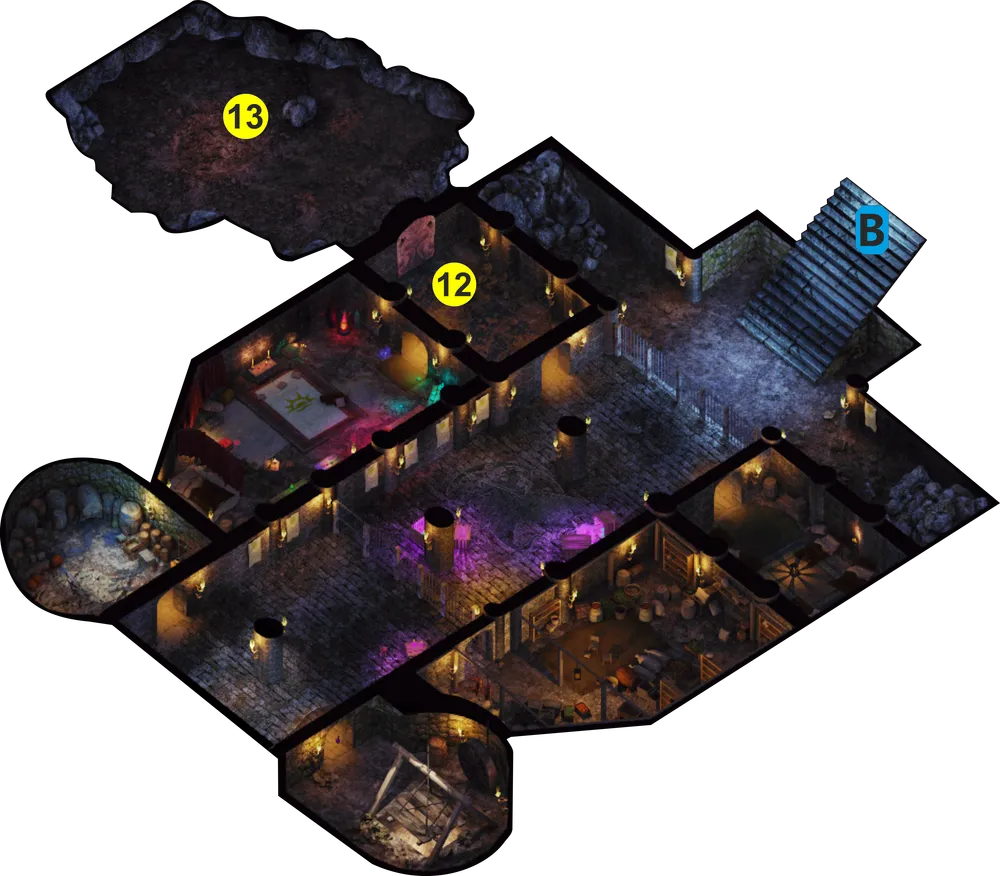
12 - locked door; 13 - closed portal;
B - exit from the basement.
Here you will meet soldiers led by Corporal Duncan. He will report that Keilar has locked herself inside behind this door, and there is no second exit from the cave, so she has nowhere to go. However, the squad is reluctant to rush in, as the coalition mages have sensed strange magical energies on the other side of the door. But now, since the hero of Baldur's Gate is present in person, the soldiers are ready to go into battle. Once you give the order to attack, the cutscene will begin.
13. Closed Portal. The hero's squad will burst into the cave first while the corporal's soldiers will cover the rear. Inside you will meet Keilar herself and her priest Hefernaan. In the dialogue, she will inform that everything is going according to her plan and during the siege she was 'playing along' to lure the hero into this cave. After the conversation, she will dismiss the invisibility spell from a quite numerous squad of elite crusaders. But at that moment, Hefernaan will cast a paralysis spell on everyone present. In confusion and impotent rage, Keilar will start to scold the priest and demand an explanation. Hefernaan will reveal all cards to her. It turns out, he had manipulated Keilar, pandering to her 'pious' whims, so that at the right moment he could seize the initiative and unleash devils from the Nine Hells.
After the dialogue, the demon-worshipper will approach the hero and make a stab with a dagger. The blood of the descendant of Bhaal will open a portal. At that moment, Bens Duncan will panic and, in his opinion, to prevent the demons from breaking free, will order to lock the door, thus cutting off the hero and his comrades from retreat.
When Hefernaan passes through the portal and the spells wear off, Keilar, with her crusaders, will rush in pursuit. And you have no choice but to follow them.
To be continued...