Siege of Dragonspear - walkthrough, part 8

Avernus, the first level of the Nine Hells, has shredded your senses. The stench of sulfur and sour milk fills your nostrils, coating your tongue and throat with nausea. Bitter moans of the damned echo from every direction, suffocating you.
As your teary eyes adjust to the dim light from the lava in the pit, you begin to feel the oppressive grandeur of the cursed wasteland surrounding you. Chasing the Shining Lady, you find yourself in the darkest place imaginable, and the pursuit is far from over. Corpses of crusaders litter the area, but there are no signs of Keylar herself.
**[Siege of Dragonspear - walkthrough, part 1](http://www.gamer.ru/baldur-s-gate/siege-of-dragonspear-prohozhdenie-chast-1)**
**
Siege of Dragonspear - walkthrough, part 2
Siege of Dragonspear - walkthrough, part 3
Siege of Dragonspear - walkthrough, part 4
Siege of Dragonspear - walkthrough, part 5
Siege of Dragonspear - walkthrough, part 6
Siege of Dragonspear - walkthrough, part 7
**
RETROSPECTIVE
Before starting this chapter, I think it’s important to notify of one nuance. As it turns out, during the defense of the camp, just before heading to the campfire to the south (see walkthrough, part 6 - camp defense, p. 1), you will have your last opportunity to reform your party. After this, there will be no more chances to do so until the end of the game.
AVERNUS

Portal
Around the hero lies a portal to Avernus, opened at the end of the previous chapter. Before entering it, you need to prepare. The theory on how to counter hellish scum can be learned from the book Faces of Evil, which you found in the library of Dragon’s Spear Castle (see walkthrough, part 7, p. 11). This book states that all demons are immune to fire damage and actively use fire magic themselves. Therefore, for mages, confidently clear spell slots of fire damage spells and add spells that protect against fire. For other characters, remove weapons and arrows, bolts, and other ammunition with fire damage, and prepare potions of fire resistance. Following the logic, one could guess that if demons are immune to fire, they could very well be vulnerable to cold. Ice damage spells (ice storm, cone of cold, ice touch, etc.) and ammo with the same property will come in handy. The book also mentions that some types of 'fiends' are poisonous and can poison or infect with diseases. So, antidotes, healing potions, and scrolls of protection against poison won’t hurt.
The remaining text of the book speaks of the abilities of stronger demons. In addition to the above-mentioned traits, they have an aura of fear, possess charm and illusion magic. Moreover, they cannot be harmed by ordinary weapons. Therefore, prepare potions and spells against fear and charm, equip magical weapons, preferably with a +3 index. It wouldn’t hurt for mages to fill a couple of slots with the enchanted weapon spell. These enhancements increase the magical power of weapons held by the selected character to +3. A scroll of this spell could be found in one of the chests of the castle (see walkthrough, part 7, p. 11) or earlier in the troll cave (see walkthrough, part 4 - LKT, p. 6).
In addition to the above, scrolls of the protection from evil spell (for mages) and mass protection from evil (for priests) will also come in handy. Naturally, having a large number of greater healing potions is vital.
Lower demons will periodically appear from the portal: lemurs (120 XP), imps (1,400 XP), hamatulas (6,000 XP), black abishai (7,000 XP), green abishai (8,000 XP), and red abishai (9,000 XP). You can safely rest between waves of enemies. A great and relatively safe way to test your strength.
When ready, go through the portal.

1 – crusader squad; 2 – angel;
A – staircase to the bridge.
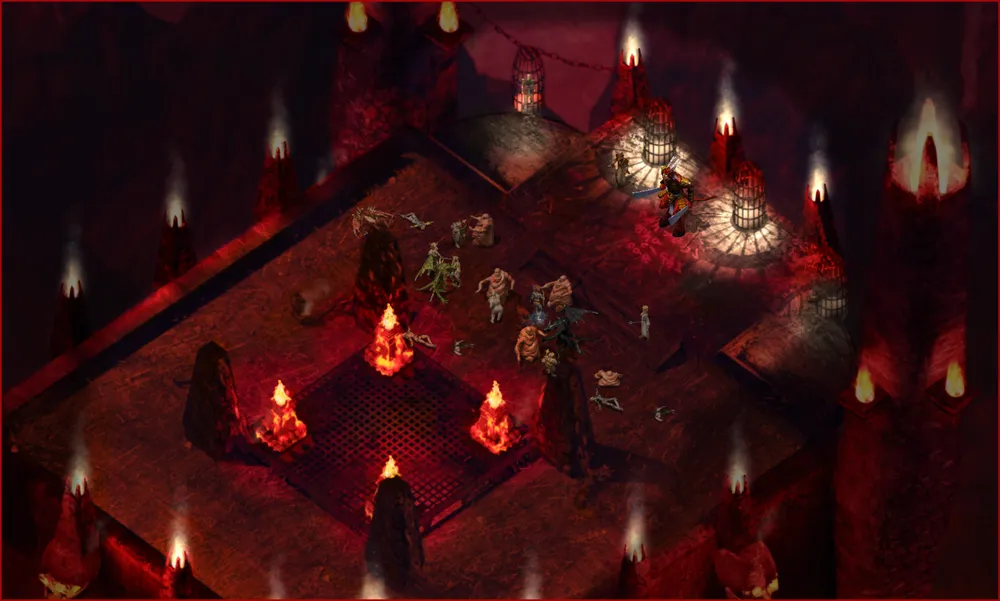
1. Straggling Crusaders. Once you step through the portal, you will find yourself on a plateau at the foot of a high staircase leading to the Basalt tower bridge. On your way there, you will encounter a squad of crusaders fighting a losing battle against demons. At the head of the demons is an erinyes (a subspecies of succubi that resembles a human girl with harpy wings) named Illyrrael. After a brief dialogue, she will attack the party of heroes. Be prepared; her first attack will likely cast terrifying charm on one of the heroes. Otherwise, you shouldn’t have any more surprises from her. The rest of the demons should already be familiar to you; they are the same creatures that emerge from the portal in the castle's cellar. However, there is one demon you have not encountered before — the Witch. In appearance and combat style, this hellish creature resembles a sneak (see walkthrough, part 4 - LKT, p. 2), but in addition, she can hide in the shadows. After dealing with the erinyes and her retinue, surviving crusaders will turn to you.
In the dialogue, crusader commander Darnass will thank you for saving them. You can either provoke them into a fight and kill them, or let them go in peace. In the second case, before heading to the portal, they may reveal some information. According to them, at the Gates of Baldur, the assassins sent by Keylar were supposed to capture the hero rather than kill him (see walkthrough, part 2 - DG, p. 3).
After dealing with the crusaders, take a look around. On Illyrrael's body, you will find a scroll with a transcript from the meeting of the higher devils. It will become clear that lord Hefernaan, a certain Destroyer of Ancient Foes, has been interested in the hero of the Gates of Baldur for a long time. However, he has gained a competitor, a mortal nicknamed The Exile. According to the Destroyer, he possesses immense power and can equally confront even such strong devils as those present at the meeting.
Note: Earlier, in the temple of Bhaal, during the description of the battle with Neofelid (see walkthrough, part 4 - HB, p. 13), there was advice to detach a partner who has fallen under charm so that they will stop being hostile until the charm's effect ends. Unfortunately, I must warn you that in this chapter, this trick does not work. The detached character will remain hostile, and since they are no longer in the party, the AI will automatically start attacking them. The worst part about this situation is that after the charmed and detached character takes damage from former allies, they will become permanently hostile.
2. Angel. At the base of the staircase, if you have any observation points left (see walkthrough, part 2 - TEP, p. 6), you might notice another shadow. Applying a charge to it will summon an angelic maiden named Idiletia.
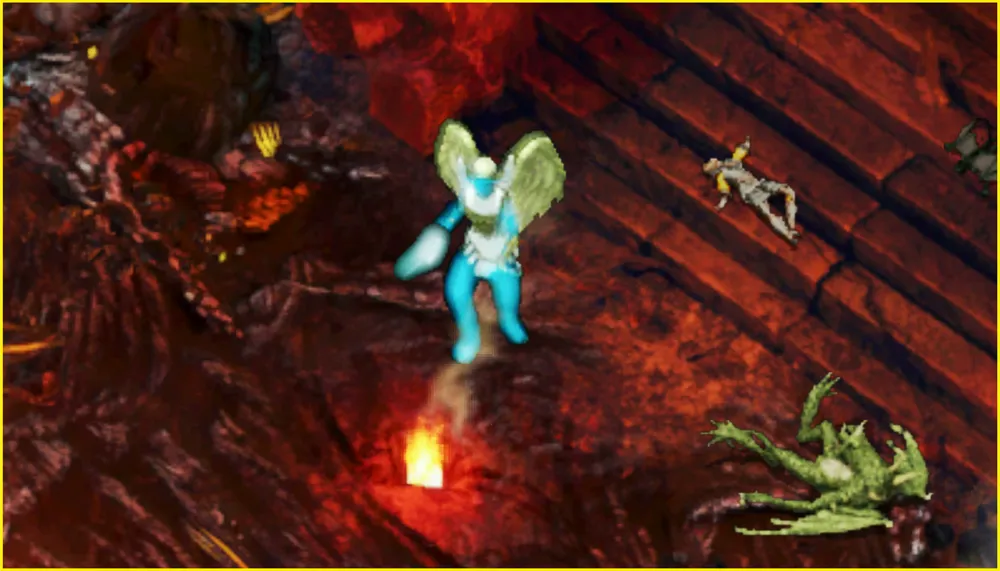
Idiletia
The angel will not be pleased that she has been summoned to the depths of hell. If you are rude in the dialogue, she will attack. As an opponent, Idiletia is quite strong, and the fight will be tough if the party’s arsenal is prepared for battles with demons as described above. The angelic maiden is weak to spells but immune to ice damage. However, magical weapons work excellently against her. Therefore, to win, send fighters equipped with such weapons to the front while priests and mages should support them with healing and protective spells. Keep in mind, the angel frequently uses dispel magic, so defensive and enhancing spells on warriors will not last long. Additionally, her blows not only deal immense damage but may also stun your warriors. You might hold her using the web spell, taking care to use potions and spells for immunity to restraint or equipping a ring of freedom of movement (see walkthrough, part 7, p. 6), or shoot her with magical ranged weapons (you will need magically enhanced ammunition of at least +2). To your dismay, there’s another surprise from her. When the maiden's health drops to its lowest, she will use healing and fully restore her health. This can extend the battle significantly, especially if you’ve already used your main arsenal. After surviving a second round, you will finally defeat her. You will earn 15,000 XP for defeating Idiletia. Unfortunately, nothing will drop from the angel's body.
If you behave correctly and take responsibility for the summoning, the angel will not attack, but the dialogue will be interrupted by suddenly appearing demons. Overcoming the beasts together won’t be difficult. After the battle, the angel will chastise the hero for thoughtless use of summoning and will teleport away. In this case, there will be no reward or XP.
After you are done, ascend the staircase.
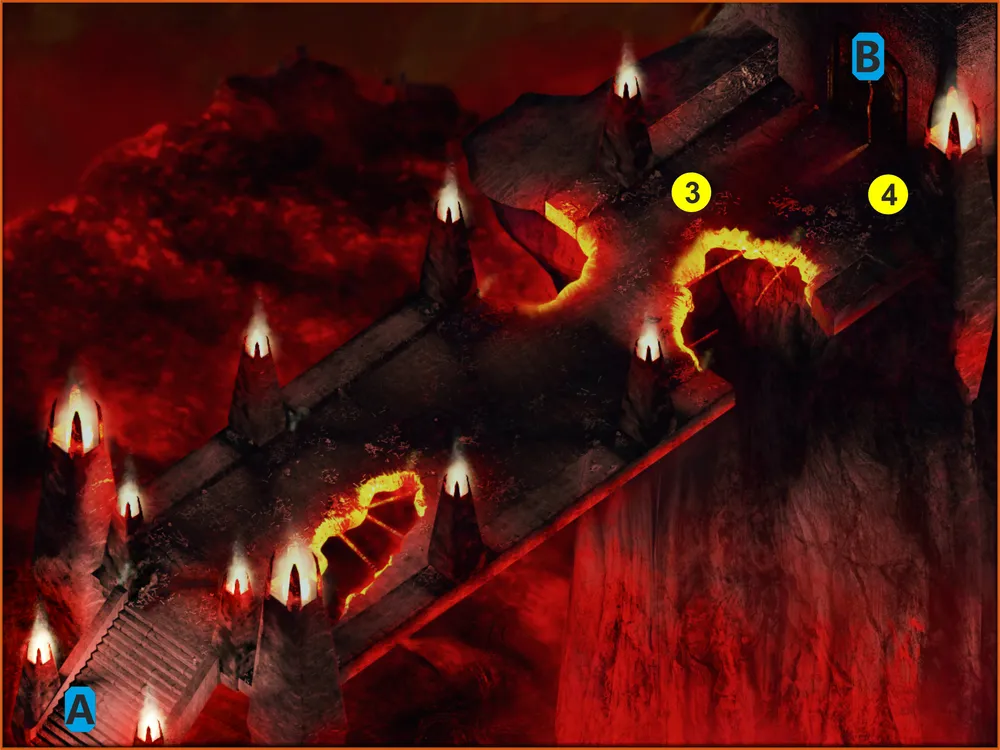
3 – Keylar; 4 – Gate Guardian;
A – descent to the portal; B – entrance to the tower.
3. Keylar. As you make your way across the bridge, you will encounter a small group of lower demons, similar to those that came out of the portal in the castle’s cellar. Therefore, they should not pose a problem. Getting closer to the entrance of the tower, you will finally catch up with the elite crusader squad led by Keylar, or rather, what remains of it.
After eliminating the last demons, one of Keylar's crusaders will speak to you. He will be displeased with the situation. The Shining Lady promised they would reclaim the souls captured by the devils, including his wife and children. But now, he sees only more deaths of his comrades, and Keylar has changed. According to him, she has lost all sanctity, and her eyes now hold only madness. Enraged by his words, Keylar will threaten her subordinate with punishment, but at the last moment, she falters. At this moment, the main hero will intervene in the dialogue. After a brief verbal exchange, the Shining Lady and her squad will enter the tower, and the gates will close.
4. Gate Guardian of the Tower. As soon as the hero's party approaches the locked gates, a cornugon named Trix the Defiler will appear nearby. In dialogue, he will inform that his lord does not wish to allow the hero into the tower until he deals with Keylar. After the dialogue, Trix will summon his 'colleagues' to battle the hero.
Trix the Defiler
The summoned squad of demons resembles the one that attacked the stragglers from the Shining Lady (see above, p. 1). However, there will be more 'fiends' this time, including previously unencountered bone demons. At the head of the demonic squad is another erinyes. Like her predecessor, she can charm one of the heroes with her first attack. Since there are no crusaders to distract the demons this time, the battle will be harder. Most trouble may come from the Witch. Attacking from the shadows, she can deal immense damage and may prey on vulnerable heroes (mages or priests).
A good tactic against these 'fiends' would be to retreat to the narrow passage on the bridge between the two molten edges. Then, have the warriors block the passage while mages cast protective spells against fear and, if possible, against ice. Afterward, unleash an ice storm on the demons. Once the lesser demons are destroyed, taking down the demoness will be easier, but keep in mind, if you get too close, the erinyes may use invisibility.
After victory, address Trix. The Gate Guardian will be impressed by the hero's strength and decide that he is capable of killing the lord. According to Trix, he is tired of serving his master and wants to break free. For this reason, the demon agrees to let the hero into the tower, but under one condition. Since nothing can be given for free in Avernus, the Defiler proposes a wager: if the hero wins, the demon will let him into the tower and grant him a powerful item. However, if he loses, Trix will let the hero pass but claim the soul of one of the companions when their mortal life ends. In turn, you will have a choice:
refuse, and the guardian will open the gates but summon new demons to punish the hero, teleporting away himself;
agree, Trix will set a riddle, but before that he will start bargaining over which soul the demon will take in case of the hero's defeat. In the dialogue, he will randomly select one of the companions. However, you can only finalize a deal if the character in question does not object, or if none of the present will intercede for them. Otherwise, the demon will choose another target. If negotiations come to a standstill, you can put the soul of the main hero on the line. The demon will gladly agree to such a condition.
The riddle itself goes as follows: “It is a useful tool, though many despise it. In the light, it topples kingdoms, and in the dark, it unites peoples. The poor are subjected to it every day, and kings fear it the most. You are born to serve it, but by it, you will likely fall. What is it?”. The answer is — murder.
Upon answering correctly, the demon will open the gates to the tower and offer to choose one of three items: the Biting Tongue +3 (10% chance to slow the target for three turns), the Devil-Guardian Helmet (immunity to critical hits, +15% resistance to slashing, piercing, and bludgeoning damage, cannot be used by good characters) or the Echo of the Devil Staff +3 (once a day to cast the red fire shield spell, 5% chance when hitting to cast the spell fire of the sun, triggering a fire wave). By the way, Trix does not want to part with the staff and will encourage you to reconsider. But a deal is a deal, so you can insist on your choice.
If you fail to solve the riddle, Trix will open the gates but warn that when the time comes, he will come for his due.
Note: If you want to kill Trix himself, during the battle with his 'colleagues', deal him damage. Why only during combat? In other circumstances, he will summon demons and teleport away. After taking damage, Trix will become hostile and summon more demons. Therefore, it is best to challenge him when there is only one enemy left from the first wave. Trix is a quite powerful demon, deals a lot of damage, and can teleport to his target, making it impossible to block his way with warriors if he aims for an archer or mage. You will receive 10,000 XP for his death. In addition, there is another way to resolve the situation with the guardian. During the first conversation with Trix, if you choose the option: “I don’t have time to talk to you; I have a tight schedule,” and then: “Can I pass?”, the guardian will not call for demons but will keep the gates closed. Also, you cannot start the dialogue with him again. In this situation, your only choice left is to attack him. After dealing damage, Trix will summon a group of erinyes and engage in battle himself.
Either way, a way opens up further ahead, into the Basalt tower.

5 – demon of the abyss; 6 – lift lever;
B – exit from the tower.
5. Demon of the Abyss. In the tower, you will see only one room in the center of which there is a lift to the top. If you have any observation points left (see walkthrough, part 2 - TEP, p. 6), you might notice another shadow near the lift. Applying a charge to it will summon an abyss demon named Xot.

Xot
Upon entering the tower, the demon will immediately attack. From spells, he only uses mirror image, true sight, and confusion. However, he is very strong on his own, dealing immense damage with his strikes, and is quite durable, capable of withstanding a significant amount of damage.
After a brief fight, Xot realizes that enemies have not come into his abyss but that he has been summoned from it, directly into Avernus, the lair of his hated rival. In dialogue, for such a rare opportunity to get to this place, he offers to part ways peacefully. If you agree, you receive as a gift the sword Gift of the Demon +5 (THACO +5), but don't rejoice too soon about this fortunate acquisition. Gifts from such strong and cunning demons always have a catch. This sword is no exception; after five strikes, its power will drop to +1 (THACO +1), and the sword is cursed, making it removable only with the remove curse spell.
If you do not agree to a truce with the demon, the fight will continue. To kill the demon of the abyss, you will first need to remove his mirror image. Here, spells like oracle or detect illusion will help. You’ll need two such spells, as after dispelling the first mirror image, Xot will immediately cast a second one on himself. Next, since the demon can employ the highly unpleasant spell confusion, it would be prudent to protect all characters from this magic. You can use priests' spells like chaotic commands and clarity potions here. After removing Xot's magical defenses and protecting your heroes from his magic, transition to a counterattack.
Just like in the case with the angel (see above, p. 2), the abyss demon is weak against magic attacks but vulnerable to magical weapons. He cannot dispel magic. Therefore, the enchanted weapon spell will come in handy. Warriors enhanced with spells and weapon effects will be able to stand up to the demon. By defeating Xot, you will earn 12,000 XP. Sadly, no items will drop from his body.
Demon of the Abyss Xot is the last of the otherworldly entities that can be summoned using Zaviak points. If you have not been overly greedy in using charges, you should have run out at this stage and the quest will end.
Note: If you still have an extra charge left, use it on any companion. There will be no consequences for that companion. The quest will conclude after the charges are exhausted.
6. Ascent. It is time to put an end to the threat of the devils; take a break and prepare for new battles. Then press the lift lever located on the far wall of the room.
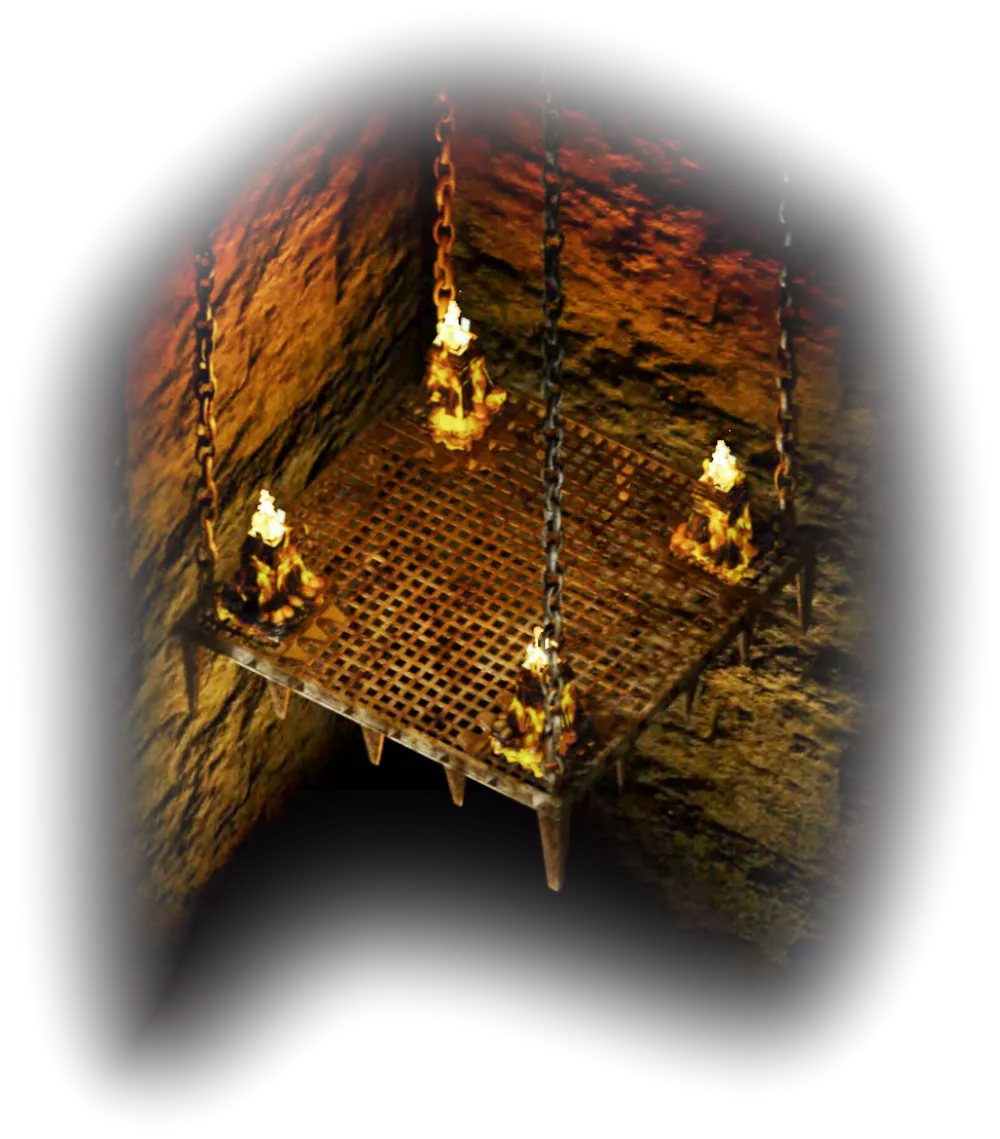
Lift
During the ascent, you will face several waves of demons, during which, naturally, you cannot rest. This time, the arena is very narrow, so the best tactic will be circular defense in the center of the lift. Unarmored heroes should take the central position while warriors encircle them. As maneuvering will not be possible, ensure the party has maximum protection: spells like magic shield, protection from evil, resistance to fear, enchanted weapon, various potions to enhance abilities, resist magic, fire, etc. Under these circumstances, a good maneuver with cold magic can be executed. Cast protection from cold on the whole party, and when the enemies appear, unleash an ice storm on them. The storm will deal immense damage, including to those who are invisible.
In the first wave, there will be lower demons: imps and lemurs. They shouldn’t present a problem. The next wave will consist of various types of abishai and witches. There could be problems with the witches, as they become invisible and deal immense damage. If two such creatures appear in one wave and attack a single unarmored character, they will be guaranteed to kill them. A good way to deal with them will be the aforementioned storm trick. The third assault will consist of abishai and bone demons. They will not apply significant pressure.
After three waves, the lift will finally reach the top of the tower.
7. Final Battle. Upon reaching the top of the tower, you will witness a battle between Keylar and her few remaining crusaders against the mighty devil named Belhifet and his entourage.
Top of the Tower
As a result, Keylar will be thrown back by the devil, and the remaining crusaders will fall one by one at the hands of the demons. However, Belhifet’s entourage will also perish, except for one — Hefernaan. Desperate, the Shining Lady will acknowledge her defeat and cease resistance. At this moment, the devil will notice the heroes and greet them. In the conversation with him, Hefernaan and Keylar will reveal the truth.
It turns out that behind all the recent events stands the devil Belhifet. A long time ago, about a hundred years ago, he had already broken into the mortal world but was thrown back into Avernus, and the portal sealed behind him. Since then, he has dreamed of escaping from hell. One day, a restless girl, in whom the blood of her divine ancestors awoke, ignoring the prohibitions, sneaked into a closed section of the Astra Order's library. In it, she read a book that was forbidden. As a result, the girl was transported to Avernus inside a locked cage and became a prisoner of the devil Belhifet. But she did not remain in captivity for long. The girl's own uncle, Aun Argent, a devout servant of Astra and a valiant paladin, freed her. He offered his soul in exchange for Keylar’s soul. The devil agreed without hesitation. Suffering from guilt, she vowed to liberate her uncle at all costs. But this was what the devil wanted; he had sent his servant Hefernaan disguised as a priest to help and direct her in this endeavor. Since only divine blood could open the portal to the Nine Hells, they initially planned to do this with Keylar’s blood, but they failed because, due to many generations, her divine power was very weak. Later, they learned that a direct descendant of the dead god Bhaal had appeared at the Gates of Baldur. In the end, they gathered a crusade under the slogan of liberating the souls of the wretched victims of demons and began planning how to obtain his blood.
According to Hefernaan, Keylar is actually indifferent to the fates of other victims; she gathered the crusade by manipulating people solely to free her uncle's soul. Keylar will deny this, but as can be seen, she herself has come to believe her legend.
After the conversation, you will have a choice that will affect the power dynamics in the final battle:
The first option is to call upon Keylar to atone for her sins by joining the party against the devils. This will inspire her, and she will side with the hero.
The second option is to ignore Keylar and challenge the devil. For this, during the dialogue, at a certain moment, you must choose: “I don’t care what lie brought Keylar here; now you will pay for the evil you have brought upon the Sword Coast.” Then, in response to Hefernaan's query about the seriousness of the threat, answer: “Well, yes!”. In this case, Belhifet will incinerate Keylar in a column of fire and attack the heroes.
The third option is to gloat over Keylar's predicament. In this case, she will plead for mercy and offer the devil a deal. She will become his loyal servant in exchange for the soul of her uncle and the death of her now useless helper Hefernaan. Belhifet will accept the condition and kill his servant. He will then turn the Shining Lady into his Black Guardian.
Either way, the battle will commence. Generally, the dialogue choices won’t drastically change the tactics to fight Belhifet.
As a greater devil, Belhifet is immune to simple and weak magical weapons. Therefore, he can only be harmed by magical weapons of +3. Characters without such weapons will be aided by the enchanted weapon spell. The devil primarily fights in close combat, periodically hurling fireballs, casting hold person, and symbol: pain, but the arena will frequently be struck by meteor swarms, dealing fire damage to all present. Thus, ensure your heroes have good fire protection. Potions and spells for fire protection and a scroll with the green rune protection from fire will help. All three effects stack, providing 127 points of fire protection and 50 points against magical flames. Additionally, red fire shields will be useful for mages, adding another 50 points against magical flames. Naturally, having protection from evil and a storm giant’s strength potion for warriors will also help. In addition to bolstering your defenses, you can weaken Belhifet's defense using spells like resistance reduction (reduces the target's magic resistance) and great curse (lowers the target's saving throws). The devil will frequently teleport around the location, attacking different heroes, so character mobility is crucial in this battle, and the haste spell will also be useful.
Another headache will be Hefernaan. He will reveal his true demonic form and utilize familiar abilities like fear aura, charm, and confusion. If instead, the Black Guardian Keylar replaces him, the pressure on the warriors will increase as she is a tough opponent in close combat but has no spells or abilities. In this case, potions of resilience and a great many greater healing potions will be necessary (I hope you stocked up on such). The