Strategist's Corner. Operation Metro. Capture.
"Strategist’s Corner" is a series of original articles that detail tactics for both team and (partially) solo play across different maps and modes. It gives advice on what to use, where to place items, and how to play with different characters.
[cut]
This article is not a standard.
You can use this article as a template to create your own, more refined tactics.
_________________________________
Briefing:
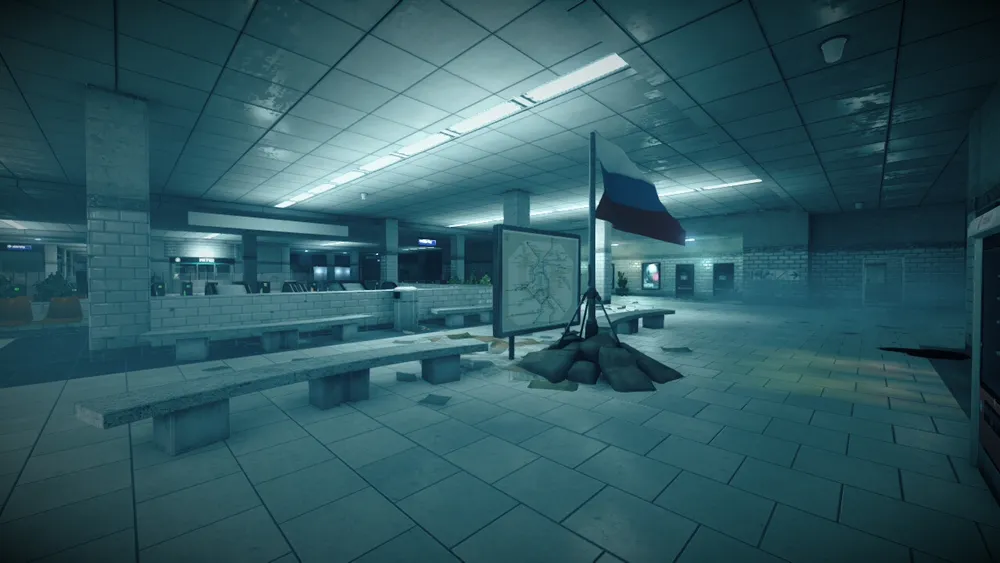
Map: Metro Operation
Mode: Conquest
Number of Players: 16x16 or more
Minimap: On
For team play:
Player Level: 37+ (to unlock all squad abilities)
Presence of voice communication between players: Mandatory
_________________________________
Since this article will be rich in text and images (after all, it is important not only to tell but also to show), and since playing with different teams (USA or RF) implies different tactics, I will place each team’s tactics under separate spoilers to avoid confusion.

Tactics for the USA (Passive Attack)

Starting the round as the USA team, you will need to run along the tunnel, capturing **point "C"** without hindrance, and proceed to three different passages to **point "B,"** which always become centers of fierce clashes between teams.
We will conditionally name these passages:
"Tunnel"

"First Escalator"
"Second Escalator"
At the very beginning of the round, while the countdown is ongoing, your team members should orient themselves and determine who is closest to the capture points.
The three closest players to the capture points should run non-stop, bypassing point "C," racing towards the three different paths to point "B".
This way, you will gain an advantage in capturing point "B" quickly, giving you a significant advantage in battle, and allowing you to push the enemy back to point "A."
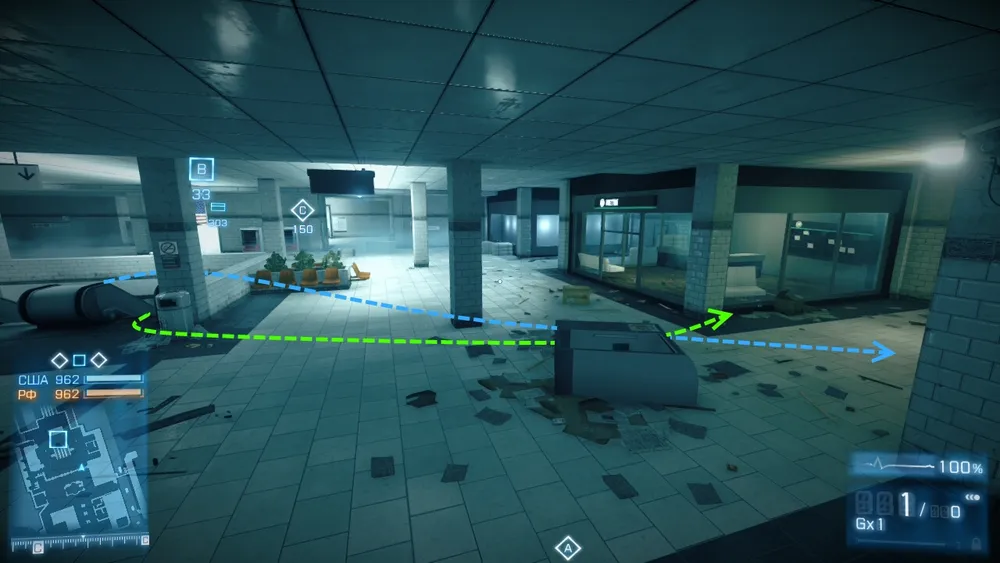
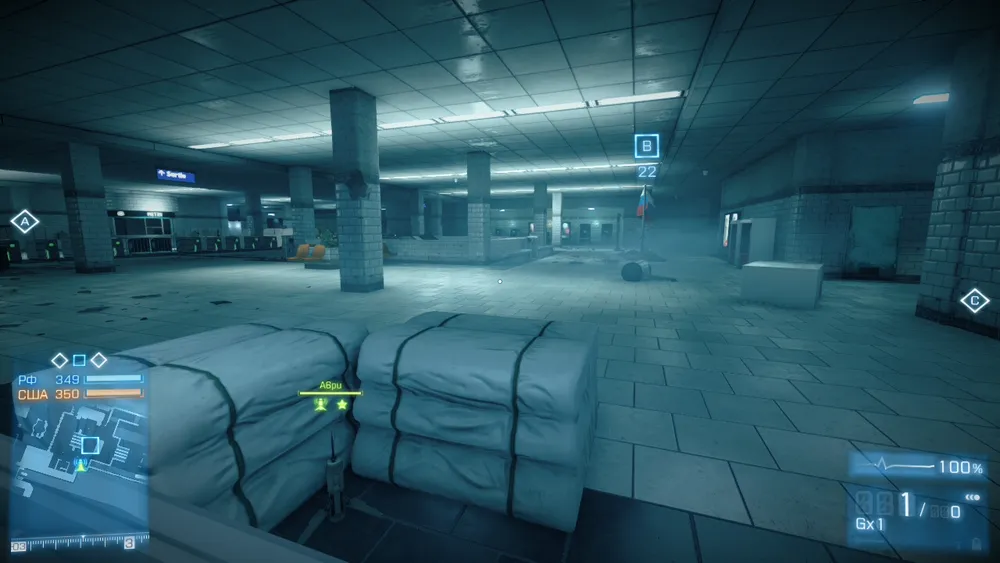
For example, if your assault soldier reaches "First Escalator" first, he can shoot a smoke grenade at the column (to the left of "Second Escalator")
and run to hide behind the white bags.
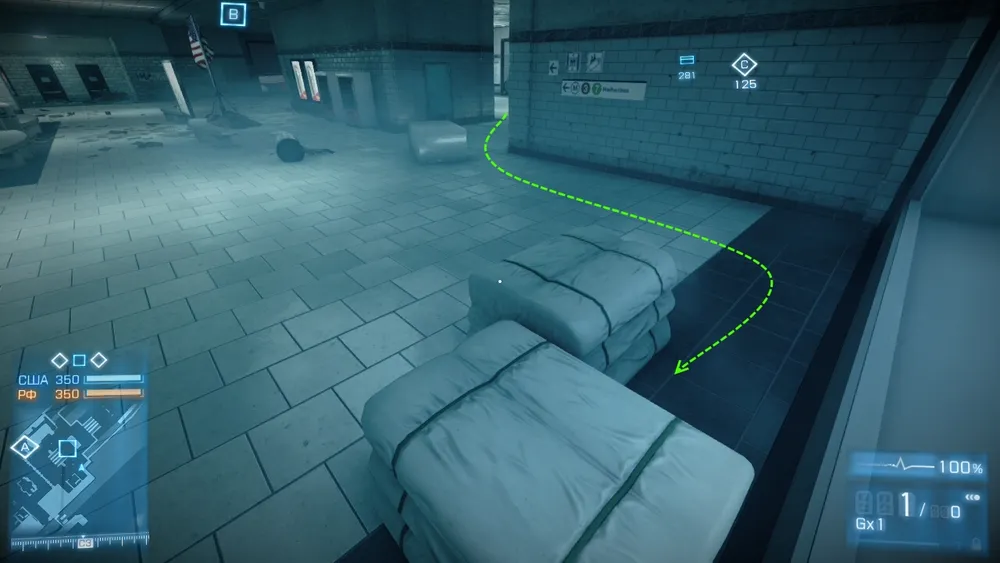
If all goes smoothly and the enemy does not notice him through the smoke cloud, he can easily "clear out" the enemy-guarded path to "Tunnel" from behind the bags, or eliminate all/part of the enemies at "Second Escalator."
The key here is to calculate the location and number of enemies in the supposed clearing area correctly. Decide which enemies you will take on and which should be killed by your teammates. Then communicate this information to your teammates (over the microphone, of course) and give them the signal to break through at the right moment.
Control of Captured Territory

If your sprinting teammates didn’t capture **point "B"** first, your team will have to "entrench" for some time in the currently controlled territory, i.e., the entire lower level of the metro.
By "entrench," I mean: placing Claymore mines, SOFLAMs, motion sensors, and respawn beacons.
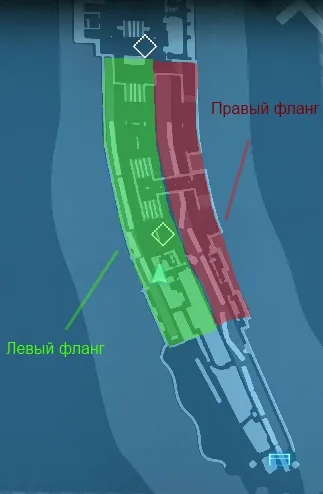
The territory under your control can be conditionally divided into two flanks: left (railway tracks on the left and the central platform) and right (railway tracks in the center and platform on the right).
Placement of Claymore Mines
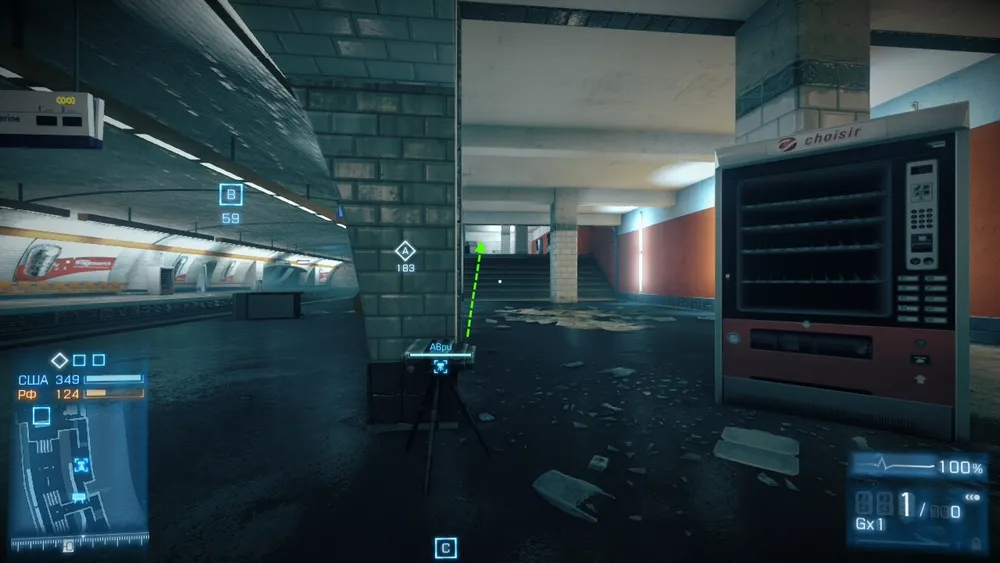
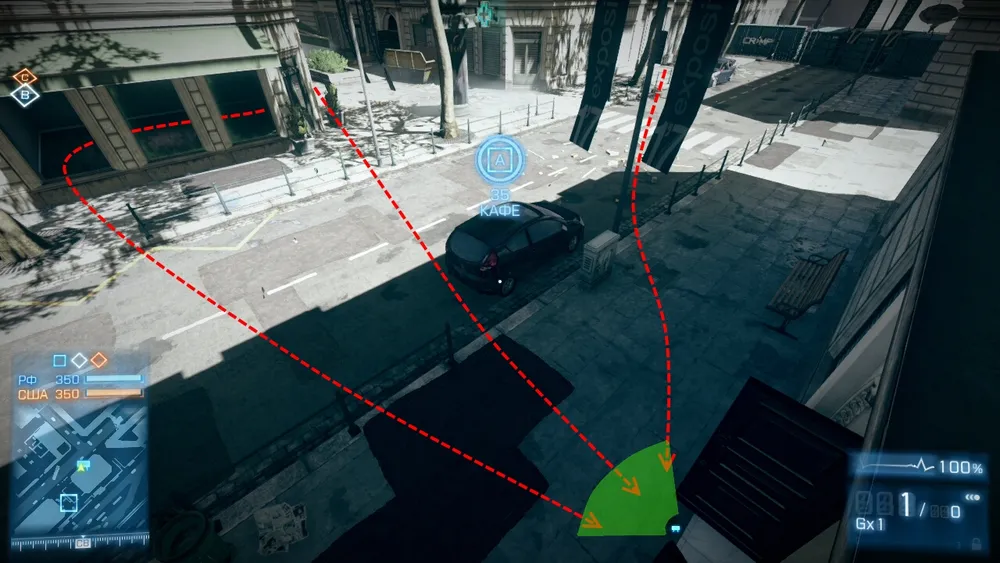
If your teammates somehow fail to hold back the enemy's advance at one of the passages to point "B," you should anticipate such a turn of events and mine some secluded spots that the enemy might use to outflank you.
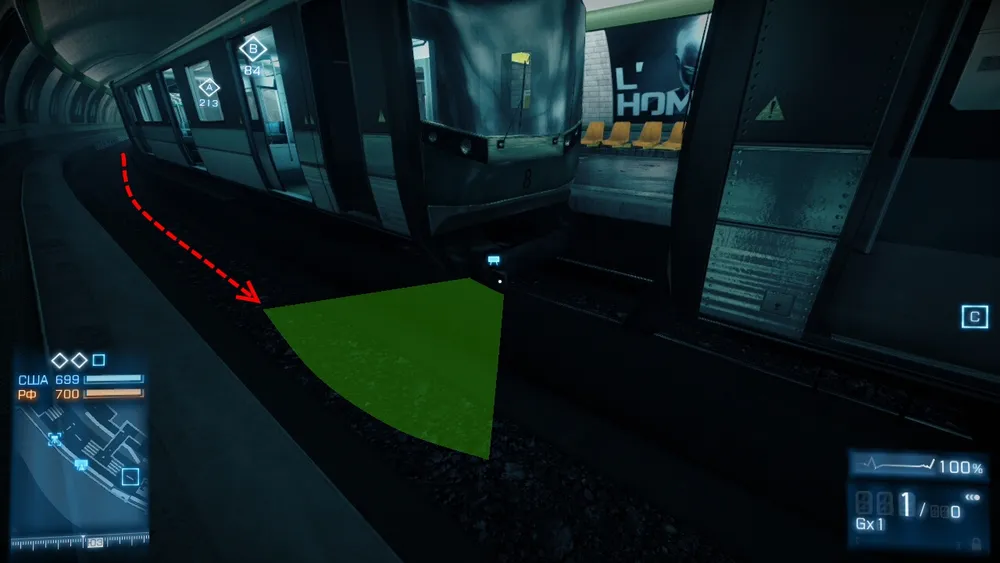
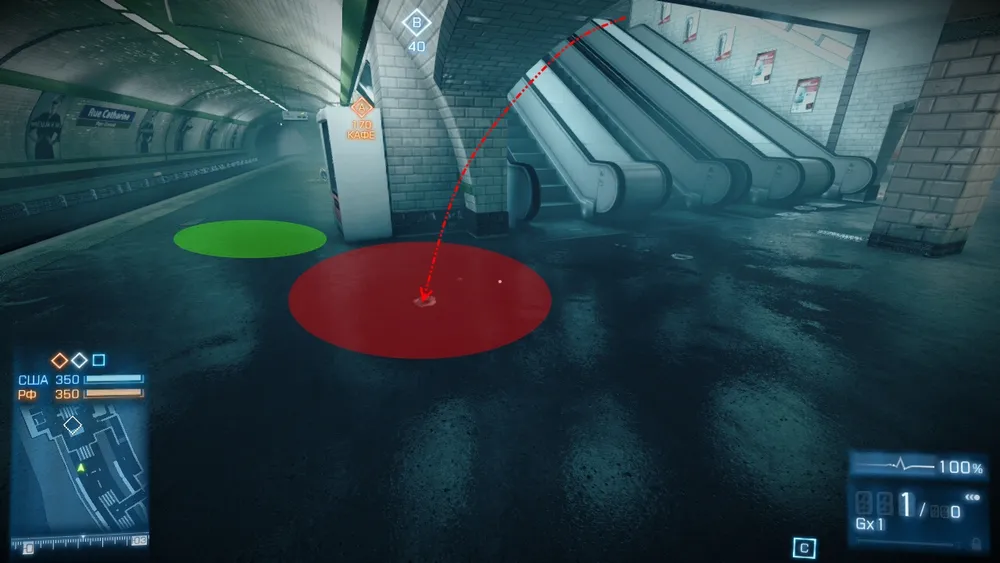
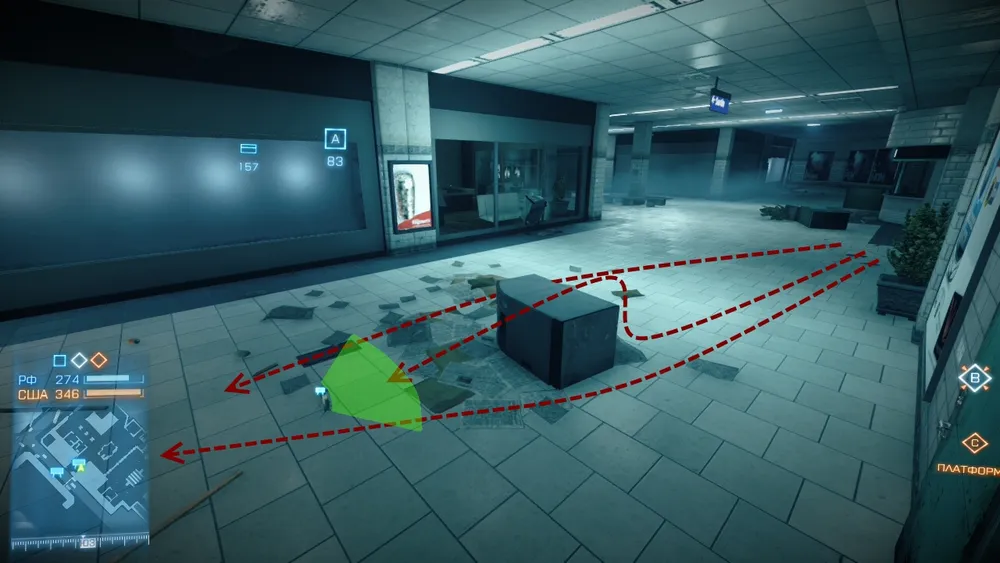
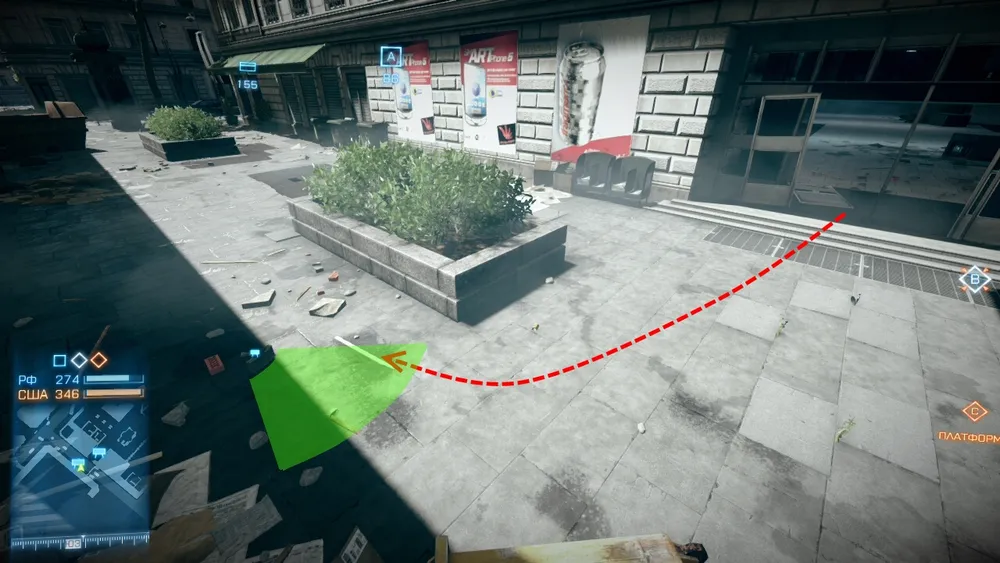
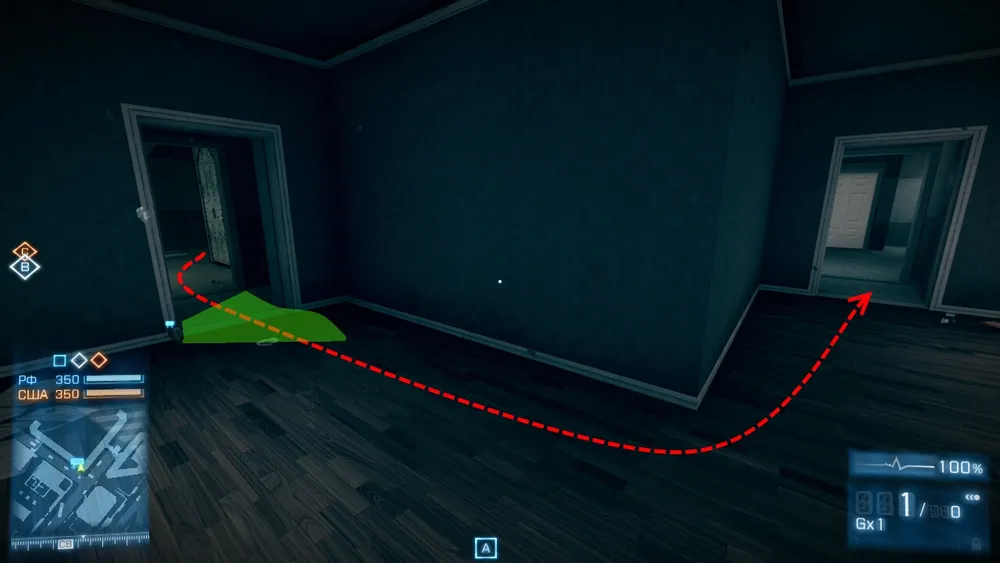
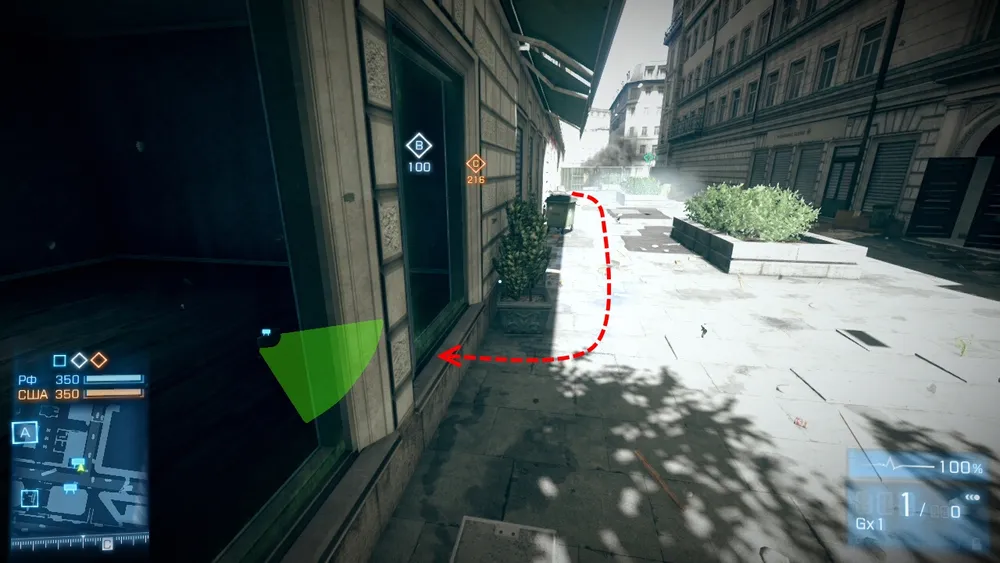
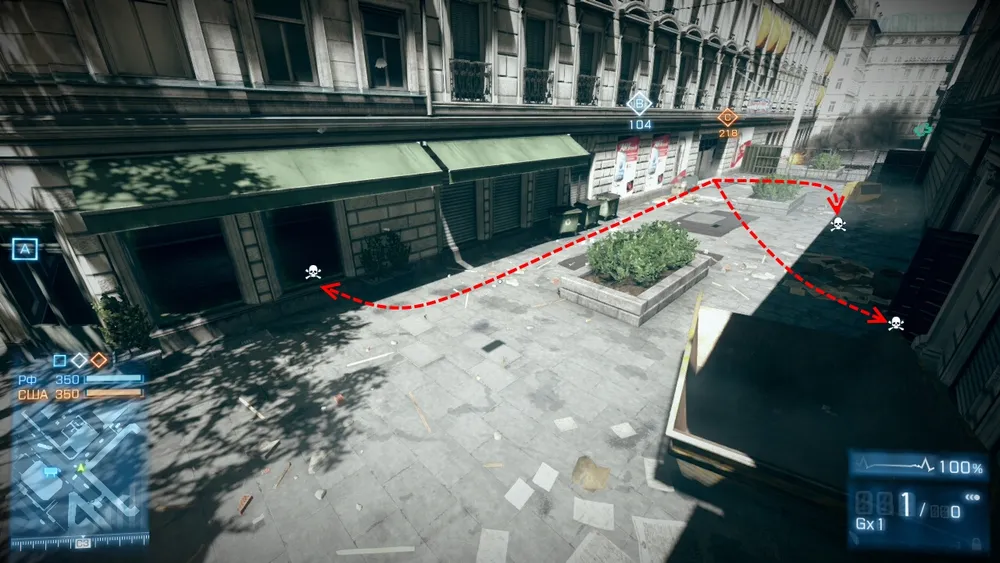
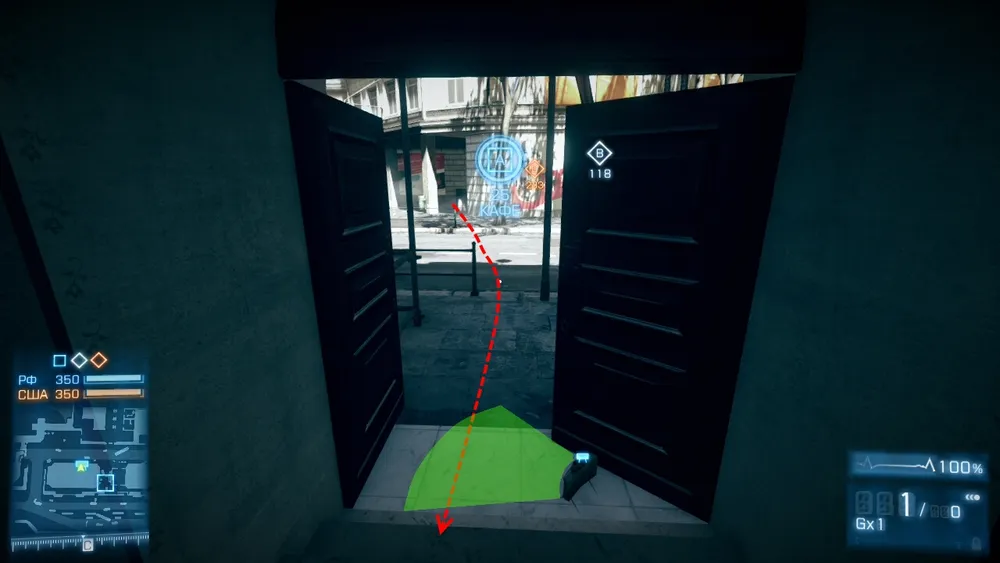
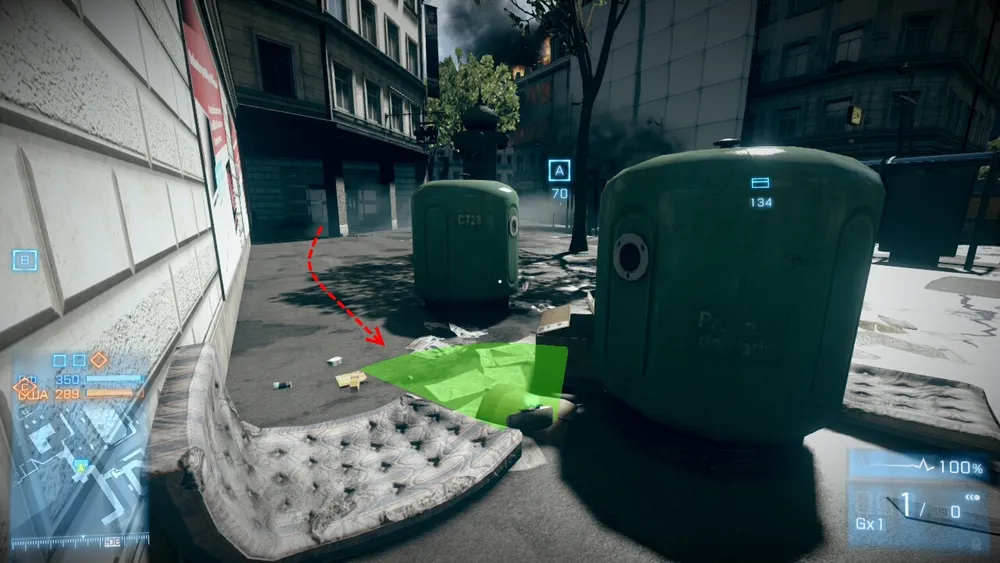
Red dashed lines — possible paths that the enemy may take. The player's hitbox is much wider than the dashed line!!!
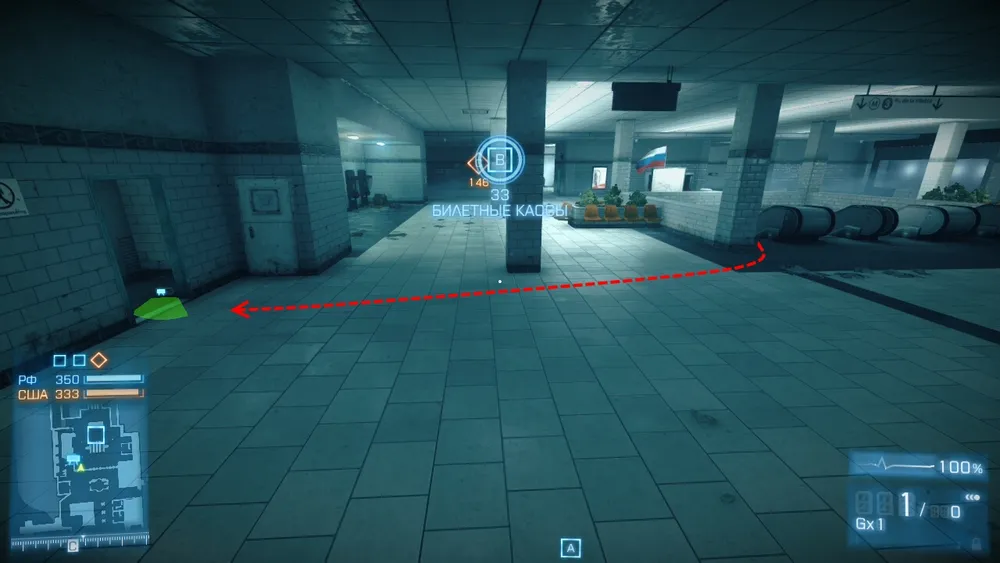
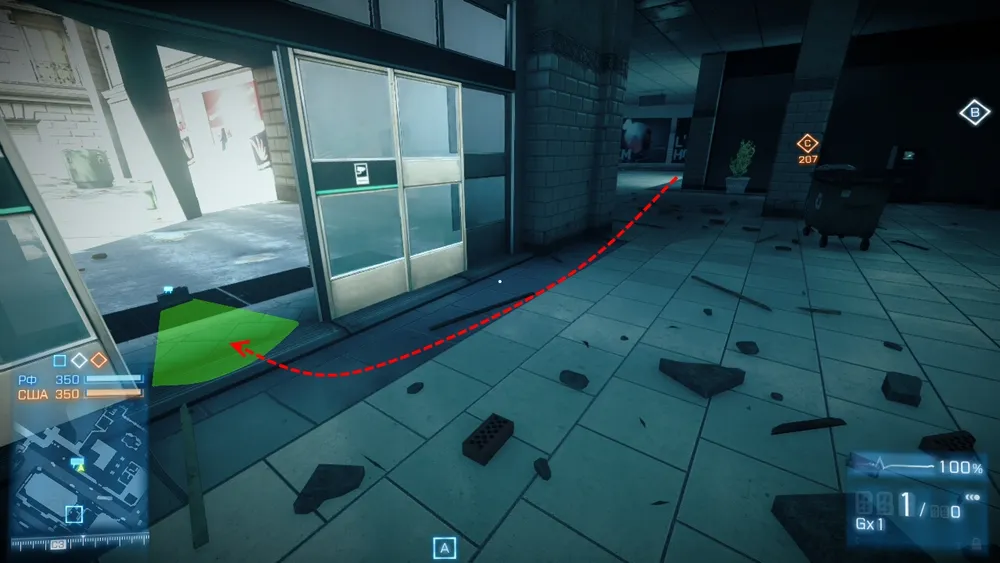
Green zone — this is an approximate kill radius of the Claymore mine. When the enemy enters this zone, they activate the mine and blow up.
Along the left flank are two passenger trains standing closely together. There is a passage between these trains and the wall that the enemy might pass through if they break through from the "First" or "Second" escalators.
Thus, between the trains, there's a spot where you can place a suspicious Claymore mine right on the tracks.
Sometimes the enemy breaks through via "Second Escalator," shooting smoke grenades at the base of the escalator and running towards a corner at the top of the escalator or the tunnel.
They mainly run along one path, and you can place a Claymore mine here.
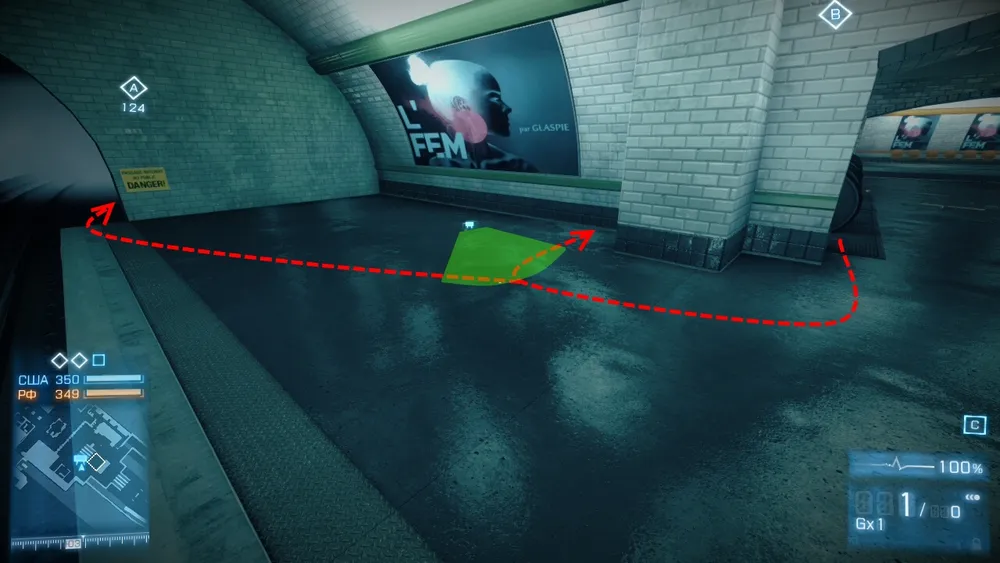
They won’t notice the mine in time because they will be running out of the smoke cover, and your teammates will be trying to kill them, making their screen fuzzy due to the overwhelming effect of bullets flying past them.
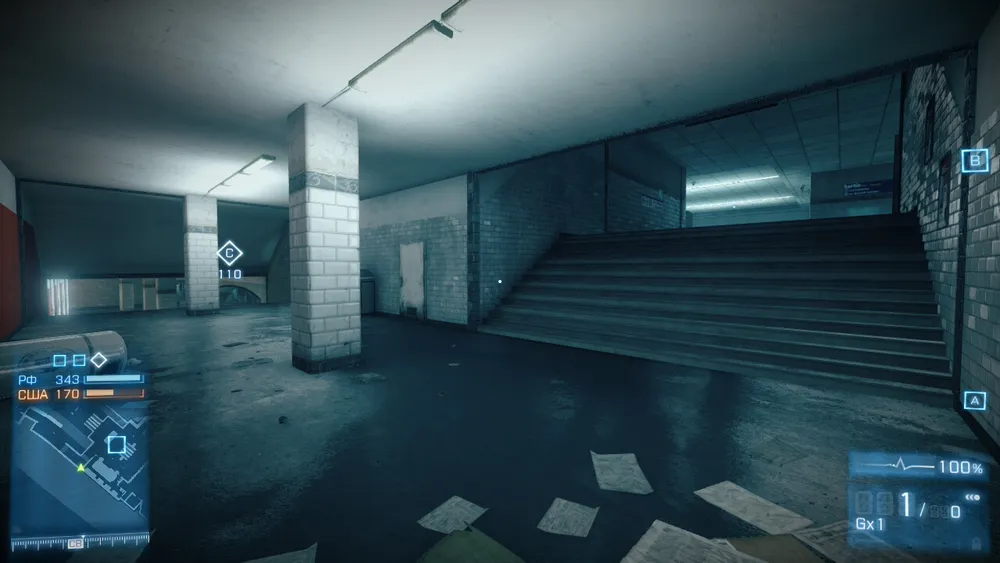
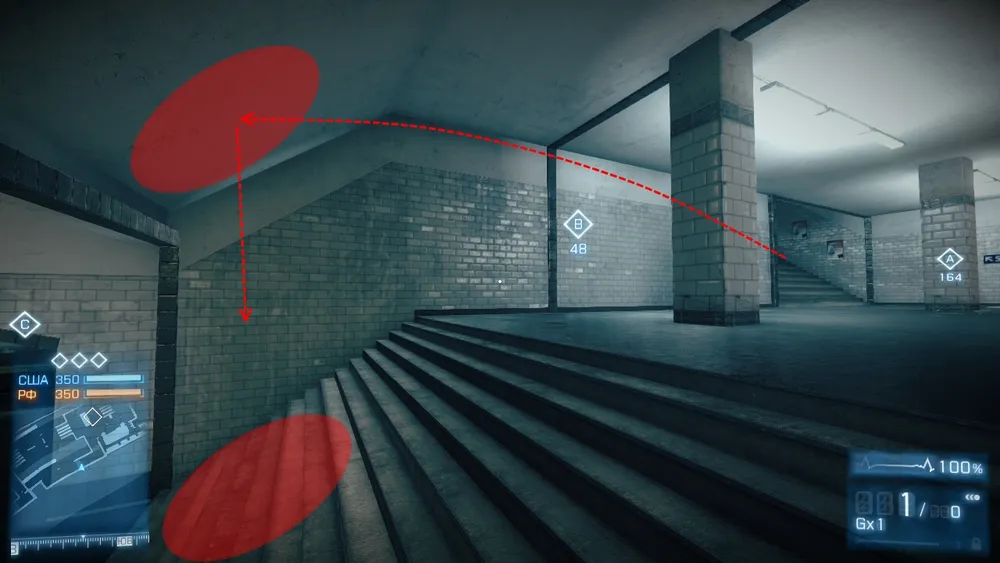
If the enemy breaks your defense at "First Escalator" and runs towards point "C," they will most likely ascend the escalators near point "C."
Here, you can place two Claymore mines. One behind the wall at the top of the escalator, and another near the corner behind the column, just before the descent from the next escalator.
Enemies will hide around this corner to shoot at point "C."
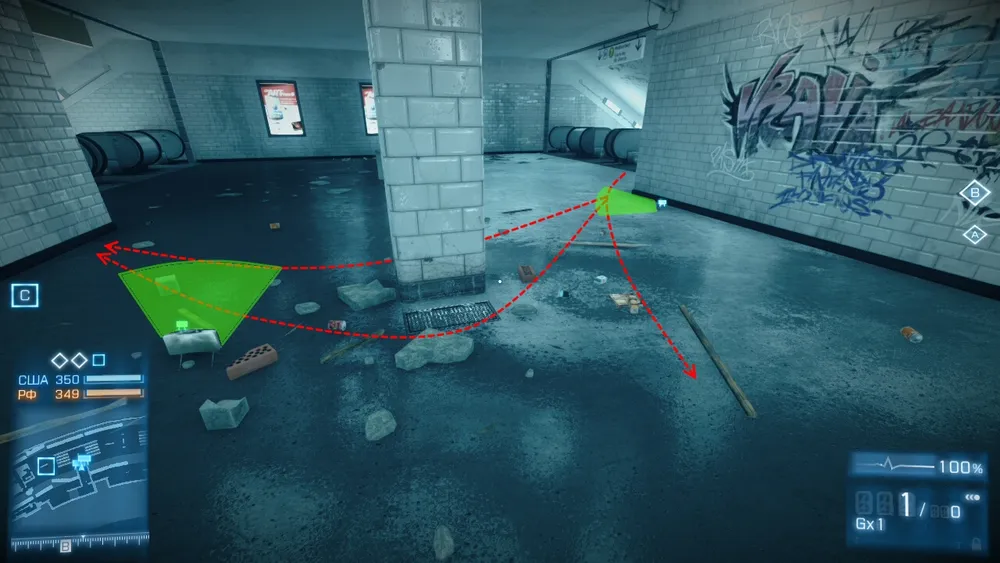
Even if the enemy takes a detour through the escalators, i.e., through the tunnel on the right, a Claymore mine can also be placed on that path, specifically behind the column.
- If the enemy does manage to reach point "C" via the right flank (through the escalators and right tunnel), while bypassing point "C" along that same right flank, they might run into a couple of your Claymore mines placed in the room and at the entrance to the carriage.
If the enemy makes it through "Second Escalator," they could quickly hide in the adjacent room with two elevators, waiting for you and your team. Upon entering, the enemy often places a respawn beacon in that room. This way, several enemy soldiers can slip behind your team, for example, while you are near "Second Escalator," and eliminate everyone.
To prevent this, you can place a couple of Claymore mines at the corner by the entrance.
The enemy will definitely not check the corner for mines because, having burst through from the escalator, they will have to quickly find a safe hiding place, or be killed. Their vigilance will decrease, and they won’t be thinking about mines that could be laid at every step.
Only the convex side of the mine can react to the enemy's movement.
**
When you place a mine on a surface, you should place it with the convex side facing forward.**
**
Keep this in mind!!!
Placing mines in all the described points is not mandatory but desirable.
It all depends on the number of Support players in your team. If there are enough of them to place mines in all the above-mentioned spots (each Support can carry a maximum of 2 mines), then consider that the enemy who has broken through to your point "C" will not live long.
Placement of Respawn Beacons.
While your team controls the entire lower level of the metro, you can place respawn beacons in the following locations:
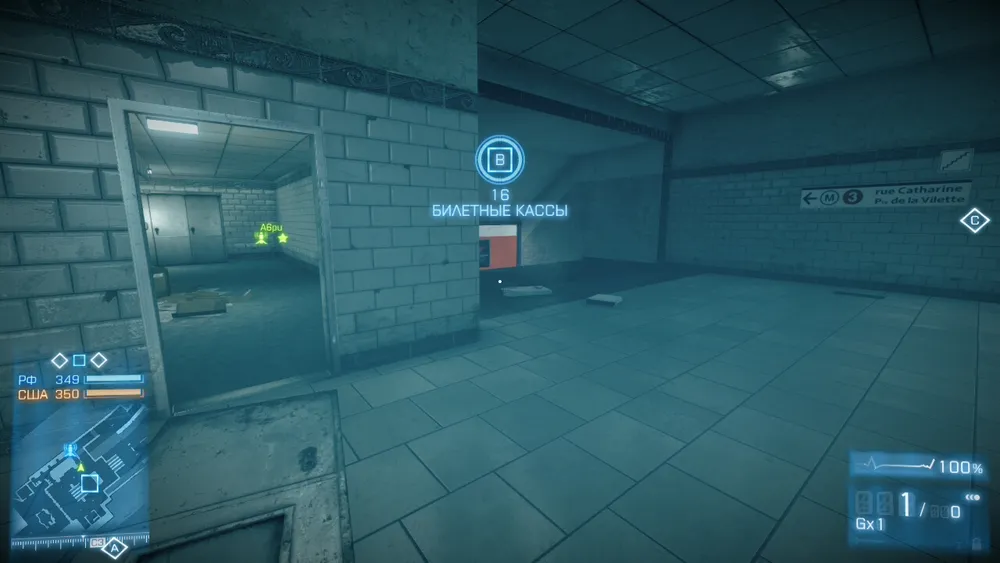
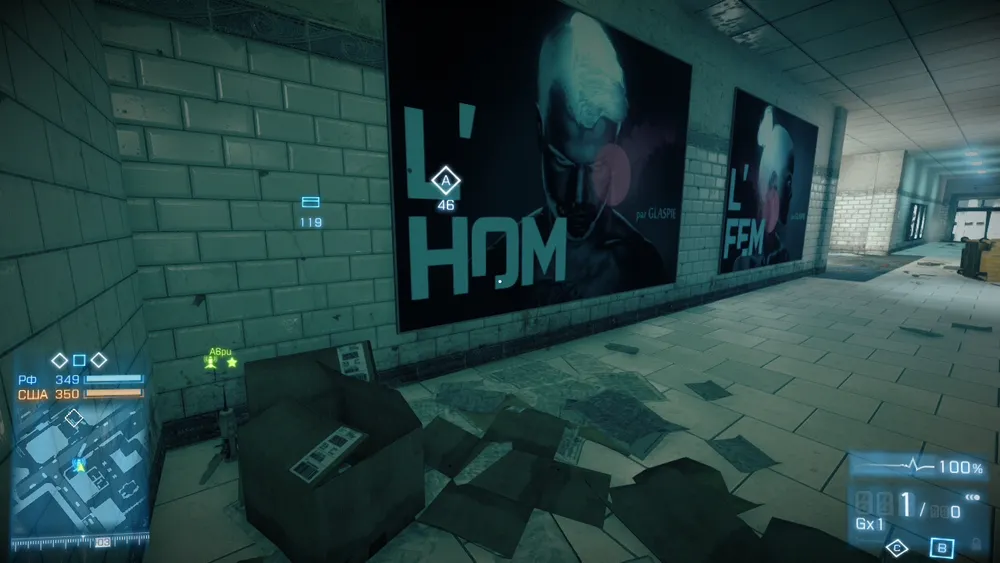
- The first beacon can be installed in the restroom, near "First Escalator" and "Tunnel."
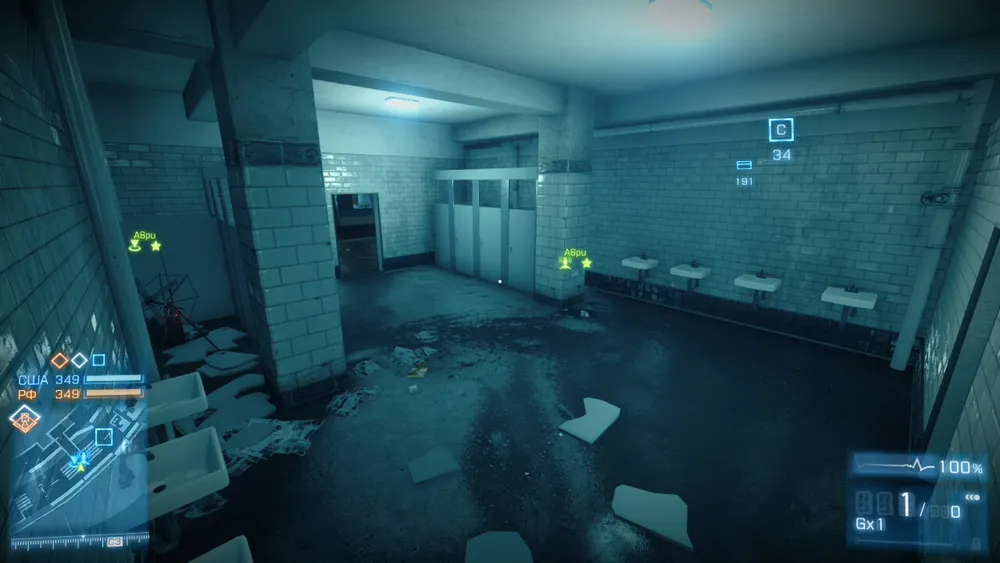
This will allow you and your team to quickly get to the needed points of fierce firefights without respawning on your teammates in the heat of the moment.
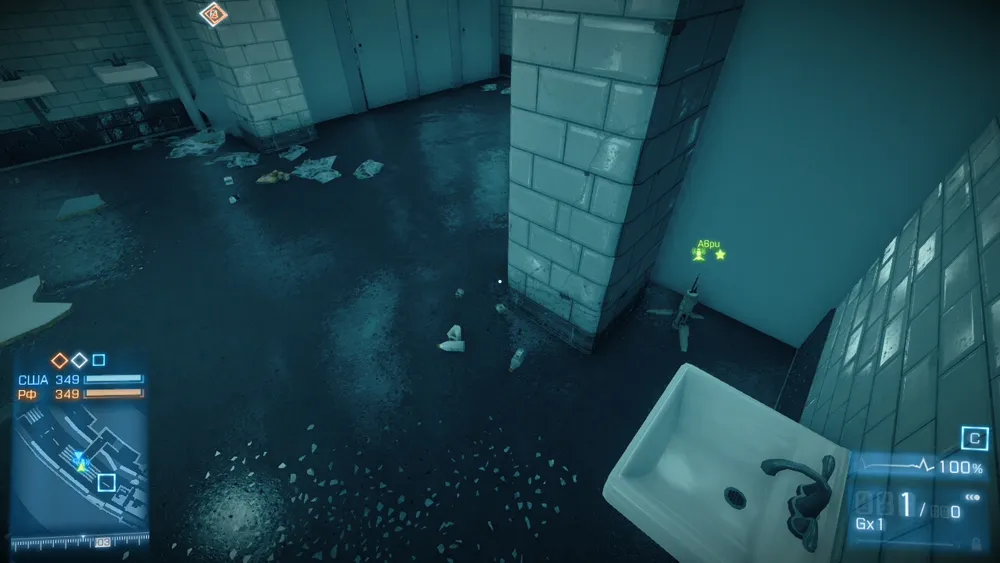
Also, in this restroom, behind the column, you can place a motion sensor. This way, you will be aware of the enemy’s proximity if they break into point "C." It will be hard for the enemy to detect this sensor.
Additionally, if you don’t want to lose a hidden spawn point when the enemy breaks into point "C," you can place a couple of Claymore mines at the entrance to the restroom.
They should be positioned in such a way that the enemy cannot see them while peeking around the corner. An open door helps with this because it blocks the view from one side at each entrance. The enemy will not be able to see that there is a mine at the entrance and will blow up.
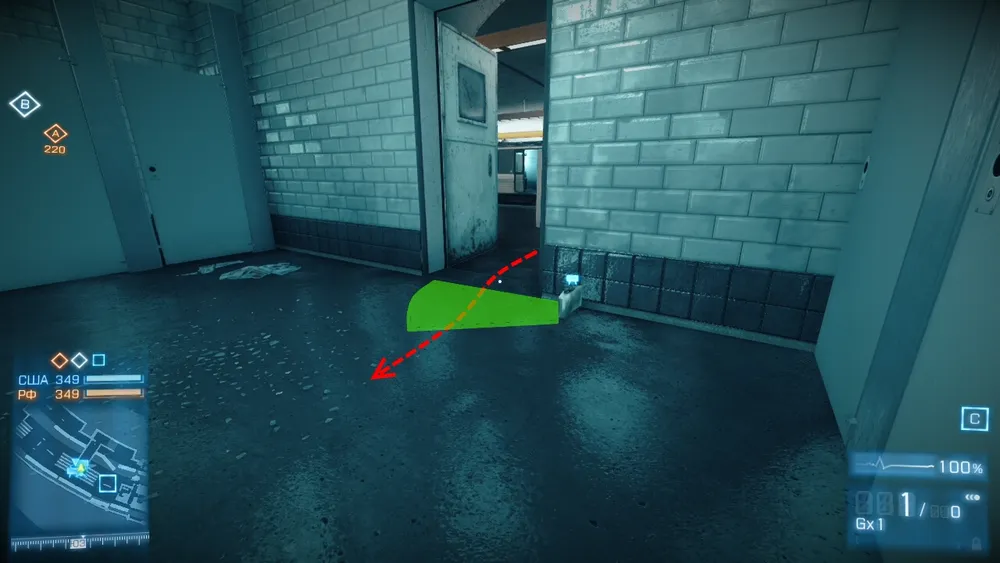
The mine at the other entrance will be positioned exactly the same as this one.
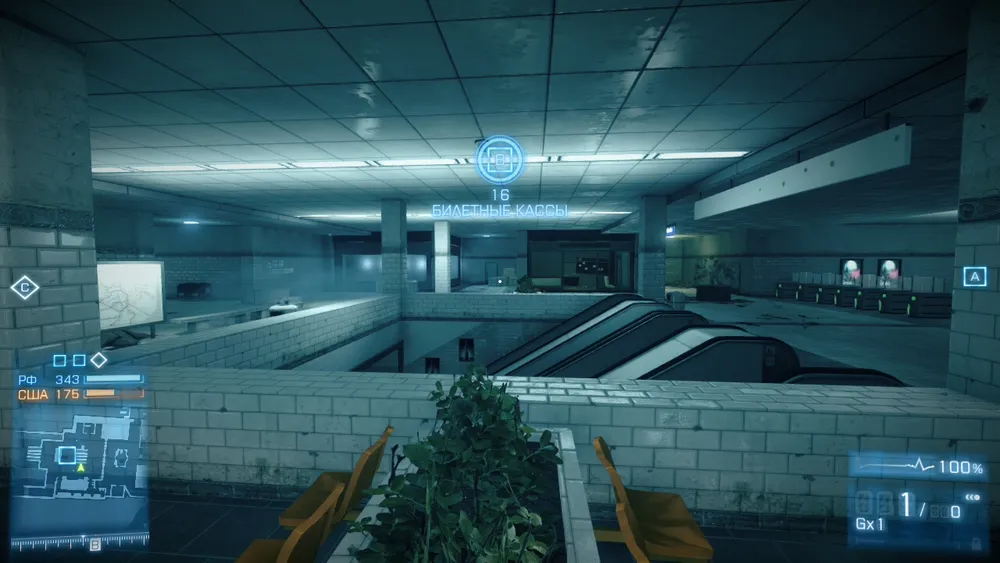
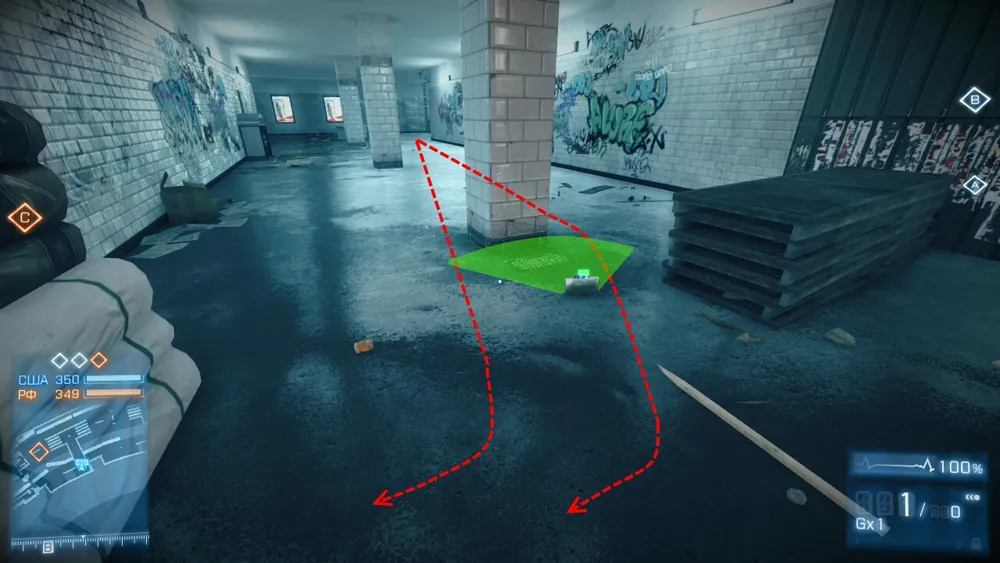
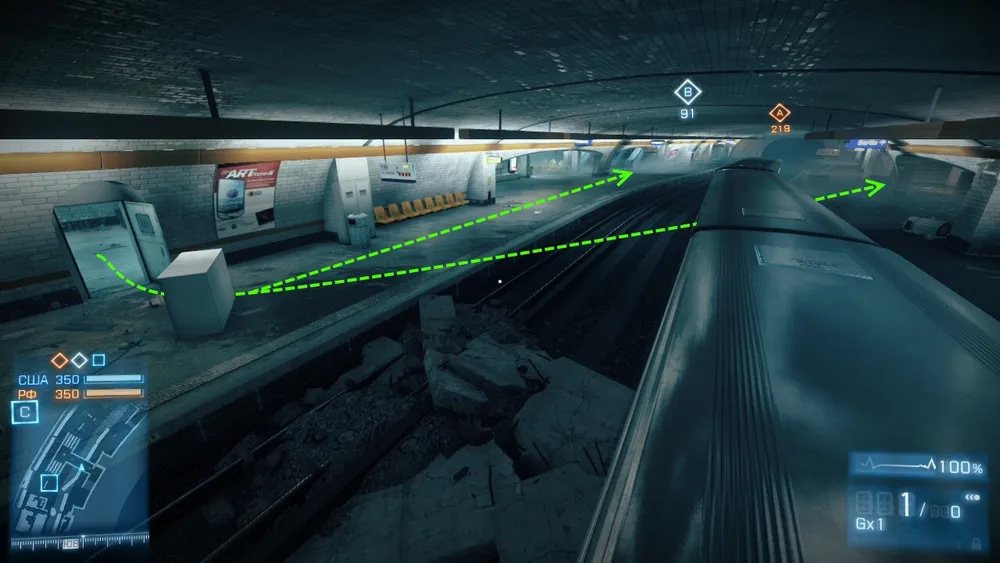
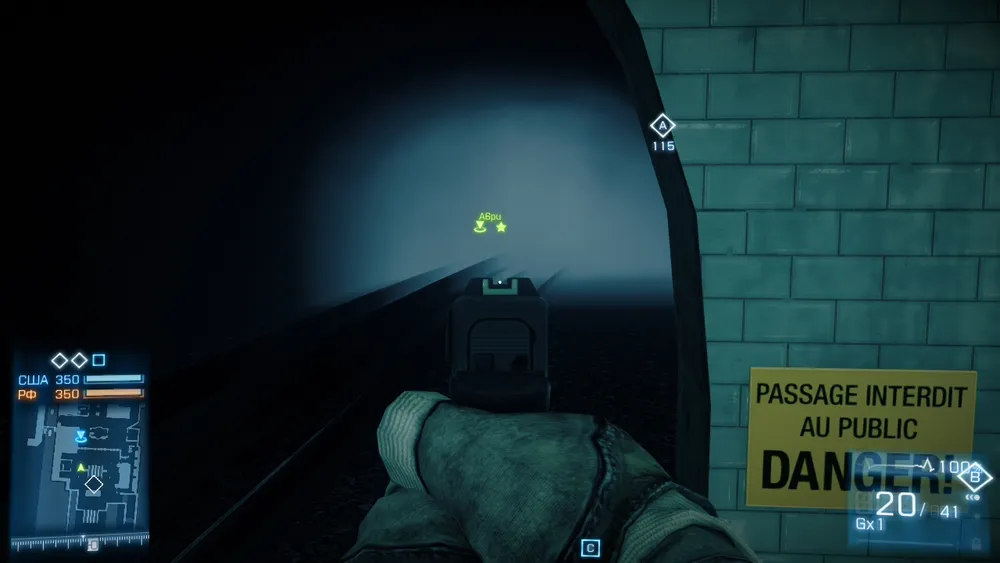
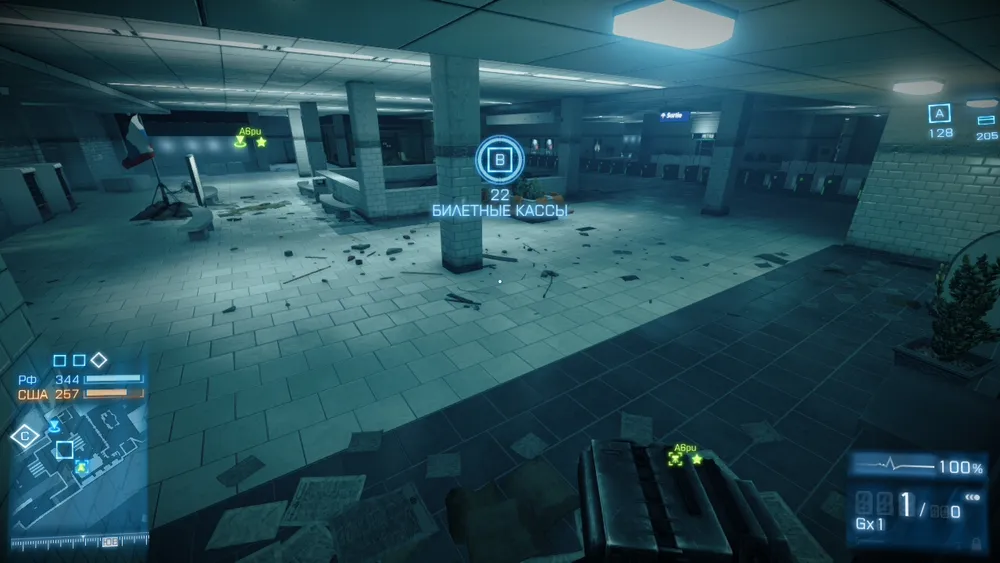
The second respawn beacon can be placed in the tunnel under point "B." Since it’s always shrouded in thick fog, making it virtually impossible to see anything, you can use this to your advantage and place the beacon right in the middle of the railway tracks.
When you and your teammates respawn at this beacon, your silhouettes will be hidden by the thick fog. You will see everything very clearly through the fog.
Also, a MAV can be placed at this location, which will be very useful as its motion sensor can highlight all enemies above you on the map (at point "B").
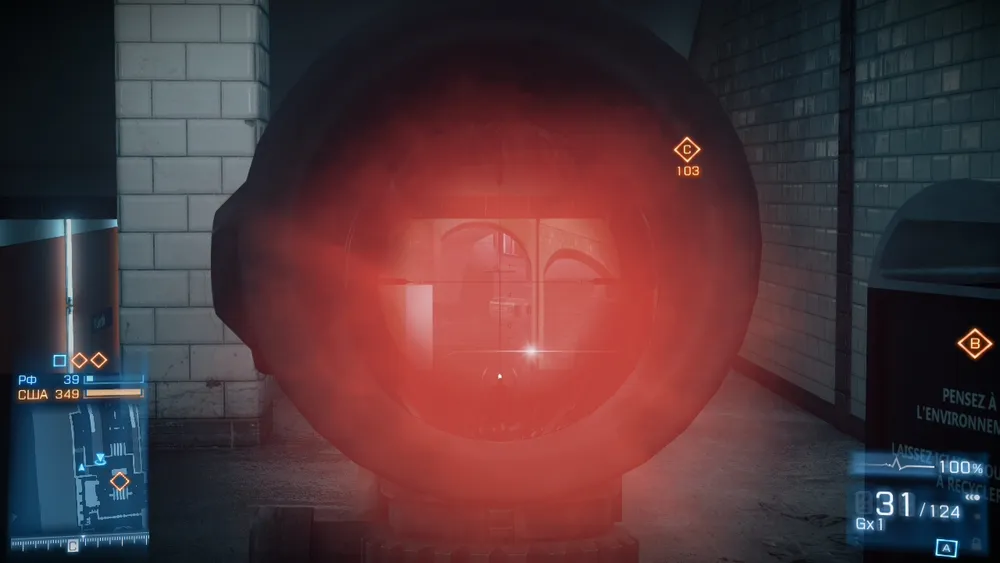
Setting up SOFLAM
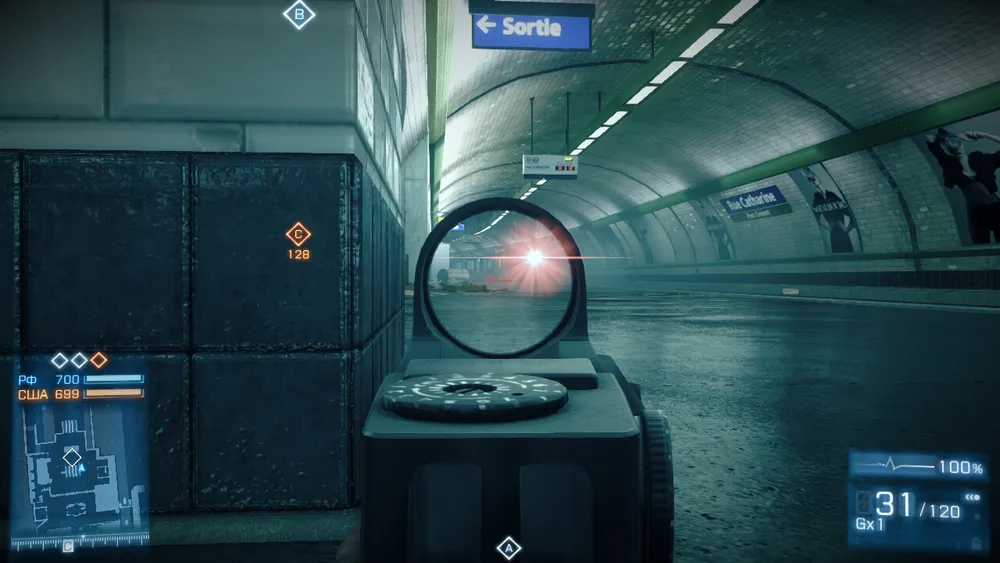
In this map, SOFLAM will serve as a means to blind the opponent.
- One SOFLAM can be set up on the left flank in the very first carriage, on the driver's seat.
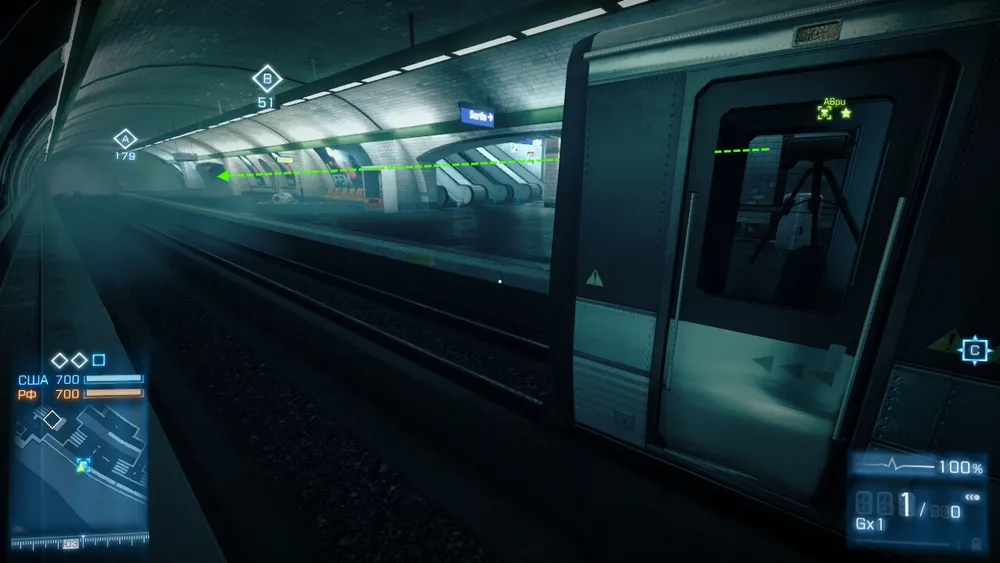
By aiming the target marker toward "Second Escalator," you will blind enemies who break through your defenses and want to peek out from around the corner.
The blinded enemy, with a laser pointed directly at their eyes, will find it very hard to discern anything. You and your teammates can take advantage of this and quickly kill them.

But remember about those enemies who, by breaking through "Second Escalator,"** might hide behind the corner of the large tunnel. If the SOFLAM target marker isn’t pointed even slightly in their direction, the beam won’t blind them at all.**
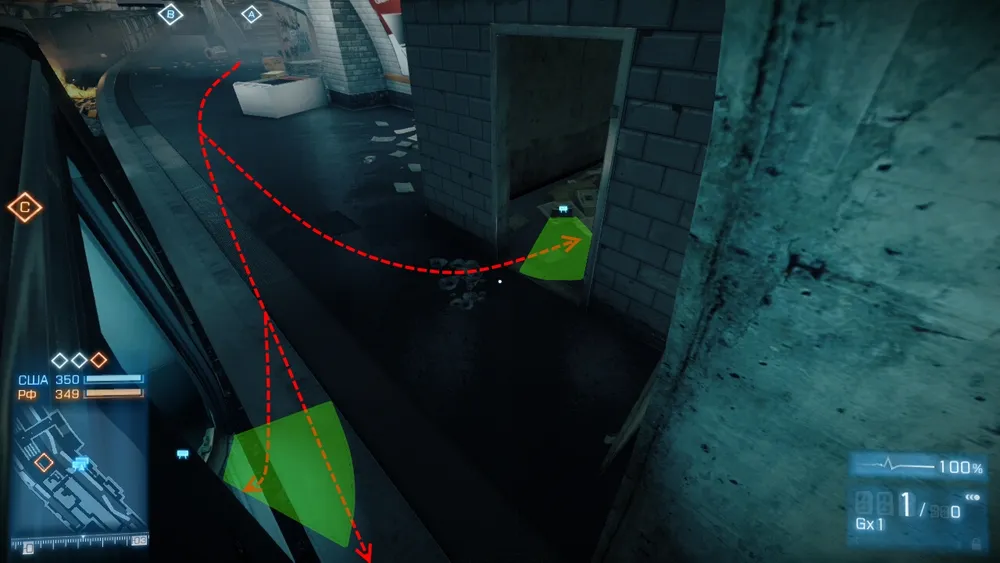
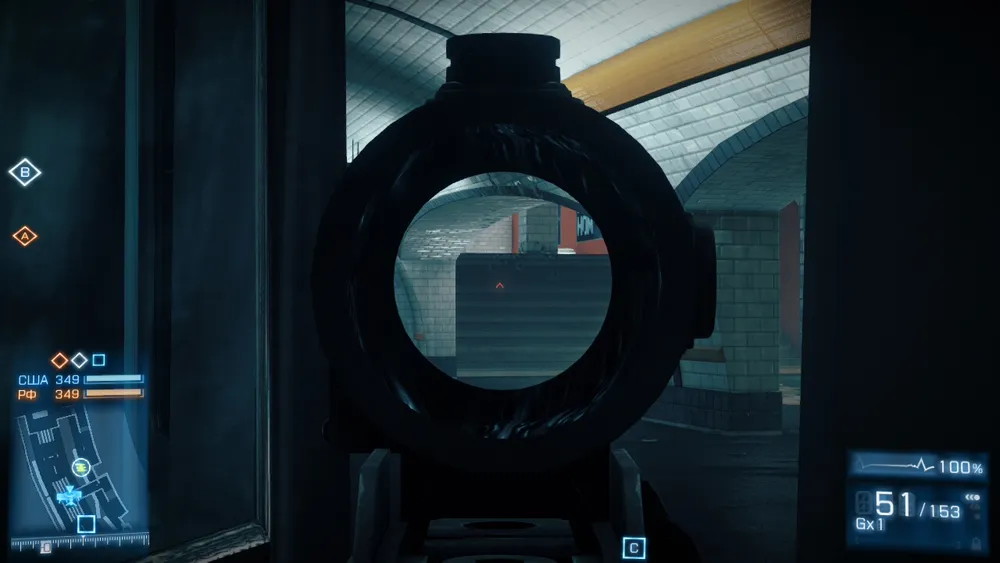
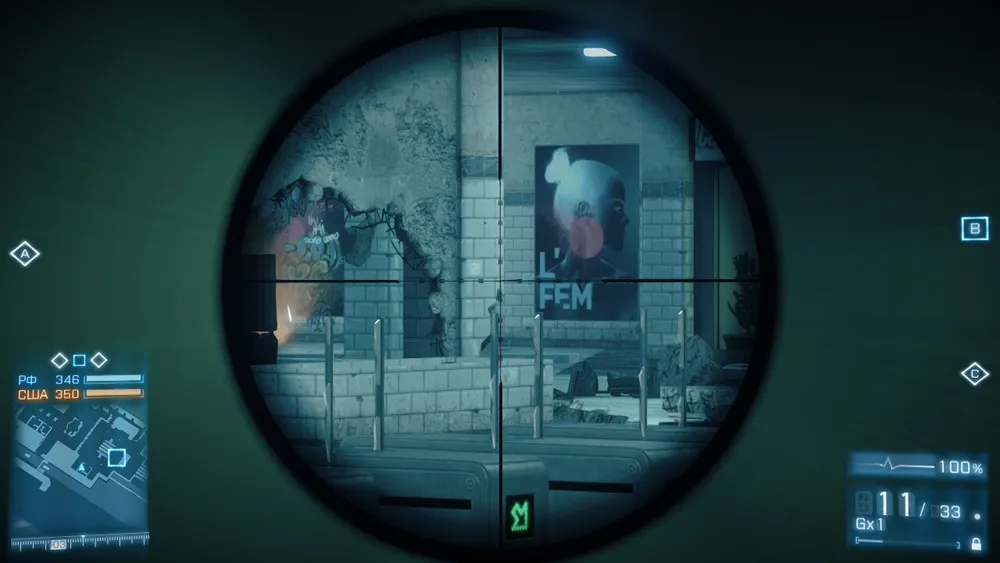
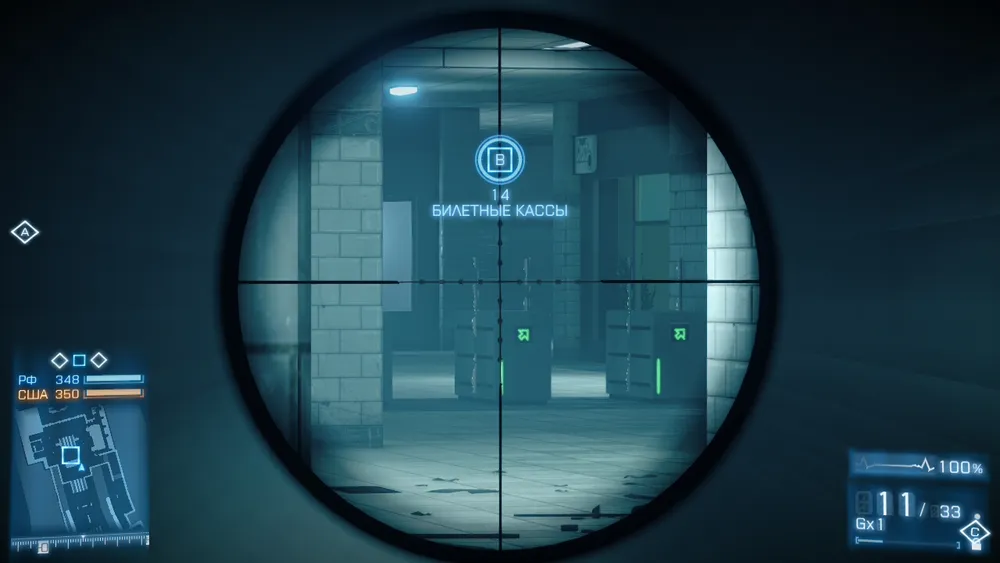
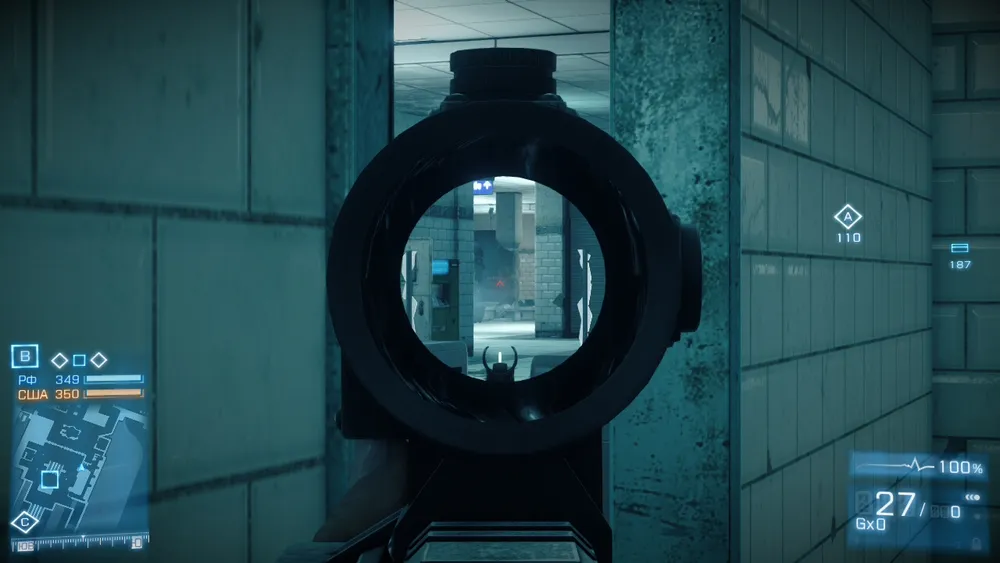
Thus, the optimal spot to aim the SOFLAM's target marker to effectively blind enemies in both different points should be as shown in the screen below.
This way, enemies peeking from around the corners, at two different points, will be sufficiently blinded to be quickly eliminated.
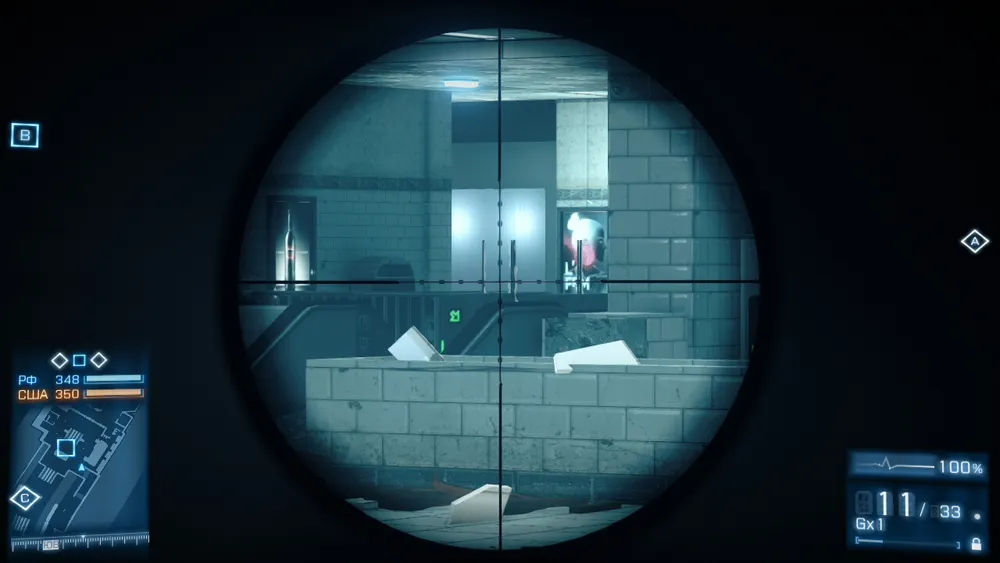
An enemy peeking out from the corner near the escalator
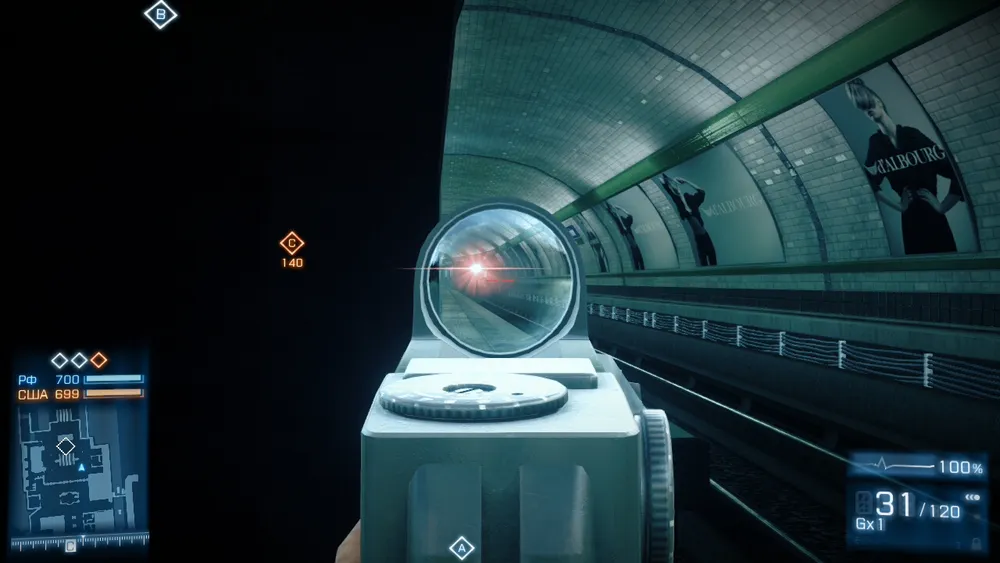
An enemy peeking out from the corner of the tunnel
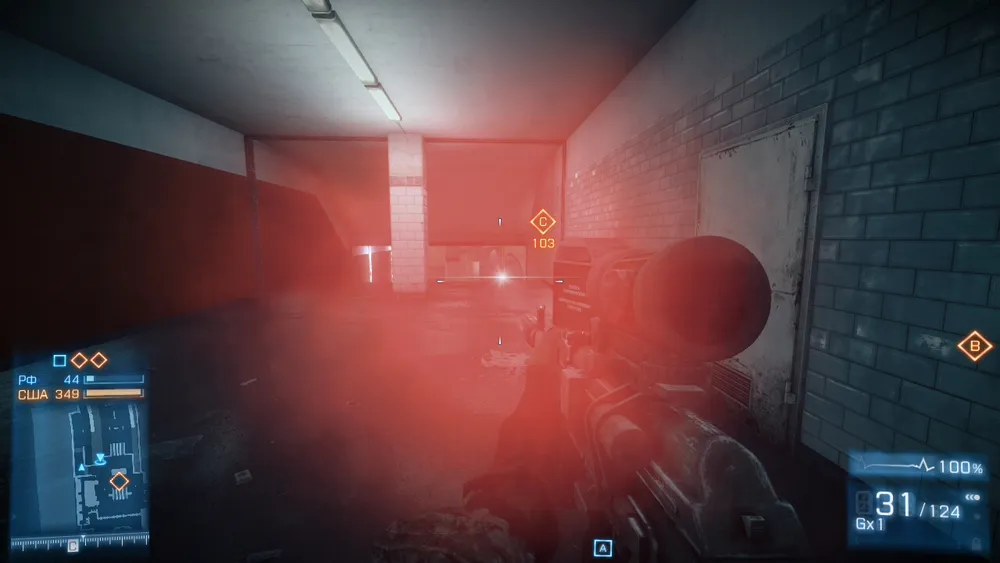
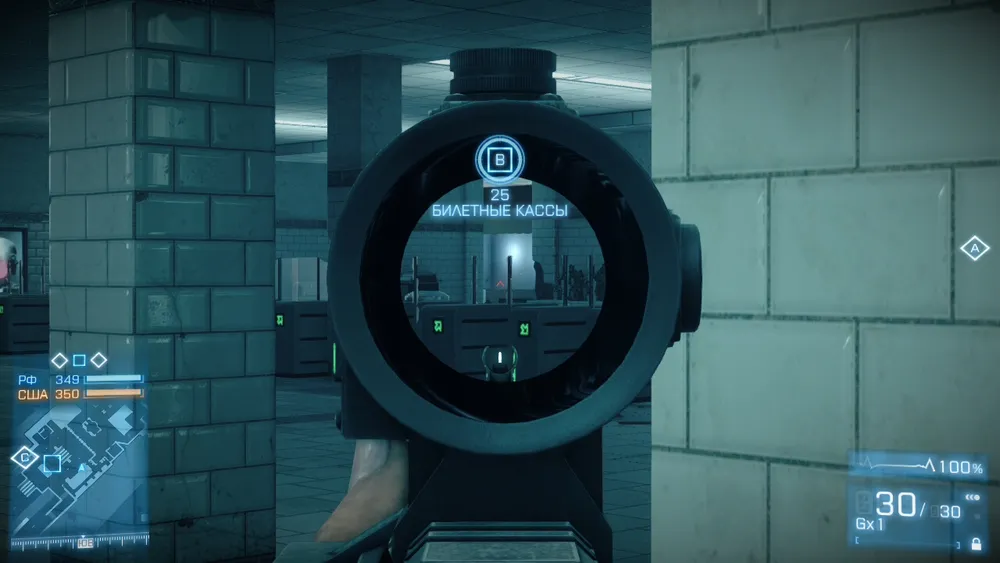
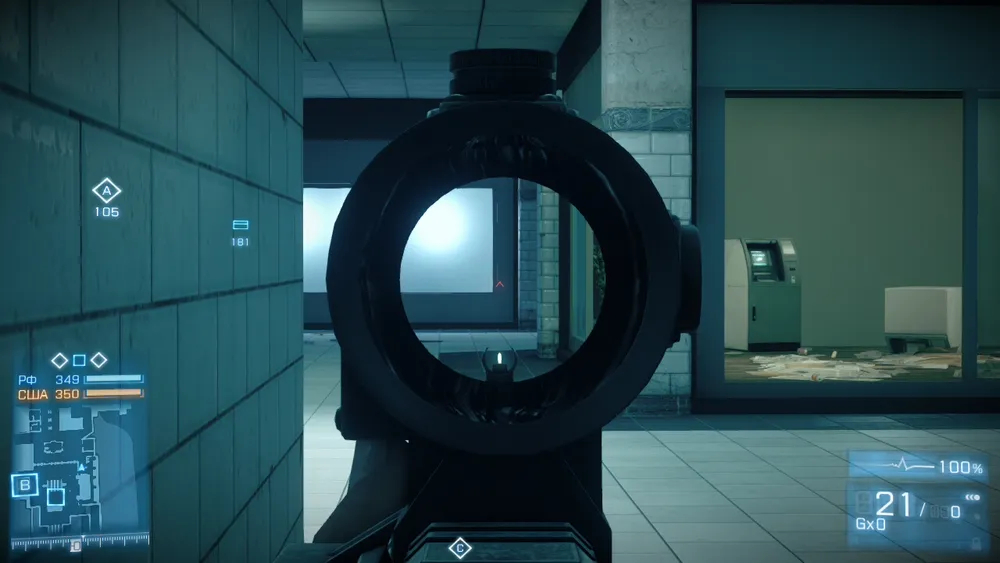
The second SOFLAM can be set up on the right flank, opposite "Tunnel" behind a column.
You and your allies, standing in front of the stairs at the entrance to "Tunnel," will have an advantage over the enemy because as soon as they peek around the corner, they will instantly be blinded by the laser, and you will be able to quickly kill them.
Combat Tactics
By taking the correct position in the areas of fierce firefights, you will either gain an advantage in combat against the enemy (and potentially emerge victorious), or often simply remain unharmed, which can only be pleasing.
Passage at "First Escalator."
Your team must hold back the enemy at this passage.
Attacking it makes no sense because upon rising up the escalator, you will be attacked from both sides by the enemy, who hides behind both corners. Furthermore, you could be blown apart by those enemies who will be defending the passage to "Tunnel" next door.
Enemies are waiting eagerly for your appearance
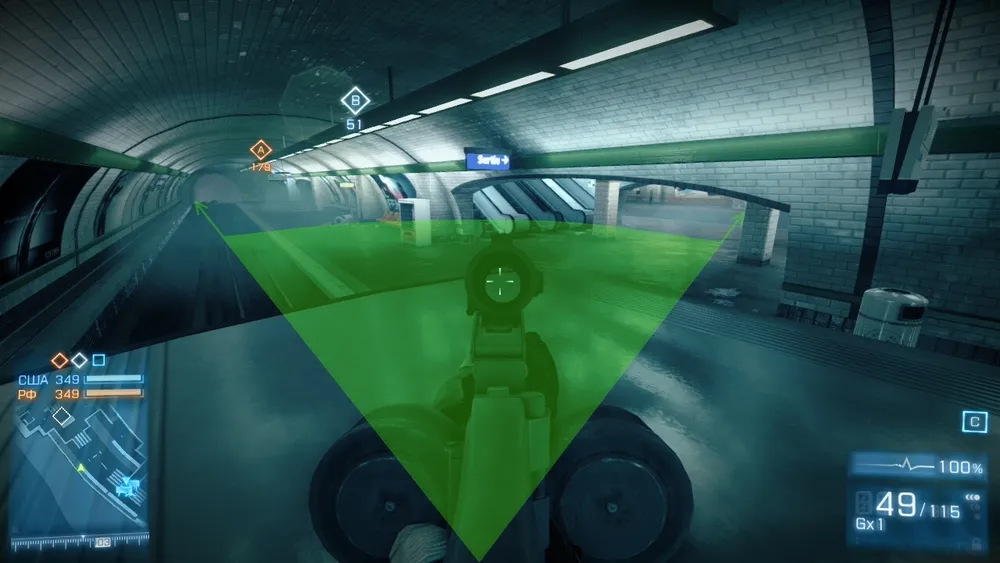
As the enemy, peeking out from the corner at the top of this passage, often shoots at you with underslung grenade launchers and throws grenades at the opposite corners below (where you and your allies are likely to stand), you and your allies must consider this and not stay in one spot for too long or throw health kits and ammo in that direction. Step back a bit around the corner; your boxes won’t reach you with an explosion.
Being in the red zone is dangerous. Being in the green zone is safe.
Being in the red zone is dangerous. Being in the green zone is safe.
You can take a very good position (with a mounted machine gun) in the first carriage, which is located near "First Escalator."
This position is meant to support your team if the enemies suddenly take them out with grenade launchers and grenades at the base of "First Escalator."
While your allies respawn safely nearby, you will shoot at the particularly daring enemies who dare to come down the escalator.
Your field of view will also be enough to periodically glance towards "Second Escalator" to shoot at enemies trying to hide behind the corner after descending the escalator.
If you take this "machine gun" position and simultaneously set up a SOFLAM in the driver's cab (which is just below you), even if you don’t notice/miss an enemy breaking through "Second Escalator," they won’t be able to spot you because they will be blinded by the laser shining directly into their eyes.
This is how you can get on the roof of the first carriage.
Conclusion: the most sensible solution would be to hold the enemy at the "First Escalator" passage.
Passage to "Tunnel."
The stairway directly at the entrance to "Tunnel" is the most undesirable spot to stay at constantly.
As the ceiling over this stairs slopes down (parallel to the stairs themselves), it poses a significant danger to your team members.
If the enemy, peeking around the corner, shoots at this slope with an underslung or standard grenade launcher, the entire explosive wave of the shell will reflect off the ceiling right onto your team standing on the stairs.
Being inside the "Tunnel" itself is also undesirable, as in such a confined space, you will be under constant fire from underslung and standard grenade launchers, as well as grenades.
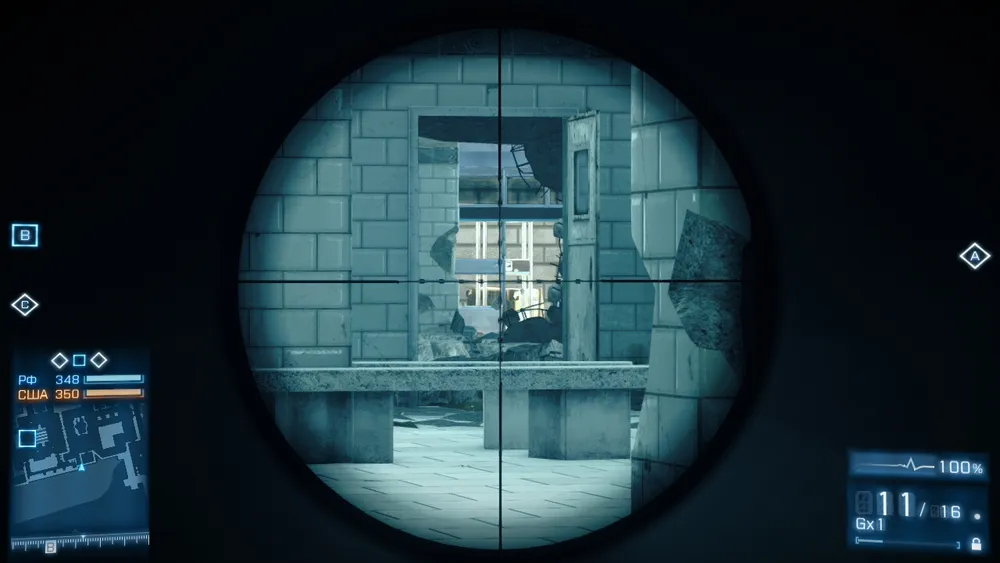
You can occupy a very advantageous "machine gun" position in the engineer's cab of one of the trains opposite "Tunnel.”

The viewing radius from it is very small, but this is offset by a highly advantageous position relative to the enemy. They won’t see you while they are in the "Tunnel," and you will be able to shoot at their legs without fear of revealing your machine-gun point.
Conclusion: the most sensible solution would be to allow the enemy to pass deeper into the "Tunnel," and then shoot them from the machine gun position and by periodically tossing grenades into the "Tunnel," thus repelling the enemy.
Passage at "Second Escalator."
If in the "Tunnel" and at "First Escalator,” your team’s (and your individual, if you are solo) tactics should be more defensive, i.e., holding the enemy back, then at this passage you should coordinate the actions of your squads via voice communication to make a breakthrough over the escalator, thus entering the enemy’s rear.
It is necessary to have one in each of the two different squads:
— Support (machine gun with increased suppression % + Claymore + suppression perk)
— Assaulter (underslung grenade launcher with smoke grenade + suppression resistance perk)
— Sniper (speed perk + MAV)
To start the breakthrough, you need to make sure that there are about 3-4 enemies guarding the passage (depending on how many players are on the server, this number may vary). They must be positioned left/right/behind the escalator, but not directly in front of it.
For this, you should have a MAV installed. It can highlight all enemies above you on the mini-map.
When you confirm that few enemies remain near the escalator, you will need to scare them away from the edges of the escalator.
For this, at the far ends of the escalator (the one moving upwards), there should be Support players with machine guns for suppression. Next to these Support players (on the ledges between the ascending escalators), there should be Assaulters with smoke grenades.
So you should have one Support and Assaulter on the left side of the escalator, as well as one Support and Assaulter on the right side of the escalator.
Those standing on the right must look left up!
**
Those standing on the left must look right up!**
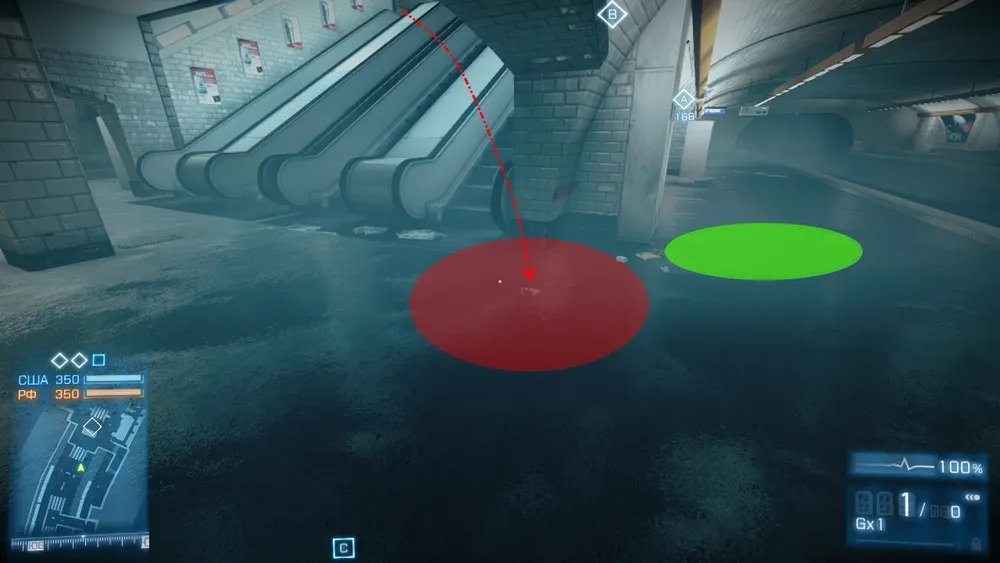
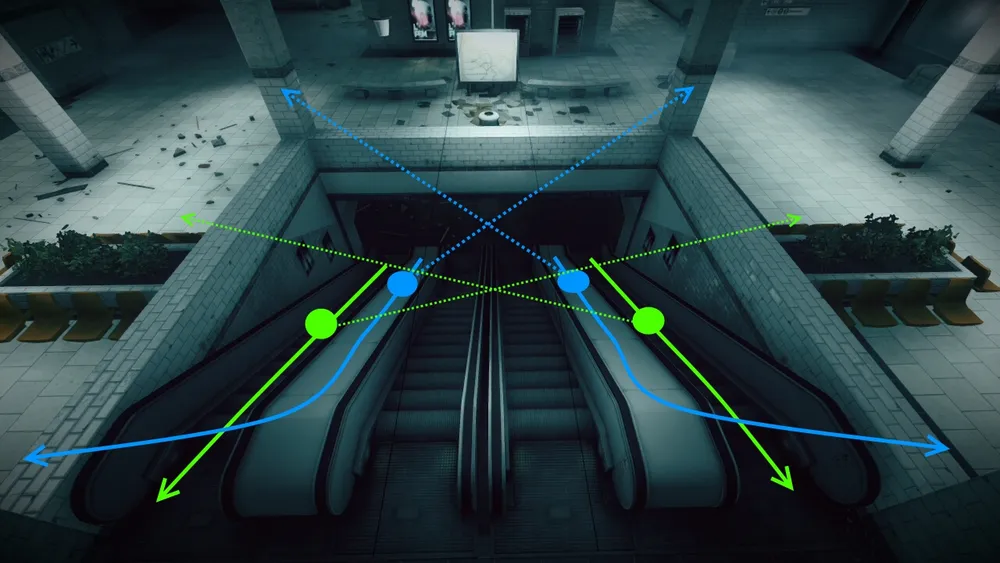
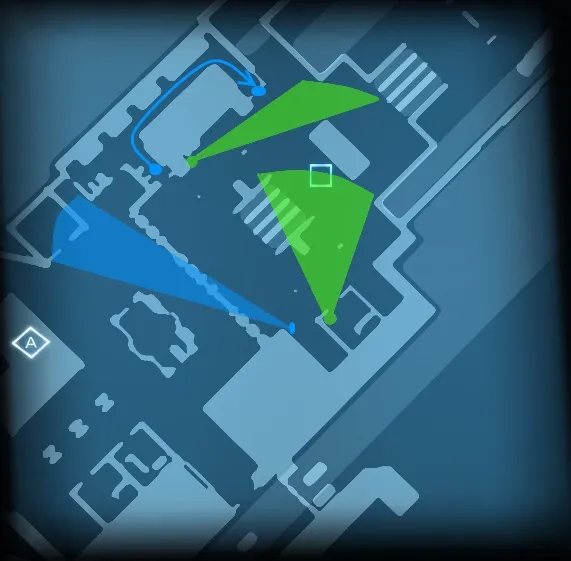
At a common signal received through the microphone, the Support and Assaulters will start moving upwards, and upon their first step, throw a grenade in the direction they are currently facing. The exact points to throw the grenade are indicated in the screenshot below.

Green circle - Support. Blue circle - Assaulter.
The screenshot shows an example of throwing grenades for those (Support and Assaulter) standing on the left side of the escalator. As both sides of the escalator are completely symmetrical, these same actions can be repeated by those on the opposite side.
The screenshot shows:
Green circle — this is a Support. Green dashed line shows where he should throw the grenade, and the red X indicates where the grenade must hit (this impacts where it will then land).
Blue circle — this is an Assaulter. Blue dashed line shows where they should throw the grenade, and the red X indicates where the grenade must hit (this impacts where it will then land).
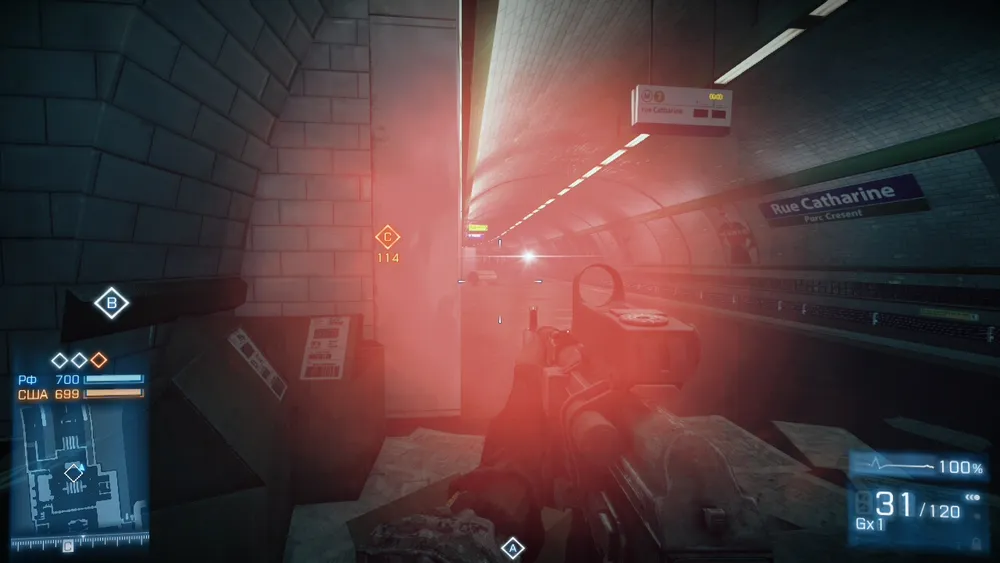
Once the grenades are thrown and the enemy is startled by them (mostly retreating behind the escalator), the Support players should continue moving upwards, taking their machine guns in hand, and shooting continuously in the direction they threw their grenade!!!
Thus, they will provide a suppressive effect for their enemies, and will seriously blur their screen, which will worsen their visibility and compel them not to stick their nose out from behind the escalator.
The Assaulters should, meanwhile, quickly pull out their underslung grenade launchers with smoke grenades and shoot at the rear corner columns from the side they threw the grenade.
As soon as they shoot their smoke grenades at the columns, they should immediately continue their movement (no need to run) up the escalator, without putting their underslung grenade launchers with smoke grenades down!
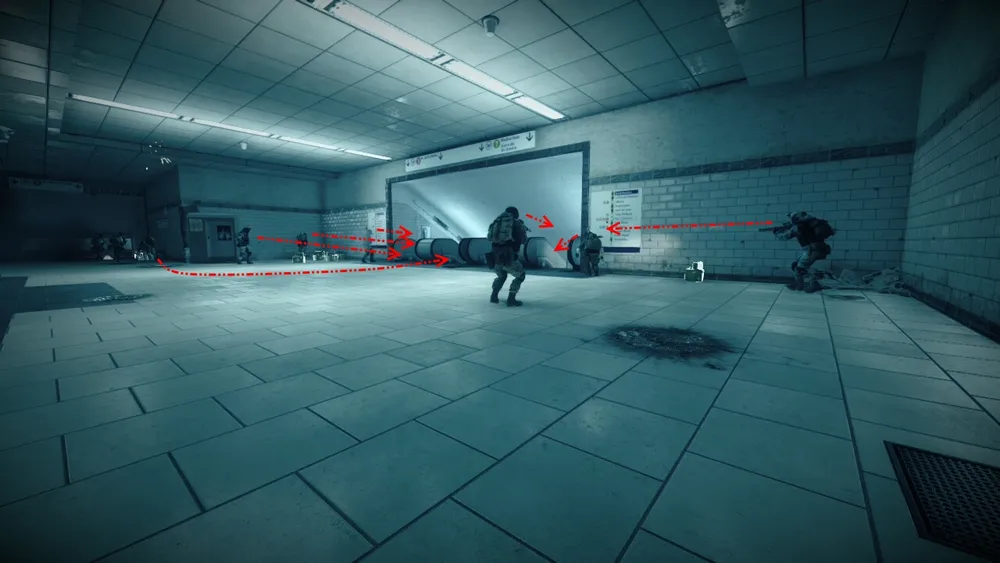
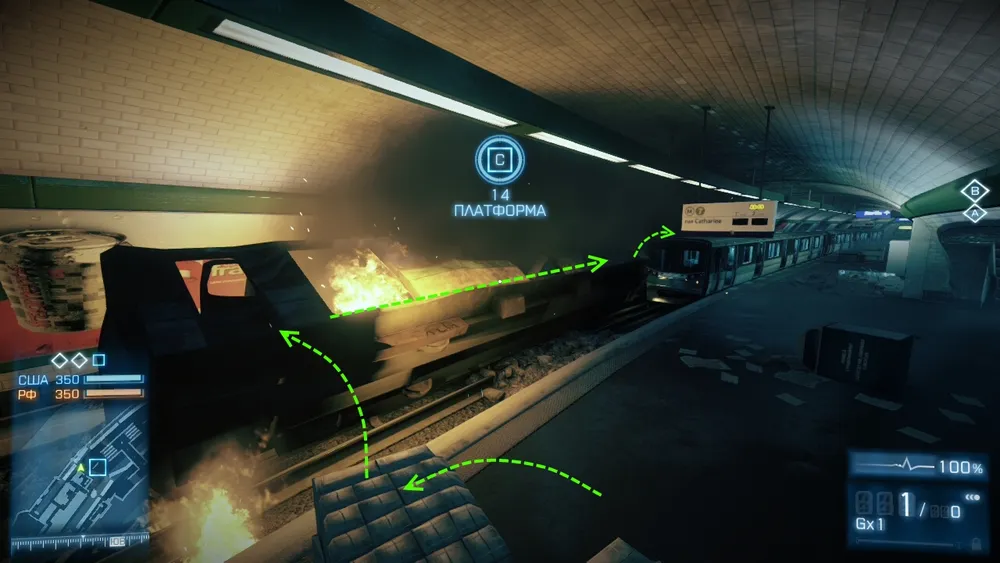
For those who didn’t immediately understand what to do, an explanatory screenshot was made:
Green circles — these are the Support players. Green solid arrows — this indicates the path they will take. Green dashed lines — indicate the direction they should shoot while moving upwards.
Blue circles — these are the Assaulters. Blue solid arrows — this indicates the path they will take. Blue dashed lines — indicate the place on the column where they should shoot their underslung smoke grenades.
As soon as the Assaulters finish reloading their underslung grenade launchers, they should turn around in the opposite direction and shoot a smoke grenade at the ceiling as shown in the screenshots below.
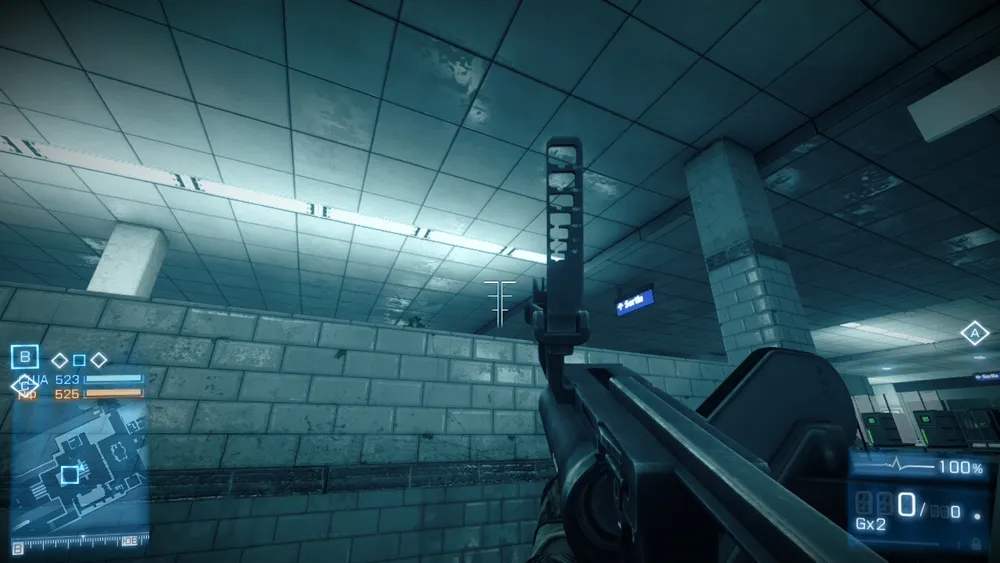
The left Assaulter shoots at the ceiling to the left.
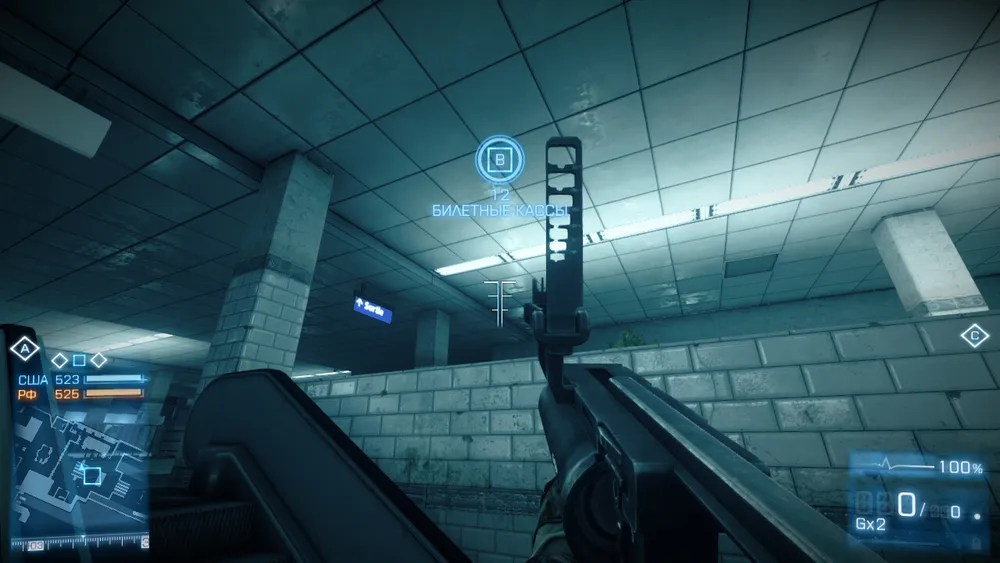
The right Assaulter shoots at the ceiling to the right.
After the Assaulters shoot their second smoke grenade at the ceiling, all four should rush to the top of the escalator, and then each pair (Assaulter and Support) runs to their respective direction (those who were on the left run left, while those on the right run right).
Those who stood to the left run to the left.
Those who stood to the right run to the right.
Thus, the grenades will scare the enemies away from the edges of the escalator, and the machine gunners will provide suppressive fire to both sides (due to this, the enemy will not be able to shoot back at you), while the Assaulters will smoke the area around the escalator.
Keep in mind, it takes 10 seconds for the smoke cloud to disperse fully.
As a result of this breakthrough through the escalator, your four comrades will control the entire rear flank of point "B" (left and right).
The machine gunners on both flanks, after the breakthrough and taking the necessary positions, should quickly reload (lying down) while the smoke is still settling, and prepare to clear the area around "Second Escalator."
Meanwhile, on the right rear flank (in the corridors), an Assaulter will conduct the cleanup. To ensure no enemy breaks into this corridor from point "A," another Assaulter (from the left rear flank) will watch the entrance to this corridor.
And yet another explanatory screenshot.
As for the snipers who remained idle in the two squads, they can guard the base of "Second Escalator" just in case your breakthrough fails.
Once you clear the area around "Second Escalator," "First Escalator," and then "Tunnel," you will need to occupy all advantageous points from which you can shoot through specific sections/passes of the upper level of the metro.
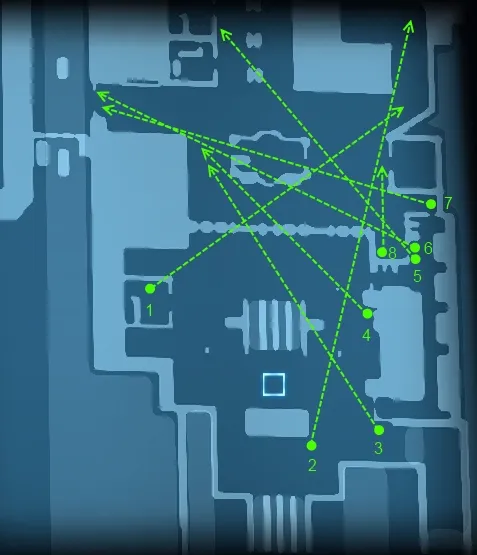
The screenshot marks all advantageous positions.
Each position comes with a screenshot showing the overview of the place you will be able to shoot from.
Location #1
Location #2
Location #3
Location #4
Location #5

Location #6
Location #7
Location #8
And that’s it, you just need to wait for the end of the round, killing enemy soldiers from your hiding spots.
They won’t suspect your location, and you will always know where they are coming from.
Moreover, if any of you miss a couple of enemy soldiers in one spot, a teammate watching the next spot (where the enemies will surely run to) can easily kill them, but it’s vital that he is informed about the breakthrough in time (over the microphone).
Tactics for RF (Passive Defense)

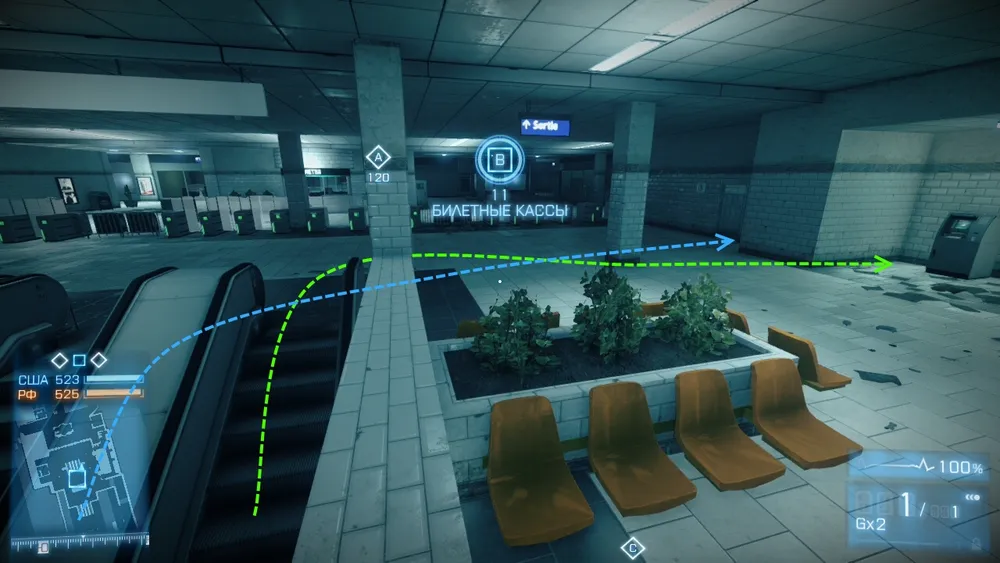
The RF team starts the game near the financial center building, then advances to **point "A,"** and after capturing it, continue to the three different passages at **point "B"** (all passages are described above).
At the very beginning of the round, while the countdown is ongoing, the members of your team should orient themselves and identify who is closest to the capture points.
The three closest players to the capture points should run non-stop, bypassing point "A," toward the three different passages to point "B."
This way, you will gain an advantage in the rapid capture of point "B." You will acquire a significant advantage in battle and will be able to hold the enemy at the approaches to point "B."
In most cases, even if the team does not consider the rapid capture of point "B" (bypassing point "A" at first), the RF team always arrives and captures point "B" first.
If your sprinting teammates manage to capture point "B" first, then for the remaining time, your team will need to "entrench" in the currently controlled territory, i.e., the entire upper level of the metro.
By "entrench," I mean: placing Claymore mines, SOFLAMs, motion sensors, and respawn beacons.
Control of Captured Territory
If the enemy breaks through to **point "B"** without attacking you (to avoid giving themselves away), they can immediately run to **point "A."**
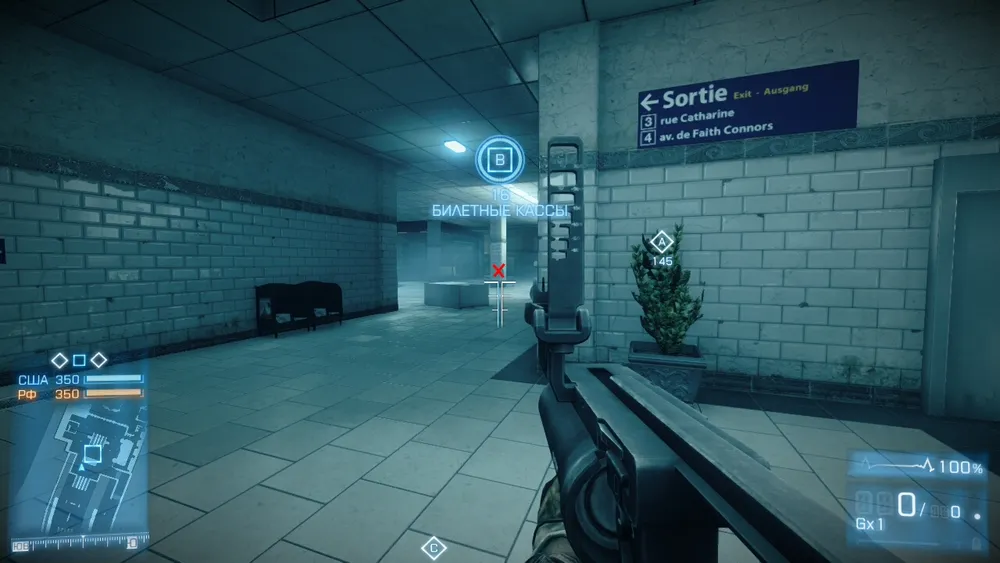
The enemy can only exit the metro (to point "A") through the right and left exits (let’s designate them as right and left flanks). They will not run through the center exit as it is a certain death for them.
Placement of Claymore Mines
If the enemy somehow penetrates through "Second Escalator" and rushes to point "A," without trying to retake point "B" (which happens sometimes), you should foresee this and place Claymore mines along their path.
When breaking through, the enemy will have reduced vigilance until they find cover.
Their main goal is to hide, and to do so swiftly. Therefore, they will not be on the lookout for your mines at every corner.
- One mine can be placed on the right flank before the right exit from the metro.
After exiting the metro, the enemy can take two directions - on the right side of the flowerbeds or on the left side of them.
- If they bypass the flowerbed on the left, they will hit a mine located in the shadow (it’s very difficult to see due to the lighting).
- If they go around the flowerbed to the right and enter the house, they will hit a mine right at the entrance.
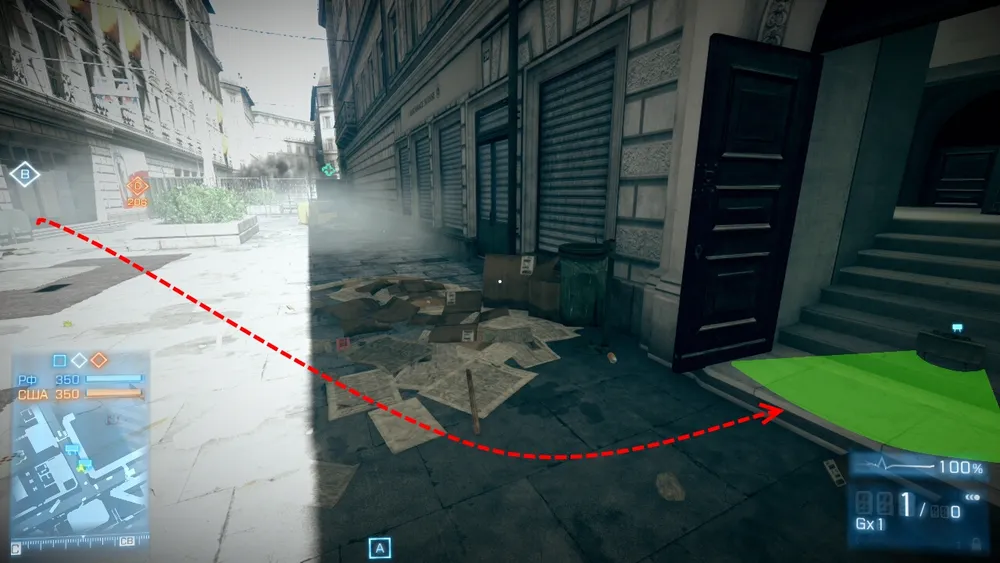
- If they pass the mine at the entrance, they will hit a mine on the second floor (if they want to enter another part of the building), right around the corner. They will not notice it in any way.
- If they bypass the flowerbed to the right and enter the small corner room on the right (where they can hide), they will hit a mine right at the entrance.
- If they avoid all the mines and want to enter the right house at point "A" (which is logical since it provides a great sniping position), they will also encounter a mine at the entrance.
As you can see, the right flank** (specifically, the passages to the houses) will be well protected against such enemy breakthroughs.**
- If the enemy breaks through via "Second Escalator," and rushes into the right corridors, they may hit a mine right behind the corner at the entrance.
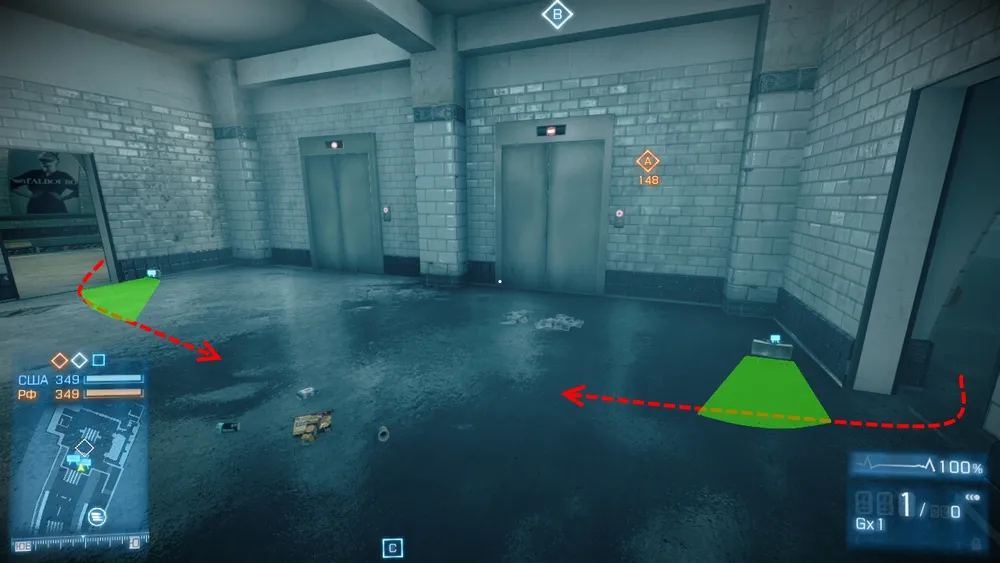
- A mine can be placed right at the left exit on the left flank. Since the enemy will be blinded by the light as they exit, they won’t notice the mine under their feet.
If the enemy does manage to exit via the left exit, they will have a choice: to run straight (into the corner of the house) or turn left (into the house).

- If they turn left, they will hit a mine right at the entrance. As the mine will be positioned behind a slightly open door, their chances of seeing it are zero.
- If the enemy runs straight, they will hit a mine that is hidden among the debris.
Placement of Respawn Beacons.
You can place only 2 respawn beacons, where you will respawn in the safest spots, and also close to areas of intense firefights.
- The first beacon can be placed in the corridors between the lockers.

The second beacon can be fitted into a showcase, to the right of "Second Escalator." If you hide the protruding antenna from the beacon within the wall, the enemy won’t be able to notice it, and nobody usually walks around this place.
You will respawn in the showcase in such a way that the enemy won’t notice you either.
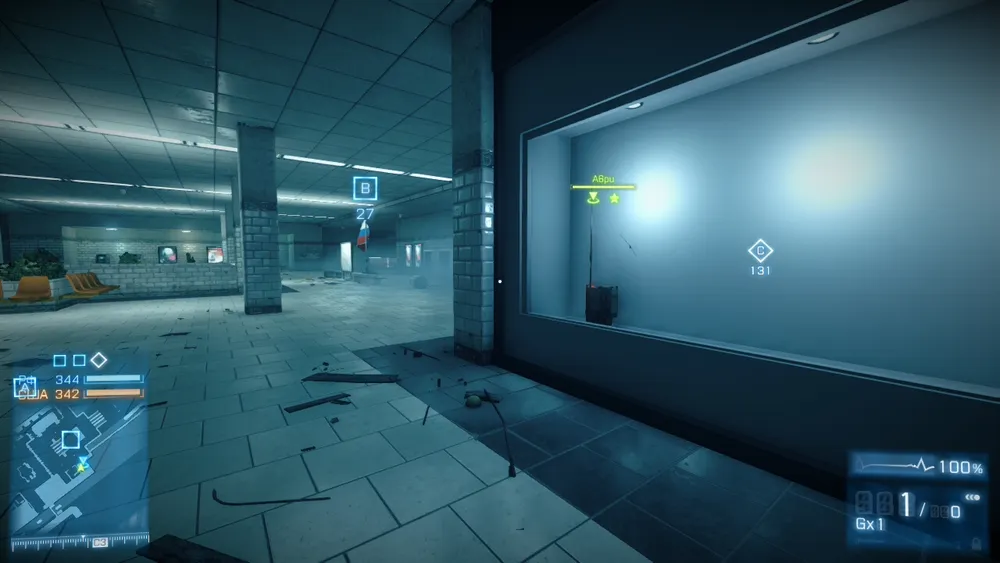
This beacon will really help if the enemy captures point "B." You can quietly respawn behind enemy lines and clear the point.
To hide the protruding antenna of the beacon in a vertical surface (texture), you need to stand sideways to this surface and place the antenna.
This way, you’ll make your antenna inconspicuous to the enemy’s eyes (but not to their ears), but you won’t be able to retrieve it "manually" from the texture.
It can only be removed when it is destroyed or when its owner respawns on it.
Placement of Motion Sensors.
To know where the enemy is currently moving, you can place 3 motion sensors around the perimeter.
- The first sensor is installed in the corner of the corridor, near the passage to "Tunnel."
- The second sensor is placed behind the white bags, behind "Second Escalator."
The third sensor will be useful if the enemy suddenly breaks towards point "A," through the right or central exit from the metro.
You will be able to detect him in time before he can capture point "A."
Setting up SOFLAM.
Just in case, you can set a SOFLAM on the left of "Second Escalator."
If the enemy captures point "B" from you, you will be able to see the enemy positions at point "B" currently, then coordinate your actions, and successfully reclaim the point.

Combat Tactics
The tactic that the RF team should adhere to is to hold back the enemy at the passages to **point "B"** until the points run out.
First of all, it’s worth mentioning some basic safety measures:
When you are near the top of "First Escalator," avoid standing too close to the edge of the escalator.
Try to stand either around the corner or in front of the escalator (stepping back to a safe distance from it). Only occasionally approach the edge to throw down grenades (or shoot from an underslung grenade launcher).
The same goes for ammo and health packs, they should be placed a little further back around the corner beside the escalator.
On "Second Escalator," it’s better to destroy the edges that are surrounding the escalator at the top.
This way, you will increase your visibility and not approach too close to the edge of the escalator to throw a grenade or fire from the underslung grenade launcher.
Ammo boxes and health packs should be used instead around the sides, behind the flowerbeds, and behind the escalator itself.
In the "Tunnel" passage, keep your distance from the walls and avoid going inside the "Tunnel" itself.
If you must go in, do so only with an underslung/standard grenade launcher, shooting at the sloped ceiling above the stairs (as mentioned earlier) and then immediately running away.
Ammo boxes and health packs should be placed near the exit from the corridors.
The tactics described below will be implementable if your team members communicate with each other via microphone.
If the enemy captures point "B" from you and pushes you back to point "A," then you will need to have one in each of the two different squads:
— Support (machine gun with increased suppression % + the perk for increased number of grenades ("SPLINTER") + Claymore)
— Assaulter (underslung grenade launcher + suppression resistance perk)
— Sniper (speed perk + MAV)
It is also important that at least one of your squads has a respawn beacon installed in the showcase (before they capture point "B") to the right of "Second Escalator" (as mentioned earlier how to install it).
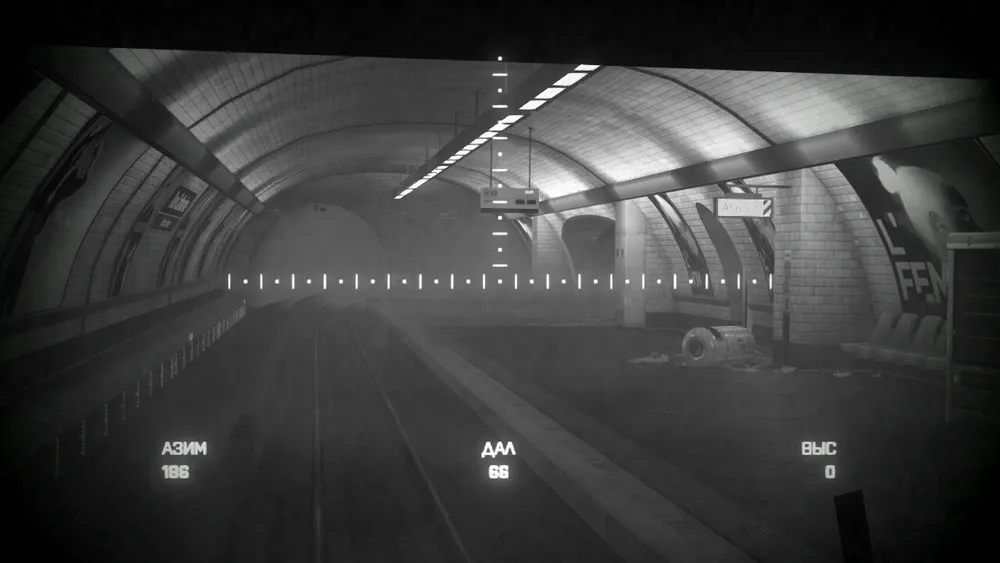
First, check where the enemy is concentrated.
Order the snipers from your squads to MAV into the metro.
Once you see on the mini-map that all—or most—of the enemy soldiers are concentrated at the exits from the metro and are being held back there by the remaining team members (at least 2 people at each exit), immediately give an order for both squads to commit suicide.
The first to respawn at the beacon is the squad whose sniper placed that beacon, i.e., Squad #1. The sniper of this squad should not respawn yet. He should exit Squad #1 quickly and switch to Squad #2.
As the sniper transitions to Squad #2 with their beacon, the members of Squad #2 will be able to respawn right where Squad #1 is.
The sniper should also avoid respawning at the beacon until after they exit Squad #2 and join Squad #1.
After respawning, he should place the beacon back in that spot.
While the manipulations with respawning Squad #2 are happening, members of Squad #1 should distribute themselves to the nearest positions (closest to point "A") as indicated in the screenshot below.
When members of Squad #2 respawn, they should occupy the remaining positions.
At this point, your squads should strive to locate and eliminate all respawn beacons at point "B."
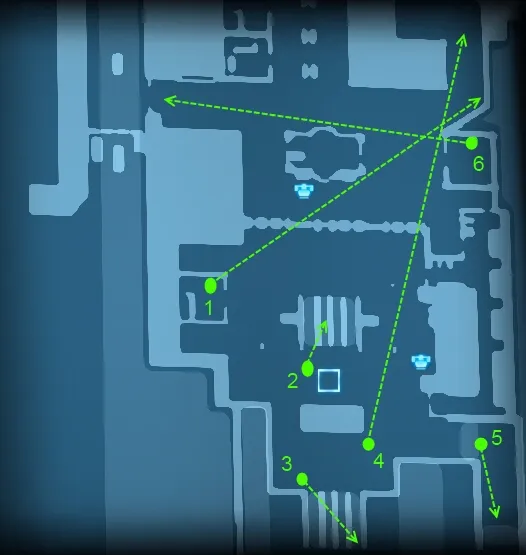
Point #1 — Assaulter. Will monitor the angle from which enemies will approach the left exit from the metro.
Point #2 — Assaulter. Will monitor the passage via "Second Escalator."
Point #3— Support. Will monitor the passage via "First Escalator."
Point #4 — Sniper. Will monitor the angle of the left exit from the metro. If they miss an enemy, the Assaulter from point #1 will finish them off.
Point #5 — Support. Will monitor the passage to "Tunnel."
Point #6 — Sniper. Will monitor the right exit from the metro fully and will simultaneously shoot enemies running to point "B" from the central exit of the metro.
The screenshot also marks the points at which the snipers from each squad will need to install MAV to highlight incoming enemies on the mini-map.
Once you occupy all positions, simply wait for the point to be captured, and under no circumstances attack the enemy whom you see near the exits from the metro.
If you kill those enemies before point "B" becomes neutral, those enemies can respawn right next to you, ruining the entire capture.
Just capture the point. And if the enemies at the metro exits see/hear that point "B" is being captured behind their backs, you’ll simply lure them closer and eliminate them.
As they run, you can make point "B" neutral, leaving them with no choice upon dying but to respawn at a far point "C."
If, after capturing point "B," enemies remain at the exits from the metro, those squad members who are closest to the enemies should find and eliminate them and return to the captured point "B" to help repel subsequent enemy attacks.
The next article will be dedicated to the map "Caspian Border," in Assault mode.