
DLC "Legacy" Walkthrough
Main Quests
A Memento of the Past

This is the main quest of the "Legacy" expansion. It begins as soon as you interact with the griffon statue. After an introductory cutscene and a conversation with your brother/sister, you embark on your journey.
Outcome: you are transported to the Vimmark Wasteland, where the Carta lurks, which has been raiding Hawke's family for some reason. The quest "Legacy" begins.

Hide and seek with the Carta in the Vimmark Wasteland
Note: Varric and Bethany/Carver will still go to new horizons, even if they are not in your group. This means they will be present during the initial dialogue, but to have them with you later, you'll need to take them into your party.
Legacy
The quest begins as soon as we find ourselves in the Vimmark Mountains.
In essence, it can be conditionally divided into two parts: the battle in the Vimmark Mountains and the exploration of the Grey Warden's dungeon.
In the Vimmark Mountains, you will encounter bloodthirsty dwarves, as well as quite a few brontos. By destroying everything that threatens the heroes' lives, you approach the lair.

Gerav - an old dead friend.

In the "Lair of the Carta" we meet an old acquaintance of Varric - Gerav. Unfortunately, he too wishes for Hawke's death, so he dies. A nice ring drops from him, just for Varric.

Fighting through the Carta dwarves who would love to spill Hawke's blood, we reach the "boss" - the dwarf Ratigan. From his corpse, Hawke collects the "Hawke's Key" - a magical weapon connected to our hero's blood. The key is needed to remove the seals placed by Hawke's father, Malcolm.
Note: here, in the "Lair of the Carta" you will have the last chance to return to Kirkwall. You must press the griffon statue.

Heavy... son of a...
The key is a weapon. Depending on the class, it can be:
For Mage - staff.
For Rogue - bow or dagger.
For Warrior - two-handed or one-handed sword.
After each sealed removed, the key can be upgraded. Only one upgrade can be chosen at a time.
First Seal. Location "The Prison of the Corypheus - Floor Sashamiri"
- Column of damage from nature's forces
- Column of damage from fire
- Column of damage from cold
- Column of damage from electricity

Twist and turn, I want more magic!
Second Seal. Location "The Prison of the Corypheus - Floor Farell"
- Column of health drain
- Column of attack speed
- Column of mana/stamina drain
- Column of armor penetration
Third Seal. Location "The Prison of the Corypheus - Base of the Tower"
- Column of reducing speed
- Column of critical hit chance
- Column of stun chance
- Column of critical damage
Once we find the key, we encounter a strange creature in the armor of the Warden - Larius.

Oh, what a man! In the past. Maybe.

He is a former commander of the Wardens, came here on the "call". The darkspawn do not touch him, taking him as one of their own, but he has not yet lost all his mind. He runs away and comes back again when you destroy the first seal. As you push through the darkspawn, you pass through three locations, each of which requires you to remove a seal and destroy the local guardian.
After we remove the last seal, Larius will appear again, worried that Corypheus is waking up and that "they are here." They are the Grey Wardens, who wish to free and control the darkspawn for themselves, unlike Larius, who believes Corypheus is dangerous and must be killed.

An organized mob...
Before the hero stands a choice - to side with Larius or Janeka. Depending on which side you choose, the gameplay changes.
If you side with Janeka:
- Varric +5 friendship
- Fenris +5 rivalry
- Anders +5 rivalry
If you side with Larius:
- Fenris +5 friendship
- Anders +5 friendship
- Varric +5 rivalry
If you support Janeka, the other Wardens will leave her and join Larius, and you will end up in the location "Prison of the Corypheus - Floor Deinikena".

Here Vasya are three golems.
You will have to activate magical barriers to push through a sort of "maze" created by Larius to delay you. At the end of the floor, there will be a battle with three golems guarding the entrance upstairs, where Corypheus is imprisoned.
If you support Larius, Janeka and the Wardens will leave, deciding they can manage without Hawke. You find yourself in the location "Prison of the Corypheus - Floor Rhiannon", where you will have to fight the Carta, which is in cahoots with Janeka, and also escape from a trap. To do this, you just need to rotate the columns, directing the beam so that it turns orange.

Fighting skeletons, darkspawn, and other creatures, Hawke reaches the tower where the last seal is located. Here, once again, there will be an opportunity to change your choice between Janeka/Larius. Support Larius - you will have to fight Janeka and vice versa.

Choose me! Choose me! The bird of happiness...
And here it is - the last seal. To remove it, you must destroy the vessels at the four corners of the hall. As soon as the last one is broken, Hawke will approach the pedestal and activate it with his key. Boom! And Hawke lies on the floor, while Corypheus is free.

Can't even lie down...
He is intelligent, but does not quite understand where he is. After a brief conversation, if you can call it that, the fight begins.
It goes through three phases.
- As soon as you remove 25% of Corypheus's health.
He activates a statue and starts spewing fire. A kind of turning "flamethrower." Corypheus himself becomes invulnerable. To get him out of this phase, you must break all the same 4 vessels at the griffon statues.
Note: when you break a vessel, two ghosts emerge next to it.

- When you remove 50% of health.
Corypheus continues to act as a flamethrower, but the room now becomes a jumble of rocks and boulders that impede movement.
Removing the "invulnerability effect" is similar to the first phase.

Who wanted some magic? Which place do you want it in?
- When you remove 75% of health.
The terrain does not change, Corypheus-flamethrower + rocks are now covered in lightning and strike with electricity if approached.
Removing the "invulnerability effect" is similar to the first phase. This is the last phase.
When Corypheus dies, Larius, if you supported him, will be freed from the "call" and leaves.
If Anders is in the party, you can take the amulet of the Tevinter magister from Corypheus's body, confirming he was once one. The golden city did not exist, but Tevinter indeed began the Blight.

Loot. Loot? Loot!
In the end, you will have a heart-to-heart conversation with your brother or sister, if you did not take them on the journey. Also - a memory of mother about Malcolm.
Side Quests
Unfortunately, there are only three.
Malcolm's Will
Malcolm's Will is a side quest. But it is specifically related to Hawke's father, Malcolm. He was a blood mage who imprisoned three demons in magical prisons.

This quest is hard to miss. It is activated in the location "Prison of the Corypheus - Floor Sashamiri". In the hall with genlocks, we come across a magical veil and suddenly realize that the demons speak in Hawke's father's voice. We need to find all the demons and destroy the barriers.
To remove the barrier, three "Sign of Binding" must be activated.
Two signs are on the crests of the Grey Wardens. The third is activated on the veil itself.

There are three places where demons are imprisoned, located in the locations: "Prison of the Corypheus - Floor Sashamiri" (one demon) and "Prison of the Corypheus - Floor Farell" (two more demons)
- The first demon - is a ghost.
The crests with the Signs of Binding are arranged opposite each other. As soon as the ghost is freed, it and its duplicates will attack Hawke.
- The second demon - is possessed.
The second barrier we find at the very beginning of Floor Farell, on the eastern side of the prison. One crest with the sign is in the room with the demon, the other is in the next room.
As soon as we free the possessed, he will summon four monsters.

- The third demon - is the Demon of Desire.
Its prison is approximately in the middle of Floor Farell, in the northern part of the prison. The location of the signs is similar to the second situation.
Once the veil is lifted, the Demon of Desire will raise several corpses.
After defeating the last demon, the quest ends with a short cutscene about Hawke's parents.

Note:
- If Bethany is in the group, she will receive the unique staff "Line of Kinship."
- If the brother/sister is dead, Hawke will receive a belt.
- If you complete the expansion after Act 1 with Carver the templar in your group, you will have a conversation with your brother about why he went to the Templars.
- If Carver/Bethany is in the group and was called to the Wardens, he/she will notice that being a Warden isn't so bad considering the Hawke family's history.
Dialogue with Bethany/Carver:
"Dad is in a better world now" - Bethany/Carver: friendship +5
"But we still have Gamlen!" - Bethany/Carver: friendship +5
"Let's finish what he started" - Bethany/Carver: rivalry +5
Altar of Dumat
This quest starts as soon as you find one of the sacrificial items for Dumat. They can be found on the "Floor Farell" and "Base of the Tower". Or, if you come across the altar, which is located in the location "Prison of the Corypheus - Base of the Tower"

The quest can be completed in two ways:
- Destroy the altar.
Outcome:
- you will gain lots of experience in the form of a bunch of ghosts and 2 anger demons.
- Fenris, Anders, or Sebastian will gain +5 friendship points.
- Place all four sacrificial items on the altar.
Outcome:
- you will receive 4 gold
- item "Chain of the Repentant" (+1 to constitution, +1 to armor, +7% to provoking danger)
- rivalry with Fenris will increase by 10, with Sebastian or Anders - by 5

Locations of sacrificial items:
- Crown of Dumat - an ancient Tevinter crown intended for sacrifice. Located in a side room in the eastern part of the location "Prison of the Corypheus - Floor Farell"

- Sacrificial Dagger of Dumat - an ancient Tevinter dagger designed for ritual sacrifice. Located in a side room in the western part of the location "Prison of the Corypheus - Floor Farell"

- Ritual Scroll of Dumat - an ancient Tevinter scroll containing the words of the religious sacrifice ritual. On a pedestal in the location "Prison of the Corypheus - Base of the Tower"

- Sacred Urn of Dumat - an ancient Tevinter urn covered in a crust of dried blood. Located in a small cave in the south of the area, where deep hunters fight spiders. Location: "Prison of the Corypheus - Base of the Tower".

The Paragon's Heir
This quest is activated only in the location "Prison of the Corypheus - Base of the Tower", when you find one of the three dwarven journals sent in search of the son of the Paragon - Tetras Garen.

To complete the quest, you need to find all three journals. Then a marker will appear on the map indicating where the body of the deceased dwarf lies. Hawke will read a dwarven prayer, thereby resting the spirit of the son of the Paragon.
The codex will be updated: "Tetras Garen returned to the stone, as befits the son of the Paragon"
Location of journals:
- The first journal - in the curl in the southern part of the location, near the entrance.

- The second journal - in a large stone structure in the northern part of the location.

- The third journal - in a small cave south of the area that needs to be cleared of monsters, where the Altar of Dumat is located.

Once you find the last journal, you will learn where the body of Tetras Garen lies.

Some Interesting Moments in the Game
These are not quests. They are not entered into the journal but are of interest to us.
I recommend taking Anders, Varric, and your brother/sister with you. Then there will be more such moments, and the dialogues will become more interesting.
"Anders's Call"

Anders is a Grey Warden. In his blood is the taint of the darkspawn. He, like the local darkspawn and Wardens, hears Corypheus's call. At one point, the call becomes so strong that Anders cannot resist and resorts to his last line of defense - Justice. Justice takes control over him and summons two ghosts. We must fight against a former ally. When Anders comes back to himself, he becomes his old self again.

"The Torch Riddle"
This riddle is located in the "Prison of the Corypheus - Base of the Tower". You need to light all 6 torches to open the sarcophagus, which contains part of the set (gloves).
It is solved quite simply. Let's designate each torch as shown in the picture:
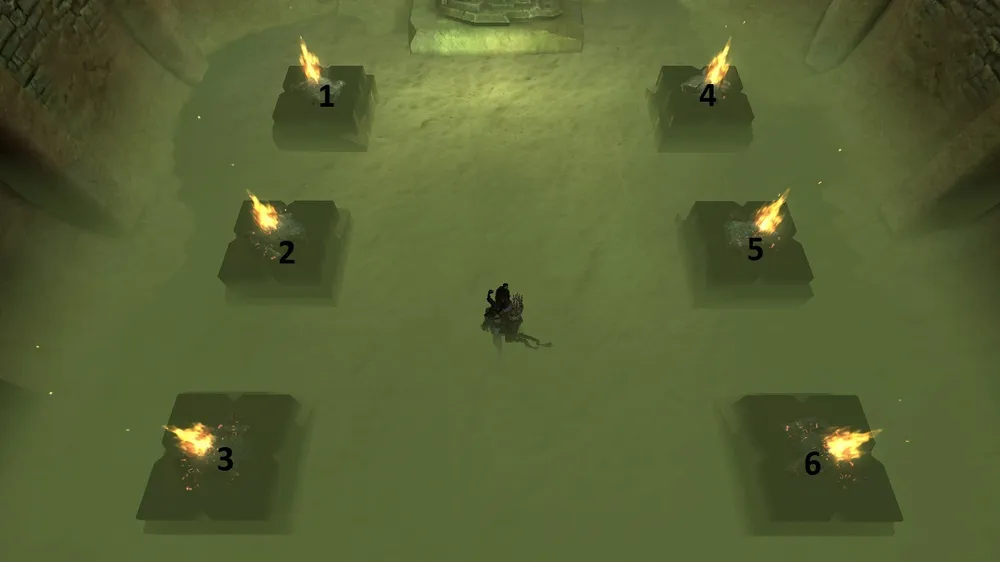
Clicking on each torch has its effect. So:
Clicking on the 1st torch: lights 1, 3, 4.
Clicking on the 2nd torch: lights 1, 2, 4.
Clicking on the 3rd torch: lights 2, 3, 6.
Clicking on the 4th torch: lights 4, 5.
Clicking on the 5th torch: lights 1, 4, 5.
Clicking on the 6th torch: lights 1, 6.
Now you can create your version for lighting the torches. I suggest this: 4, 6, 1, 2.
"Secret Boss"
This gem can easily be missed. For the quest to start, you need to find a warm sphere in "Lair of the Carta".


As soon as you take it - run back to the Vimmark Wasteland. To where you first met the bronto. There will be a strange structure that you activate by touching it.


You will be surrounded by ghost archers. Once you kill them, the boss himself, who previously was not moving and was invulnerable, will appear. This is Namrelis.
He also has 2 phases. At 50% health, he transforms into a dragon.

Killing him is not easy. The ghosts still try to help him send you to the other side. But once you defeat him...

You will have plenty of meat!
Achievements
Achievement
Description
How to Get
Conductor
Defeat the ancient evil in the Vimmark Mountains
Kill Corypheus
Deep Roads Safari

Kill a genlock, genlock leader, hurlock leader, bronto, and deep hunter in the Vimmark Mountains
Kill one of each enemy type.
Family Outing

Complete the main quest in the Vimmark Mountains with Bethany or Carver in the party
Take your brother/sister on the quest
Family Legacy
Apply three effects to Hawke's key.
Remove 3 seals and upgrade Hawke's key to the maximum.
Tower Sweeper

Complete all side quests in the prison tower in the Vimmark Mountains
Complete 3 side quests:
The Paragon's Heir
**
Altar of Dumat**
**
Malcolm's Will**
Thank you for your attention ^^