Siege of Dragonspear - Walkthrough, Part 2

Korlas has been defeated and the last shred of Sarevok's influence has vanished along with her. Your adoptive father, Gorion, has been avenged in full. Besides your friend Imoen, those who aided in thwarting your half-brother's machinations are leaving, returning to their normal lives. For the first time in so long, after leaving Candlekeep, the opportunity to reflect on the amazing events that turned your life upside down arises.
Despite expressing admiration for the rulers of Baldur's Gate, a nagging sense of unease doesn't leave you. Whispers circulate about a shared - dark - bloodline between you and Sarevok. Some speculate you killed your half-brother to usurp his place and gain power, rather than for the city's good. However, these voices are currently drowned out by others, occupied with pressing concerns.
Every day, more refugees appear at the city gates, expelled from their homes by Keilar Argent's minions. Many share stories of the Shining Lady's mercy and her fanatical followers. Ten days have passed since Korlas's defeat. With anxious thoughts, you lay down to sleep in your room at the dukes' palace. You ponder how Keilar Argent's crusade will affect Baldur's Gate, unaware that the answer is close...
**[Siege of Dragonspear - Walkthrough, Part 1](http://www.gamer.ru/baldur-s-gate/siege-of-dragonspear-prohozhdenie-chast-1)**
RETROSPECTIVE
Before continuing the adventures, allow me to add some additional information about the prologue.

In the quest for the moss (see Part 1 of the walkthrough, 2. Ammon), if your character is a mage or sorcerer, you can do without moss. In a dialogue with Ammon, you can suggest a recipe that substitutes this ingredient. Upon re-talking with Ammon, she will say that it worked and ask you to sign a letter for her.
Moreover, in Korlas's bedroom (see Part 1 of the walkthrough, 19. Korlas's Bedroom), there are "a few tomes on Baal's research, which are of no interest to you." If you take them with you, before leaving the location, they can be given to Imoen. Unfortunately, I didn’t see any money or XP points for this gesture.
TABLE OF CONTENTS
**
Headquarters of the Iron Throne
**
CITY MAP
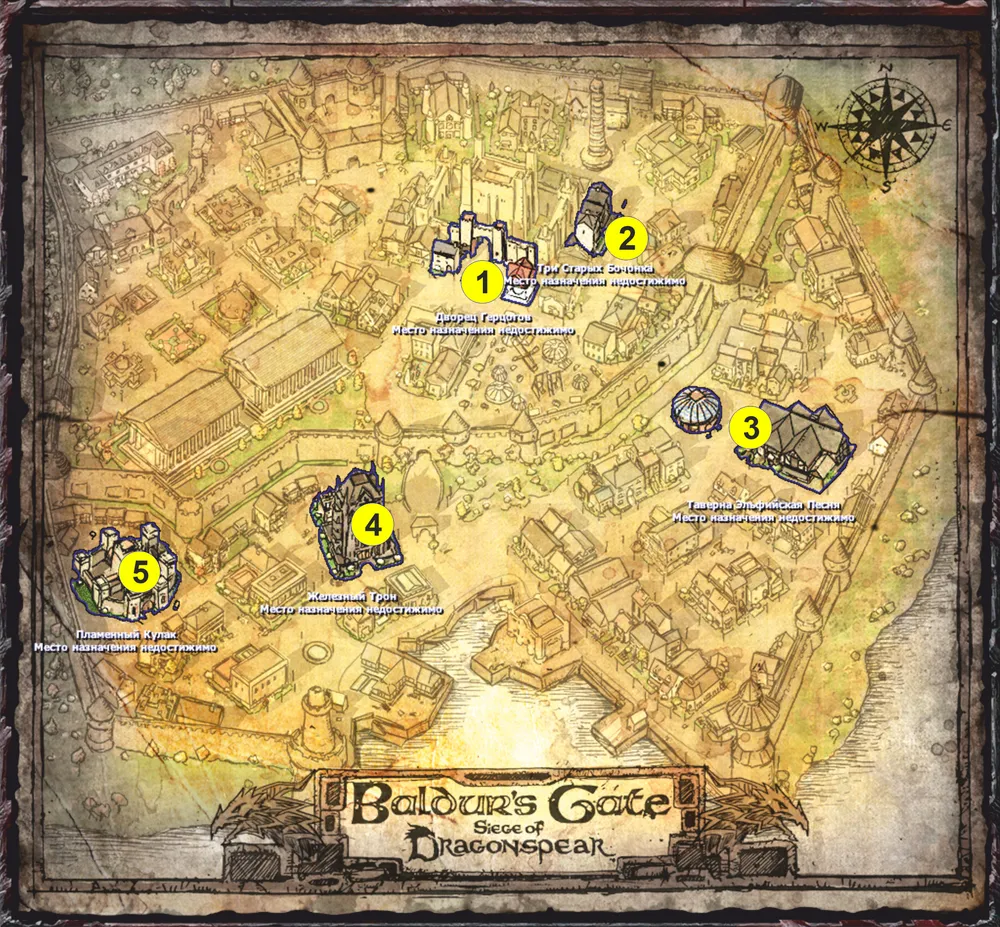
1 - duke's palace; 2 - inn "Three Old Barrels"; 3 - shop and tavern "Elven Song"; 4 - headquarters of the Iron Throne; 5 - castle of the Fiery Fist
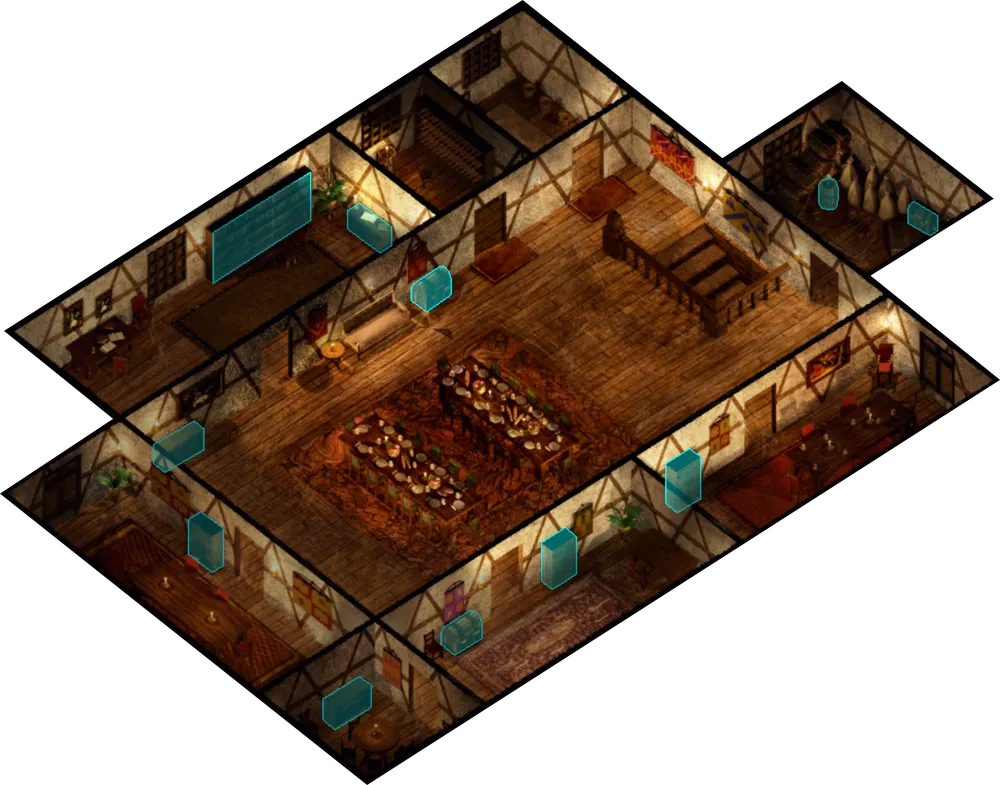
DUKE'S PALACE
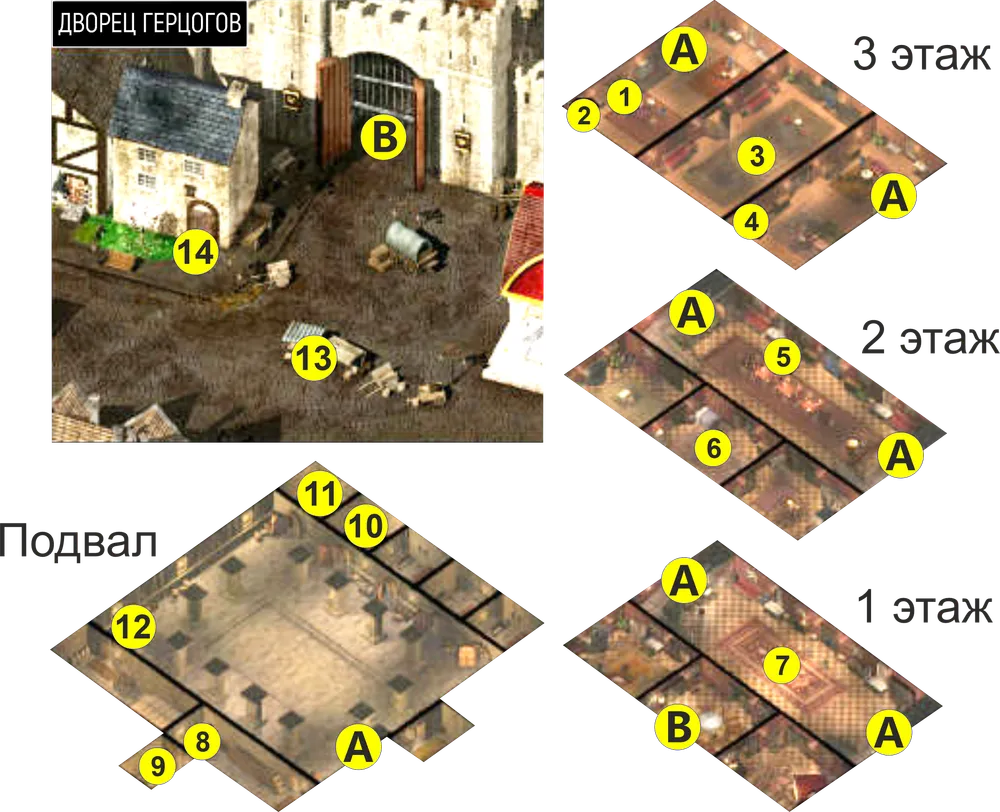
A - Stairs between floors; B - Exit from the palace
1. Bed. This chapter begins from this place. In the middle of the night, you are awakened by Imoen, who tells you she heard strange sounds in the corridor: either footsteps or some mumbling. Imoen then goes to check what's happening.
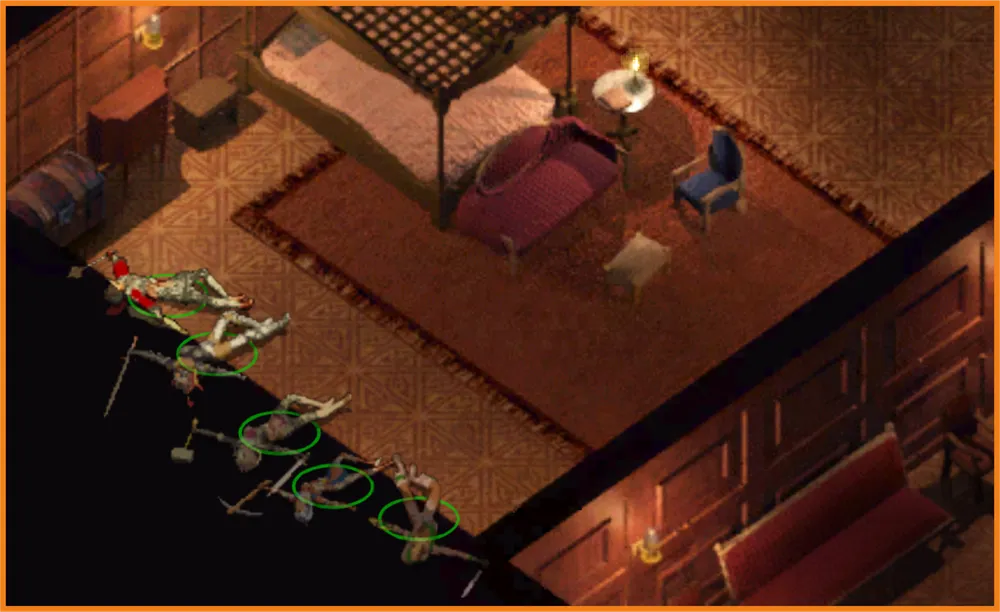
If, at the start of the game, you created the entire party yourself, your companions won't disappear. They will be lined up against the wall.
2. Chest. Now you can sort out your gear. Next to the bed is a chest that stores items that were in the characters' inventory during the prologue (there will be no equipped items in the chest, only those stored in the inventory). This chest will be encountered by the hero throughout the game, so you can store excess items in it and take only what is necessary.
3. Central Hall. After sorting out your belongings, head to the central hall of the floor. Upon entering the room, you will see how four assassins attack Imoen. One of them appears behind Imoen and injures her, after which the enemies switch to the hero. You can fight back on your own, or simply retreat, as Captain Corwin will appear shortly to help deal with the assassins. After victory and dialogue with the captain, she will summon Duchess Lia Jannat, who will teleport into the room and provide first aid to Imoen. The duchess will also order you and Captain Corwin to clear the rest of the palace from assassins. Before leaving, pick up a parchment from one of the enemy corpses indicating that you were their target.
You can also search two bookshelves on the northern wall of the hall. One has the book "History of Amn," and the other "History of Waterdeep, Part 1."
4. Imoen’s Room. Here is Imoen's chest. Inside you can find: healing potions, speed oil, a wand of magic missiles, 40 arrows, a short bow, and three spell scrolls (magic missile, identify, armor). If you imported your save into "Siege of Dragonspear," you will find all her gear from the main game here as well.
5. Dining Room. The floors of the palace are connected by two parallel staircases at the northwest and southeast corners of the location. Descending one of them, you will enter a room with a large dining table, where two guards are fighting three assassins. After you assist them, Captain Corwin will talk to you. She will instruct you to descend to the first floor. In the dining room, you can search the large table. Each half contains a bottle of wine. Before going down further, be sure that no enemies are left on the second floor.
6. Living Room. Here you will be ambushed. Three assassins will attack from the shadows, first closing the doors. You can fight them alone or rush back to the dining room (the doors are closed but not locked), where you will have the guards help you. After dealing with the attackers, search the cupboard by the entrance from the dining room. You'll find ammunition for bows. Also, proceed to the neighboring room to the north and search the table. Inside is the book "History of the North I."
In the dining room under each of the existing staircases are wide doorways. In the southeast part of the room, this doorway is not visible due to the design of the location. Through one of these doorways, you can transition to the first floor.
7. Sitting Room. Here you will meet four great dukes - Belt, Elthana, Entar Silvershield, and Lia Jannat - even if some of them died during the original [Baldur's Gate](/games?search=Baldur's Gate). They will inform you that the assassins bore Keilar Argent's crest and suggest that the hero resolve the situation. The great dukes will recommend Captain Corwin as a companion in Baldur's Gate while you gather your party from former companions in town. Captain Corwin will wait for you at the palace exit and will follow you when you leave.
After the cutscene, Ski, Entra Silvershield's daughter, will appear at the sitting room doorframe and "wave to you." She will tell you that the Great Dukes suspect that Keilar is yet another offspring of Bhaal. However, Ski will not want to reveal more and promise to talk to you later in private. Then she will leave the palace.
On the first floor, you can also meet Jospill. At first, he will interrupt the conversation because he is depressed over recent events. To cheer him up, you need to talk to him again and discuss the problems that trouble him. If you succeed, you will earn 250 XP and receive Breven's staff +1.
Search three containers in the sitting room. You will find the book "History of Waterdeep II" and various potions.
At the palace exit, talk to Captain Corwin. She will hint at where to look for your money. You need to go to Treasurer Ofilius. He is located in the palace basement. The entrance is under the northwest staircase.
8. Treasury. When you reach the basement, go south to the passage leading to a narrow corridor. At the end of it, you will find the treasurer at a locked door. When you present him with your treasury bond, intending to collect your money, Ofilius will admit that he lost it gambling on dog races. But the treasurer vows to return the full amount soon. Afterward, he will go for the money.
9. Vault. The door to it is locked, and there is no key. You can only get in if you have a thief or a mage with the unlock spell. Since there is currently no such character available, and kicking the door down with weapons doesn’t work, you'll have to retreat and come back later with the necessary companion.
10. Korlas's Cell. In case you arrested Korlas in the prologue, as soon as you approach her cell, she will break out. You will have to fight her again. You will receive help from two members of the Fiery Fist who are nearby. Korlas mainly runs around and casts spells: Confusion, Mirror Image, and Slow. For defeating her, you will earn 2500 XP, provided that you killed her and not the guards.
After the fight, there will be a conversation with the guard, who will tell you about a doppelganger in the adjacent cell and inform you about the nature of this creature.
11. Doppelganger Cell. When you approach this cell, the doppelganger inside will start banging on the door, begging to be released. He will claim to be an officer of the Fiery Fist, who was deceitfully locked inside. There are several ways this can play out:
- ignore him and leave him in the cell;
- release him unconditionally (the only option for those who haven't revealed his nature);
- attack the doppelganger (to do this, you will have to unlock the door). Once the doppelganger takes enough damage, he will beg for mercy. You can either re-lock him in the cell, kill him, or accept his offer;
- open the cell and accept his offer. (Only if you know in advance who he really is).
In this walkthrough, the last option was chosen.

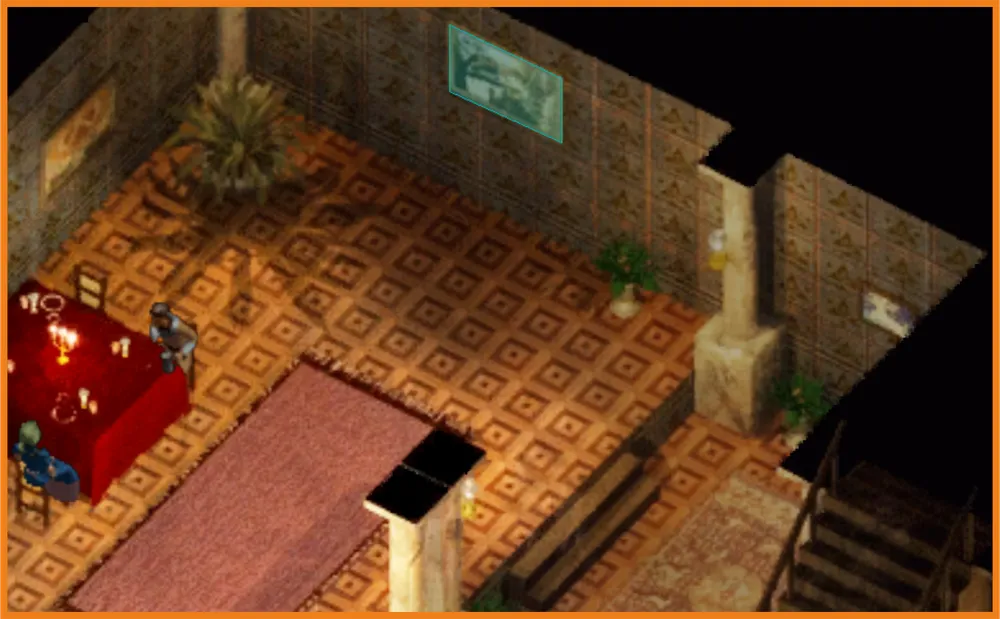
The doppelganger in its true form
12. Key to the Doppelganger Cell. Take the key from the table and unlock the cell. The doppelganger will tell you he has hidden a stash of valuables in the basement of the Iron Throne headquarters. He agrees to give these valuables to you if you meet him there in three hours (in reality, the impact of time on the quest is not observed). Once you give your consent, the doppelganger will leave the palace.
After meeting with Captain Corwin, tell her you are ready to head to the city, and then exit the palace.
13. Tira and Kila. Exiting to the courtyard, head south towards the market stalls. Along the way, you may encounter the wounded Ofilius, who will inform you that while he was returning with the money, he was robbed by several refugees who fled to the inn "Three Old Barrels."
Talk to Tira. She will ask you to deliver and give 50 coins to the pawnbroker she owes money to. Tira cannot leave the shop because the last time she was away, her shop was robbed, and today is the last deadline. Agreeing, you will receive 50 gold.
14. House of Virtue. At the door stands a stout man named Garachen. He will tell you that he offers shelter and bread to refugees. Standing nearby, refugee Perrin will complain that Garachen charges an exorbitant fee for his services. To the suggestion of charging the refugees less, Garachen will respond that provisions are expensive these days, and if you want to help, you should deliver food from lady Alit from the tavern "Elven Song." He will emphasize that he does not intend to pay for them.
Currently, there are no objectives left in the palace, you can go about your business in other districts of the city.
INN THREE OLD BARRELS
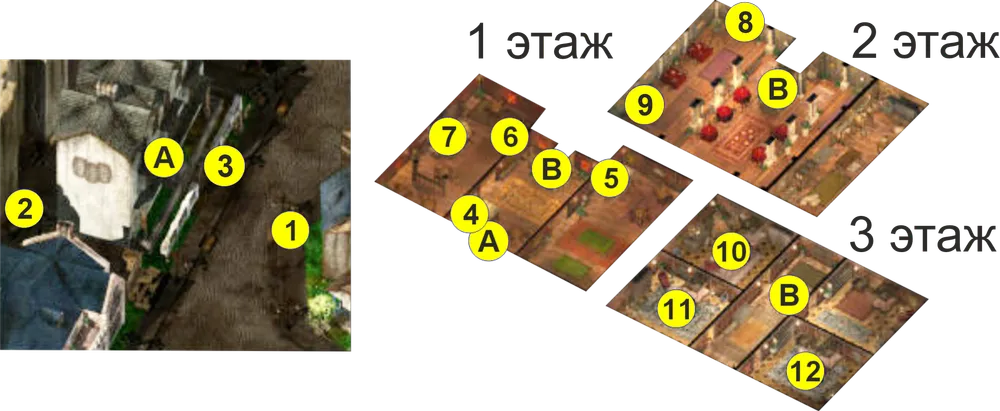
A – entrance to the inn; B - stairs between floors.
1. Asheri, Dirla, Gott, and Luis. This quartet is a gang of robbers. If you talk to them, they will decide that you have something valuable and attack. If you are a warrior, you can mention in conversation that you are an experienced fighter. This will frighten Asheri away. The reward for defeating the robbers is 1450 XP (as long as you kill the enemies, not Corwin). After their death, among other things, six healing potions and a potion of heroism will drop.
2. Eilin. Before entering the inn, look around the building. In the alley, you will see a woman named Eilin standing next to a cart with a dead man. She will tell you that this man was her cousin and died from some illness. The temple is asking her for 100 coins for the funeral, and she is missing 15. But if you don’t believe her and say you will talk to the priest, she will change her story. The truth is, the body belongs to her drunken husband, who "accidentally" hit his head and died when he attacked her. And she needs the money to make it disappear without a trace and avoid unnecessary questions. There are several ways to resolve this dilemma:
- pay Eilin 15 coins without getting the whole story. You will earn 200 XP;
- pay Eilin 15 coins after you understand the whole story. You will earn 300 XP;
- promise Eilin that you won’t say anything to the Fiery Fist. You will earn 100 XP;
- blackmail Eilin. You will earn 85 coins and 100 XP;
- promise nothing and later inform officer Fritz in the Castle of the Fiery Fist about Eilin, and you will receive 50 coins and 300 XP.
3. Robel. He works as a barker and stands at the entrance to the inn. In conversation, he will ask you for a favor. He has been standing for hours calling customers and his throat is dry, so he asks you to find Katira inside and ask her to send him a drink. If you agree to help, you enter the inn (if you demand a reward for your service, he will refuse to accept your assistance).
4. Charra. This character stands behind the counter near the exit from the inn and sells drinks. Here you will be waiting for Captain Corwin.
5. Katira. You will find her by going into the billiards room. She stands behind the bar and sells drinks. To convince her to send Robel a drink, you need to choose a dialogue option that starts with "Robel works so hard..." when you have a charisma of 14 or higher, or "I boast endurance..." when you have a constitution of 14 or higher (you might encounter other options too). After that, you can return and report the results to Robel. If you succeed, you will earn 30 coins and 300 XP. If you fail to negotiate (she will only send it when she has time), you will earn only 300 XP.
6. Atinn and Lucille. Opposite the billiards room, sailors are relaxing in the bar. When you enter the room, you will witness Atinn speaking disrespectfully about the ship "Amn’s Delight" and humiliating its crew. Lucille and several other sailors don’t like what he says, after which they will have a quarrel. Bartender Nantrin Belloglin recognizes you and asks you to prevent the fight. There are three ways this can develop:
- you can act diplomatically and convince the sailors to retreat (by saying: "How about another drink?", and then "All right, calm down"). For this, you will earn 500 XP;
- you can help Lucille fight Atinn (by saying: "And you may have the ugliest face", "And you are wiser", and then "Yes, all right"). Atinn will surrender as soon as you deal enough damage to him. However, if you manage to kill him, you will earn 750 XP and find the Eadro Blade +1 on his body. After the fight, Lucille will give you Montgomery's Club +1;
- you can help Atinn fight Lucille (by saying: "I dealt with Sarevok's threat", and then "I’m with you"). Lucille will surrender as soon as you deal enough damage to her. And likewise - if you manage to kill her, you will earn 750 XP and find Montgomery's Club +1 on her body. After the fight, Atinn will give you the Eadro Blade +1.
7. Nantrin Belloglin. After dealing with the sailors, go behind the bar and talk to the bartender. You will receive the following rewards:
- if you handled the situation peacefully, he will offer you 200 coins, which you can refuse and gain +1 reputation;
- if there was a fight, he will only give you free drinks.
After exploring the first floor, ascend the stairs to the second.
8. Painting. By going up to the second floor, you will enter a sort of restaurant, with decorated tables and a kitchen. Customers are served by a waitress named Ittil Kalantrin. To the north of the stairs hangs a painting you can examine. Behind it, you will find a couple of random gems.
If you are going to the second floor for the first time, it’s better to save the game on the first floor in advance. This will give you the chance to choose suitable stones through reloading.
9. Berakhli, Hastus, and Ozil. In the corner behind one of the tables, six refugees are feasting, three of whom beat and robbed Ofilius, the treasurer of the Duke's Palace. During the dialogue you will learn that they have already given away and spent the money. You will have three options:
- forgive their crime. You will receive a battle axe +1;
- arrest them. You will earn 750 XP;
- kill them (you will have to fight all six at once). In the battle with them, you will be helped by the waitress Ittil Kalantrin (a mage). You will earn more than 600 XP for defeating the battle and find a battle axe +1 and 132 coins on their bodies.
After resolving the situation, head to the third floor, where there are four guest rooms.
10. Lady Araya, Lord Maxwell, and Lord Terton. Immediately at the stairs upon entering the first room, you will hear three people conspiring to overthrow the Council of Four. In conversation, you can resolve the situation in three ways:
- blackmail them. You will receive a Cloak of Protection +1, a Dagger +1, Boots of the Braggart (+4 charisma), 600 coins, and 300 XP;
- attack them or try to arrest them. Either way, you will have to kill them. You will earn 45 XP for the battle and find a Cloak of Protection +1, a Dagger +1, Boots of the Braggart (+4 charisma), 800 coins, and a letter from the rebels. By taking the found letter to the first floor to Captain Corwin, you will receive another 500 XP and +1 reputation;
- offer them your help. The conspirators will send you downstairs to search for a fourth accomplice named Eldrik; however, you will not find him. In reality, the game does not provide an option to help the trio. Instead, you will only be able to report the conspiracy to Corwin. The captain will then send you back upstairs to talk to them, thereby forcing them to incriminate themselves. As soon as the conspirators say enough, Captain Corwin, Inspector Tail, and a city guard will intervene and arrest them. You will earn 750 XP and receive an Emerald for your efforts.
A small addition: if you already have two companions with you, then after the final dialog, you can make the following trick. After they give you a reward, the dialog will end and the quest in the journal will close, pause the game (space by default), then give orders to your heroes to attack the conspirators, each taking on one target (preferably long-range weapons). The main task is to kill them before they disappear. If everything goes well, you will be able to take the Cloak of Protection +1, the Dagger +1, the Boots of the Braggart (+4 charisma), 800 coins, and the letter from the rebels. By bringing this letter to Corwin, you will receive another 500 XP and +1 reputation. Thus, the game considers the rebels' arrest, but you gain all possible rewards from this quest.

Opposite the conspirators' room are the apartments. During the day they are empty; at night, a sleeping elf is in one bed and a dwarf is on a chair. You can’t talk to them, but you can search two bookshelves, obtaining the books "History of Vasta" and "History of the Dead Trinity."
11. Dinahair, Minsk, and Boo. Proceeding further down the hall, you will meet your old acquaintance, the ranger named Minsk. He and his pet hamster Boo are glad to see the hero, but they will not want to join without the sorceress Dinahair. So talk to her to recruit both of them into your party (and Boo).
12. Delenda's Room. In this room, you will encounter a noblewoman. She won't be happy to see you and, if you refuse to leave and continue to speak with her, she will call for her bodyguard Bartleby. The subsequent events can develop as follows:
- if you kill Bartleby, you will earn 650 XP, and on his body, you will find Bartleby's wakizashi. After that, Delenda will flee, and Ittil Kalantrin (see above p. 8) will teleport into the room. She will be shocked by the dead body and will report that she will file a complaint with the Fiery Fist (-1 to reputation);
- if you are playing a warrior, you can threaten Bartleby that you are a fighter of unmatched skill, and he and Delenda will leave, earning you 200 XP.
A small addition: if your character is a mage, you can avoid the scandal altogether by offering Delenda magical services to smooth her wrinkles. In return, she will give you her necklace "tears of Laeral."
After settling matters in the "Three Old Barrels," return to the first floor to Corwin. Introduce her to your companions, and you can either leave or invite her for a drink one last time. During the conversation over drinks, you can discuss Keilar or learn more about Corwin herself.
Upon exiting the inn, do not forget to talk to the barker Robel if you haven't done so yet.
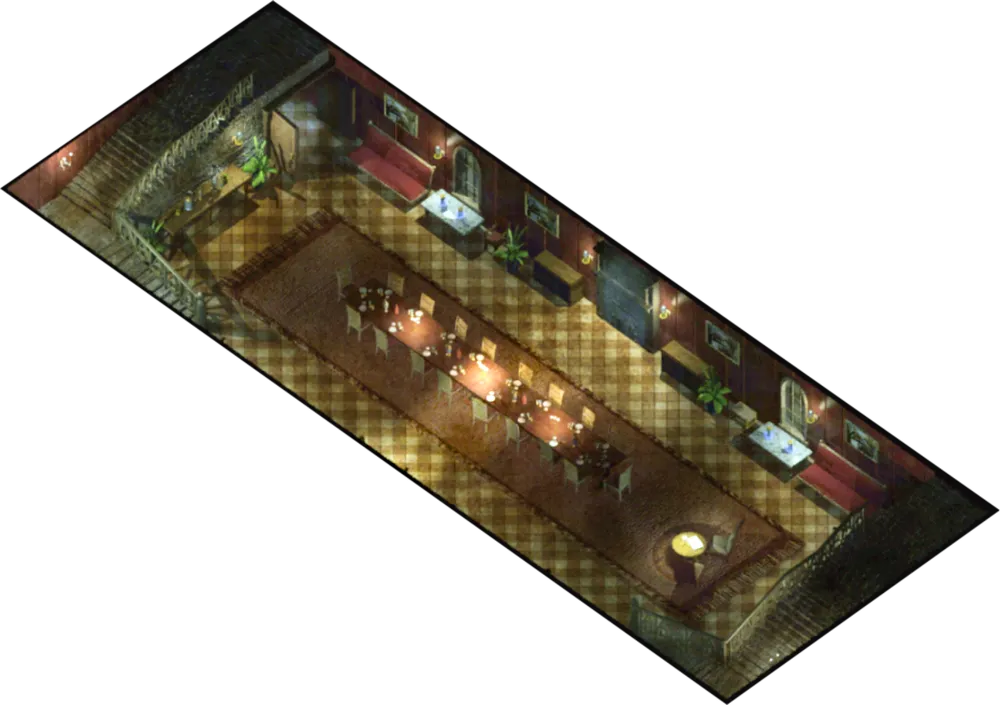
TAVERN ELVEN SONG
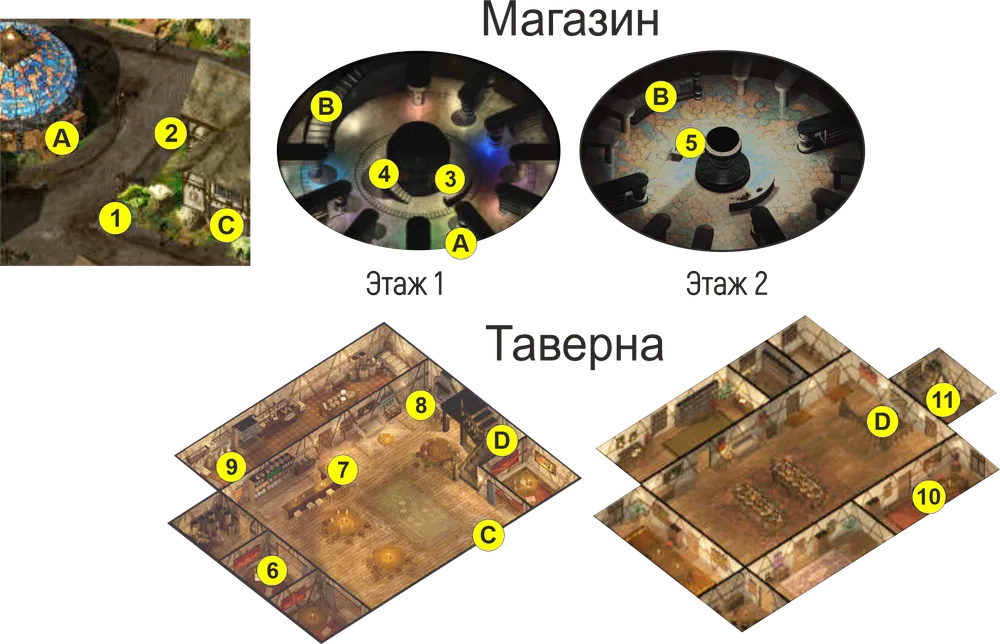
A - entrance to the shop; B - stairs between shops; C - entrance to the tavern; D - stairs between the tavern floors
If you have a quest from Tira (see Duke's Palace, p. 13), then a certain Zelma will approach you. She will inquire where to find the "Potion Supplies" shop. In fact, she is a thief. If your character's intelligence is 14 or higher or wisdom is 13 or higher, you will be able to expose her. Otherwise, she will steal 50 coins from you. You can also reveal her if you are playing as a thief; in this case, you won’t need a stat check.
If you lack the attributes to expose the thief, you can attack first before she speaks with you (you'll need ranged weapons). Surprisingly, your reputation won't decrease, and the guards nearby, as well as Captain Corwin, will assist you. From the thief's body, you can take 89 coins. If you failed to stop her, the last chance is to hit Zelma in the back after the dialogue and grab 139 coins off her body. But in that case, for the game, you will still count as robbed.
1. Officer Vida, Tanorm, and an unconscious man. At the corner of the intersection, you will stumble upon this trio. From the conversation, you will learn that Tanorm and the unconscious man are refugees who started a fight. Officer Vida detained them and wants them to be sent to prison. No matter what words you say to her, Vida will ask you to go to the Castle of the Fiery Fist and bring backup.
2. Senna. Proceeding up the street, you will meet the pawnbroker Senna, to whom the merchant Tira owes 50 coins (see Duke's Palace, p. 13). The dialogue may unfold as follows:
- if you have exposed or killed the thief before the dialogue, then you simply give her the coins;
- if you were robbed of the money or killed her after the theft, then in dialogue, the hero will inform Senna that he was robbed on the way and offer to pay from his own pocket or lament that such a sum is burdensome and will have to tell Tira bad news.
Now you can return to Tira. If you report that you gave her the coins (hers or from your own pocket), you will earn 250 XP. Otherwise, you will earn only 100 XP, and the refugees near Tira will boo you.
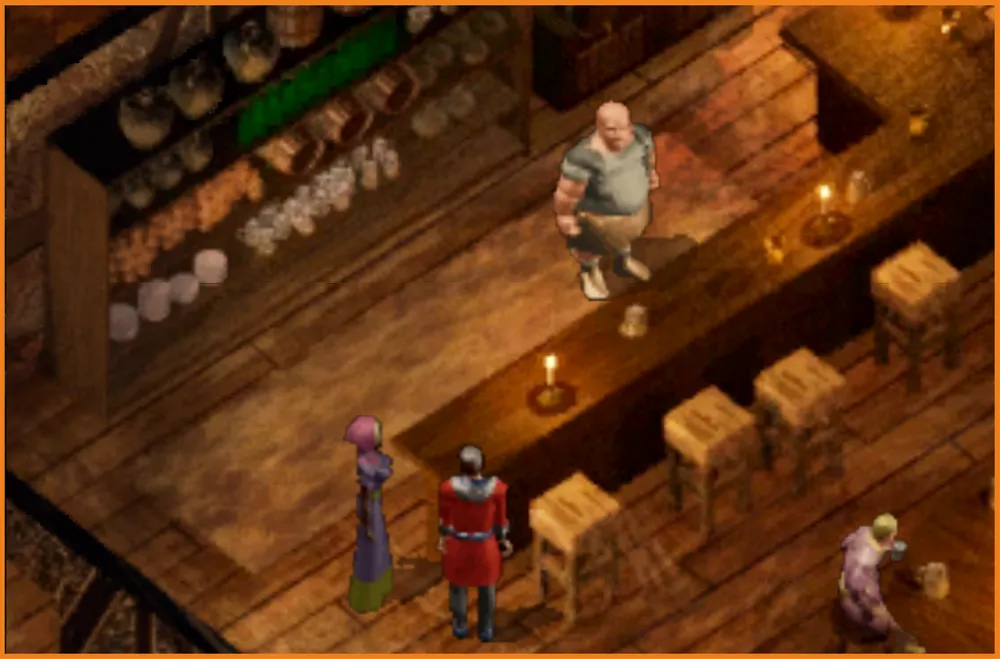
3. Halbazzar Drin. Across the road from the tavern is the "Potion Supplies" shop. Upon entering the shop, you will see a seller behind the counter surrounded by a crowd of people queuing for purchases. In dialogue you can threaten him or mention that you work for the Council of Four, in which case he will serve you out of turn. Otherwise, you will first have to fulfill his request. Halbazzar needs a bag of empty potion bottles; he will ask you to bring it from the cabinet on the second floor and give you the key to it.
4. Kazdrem. He is Halbazzar's cousin. He sells various useful items, including a scroll case, a potion bag (which I recommend buying regardless of your hero's class).
5. Lockers. Ascending to the second floor, you will see a round counter with built-in lockers in the center of the room. To open them, you will need the "Key to Halbazzar Drin's Locker" (see above, p. 3). Inside the lockers, you will find a fire resistance potion, a potion of heroism, an invisibility potion, a magical shield potion, and a potion of mirrored eyes. Here too, you will find the aforementioned bag of empty potion bottles. However, when you take it, thieves Kag (fighter), Setil (mage), Vistak (spider), and Yashna (ranger) will teleport into the room. Regardless of what you say to them, they will attack you. For defeating them, you will earn 850 XP, and from their bodies, you will find several flame arrows, bracers of defense 7, several darts +1, and a mantle of a rogue.
After the victory, you can return to Halbazzar. Hand him the bag of empty potion bottles, and you will receive a reward of 50 coins and 750 XP. If you mention that you prevented the robbery, Halbazzar will add a protective amulet +1.

After searching these shelves, you will find scrolls of Protection from Cold and Protection from Electricity, as well as a Cursed Scroll of Petrification.
Business at the shop is done. Descend downstairs, speak to Corwin, and exit the shop. Cross the road to the tavern "Elven Song."
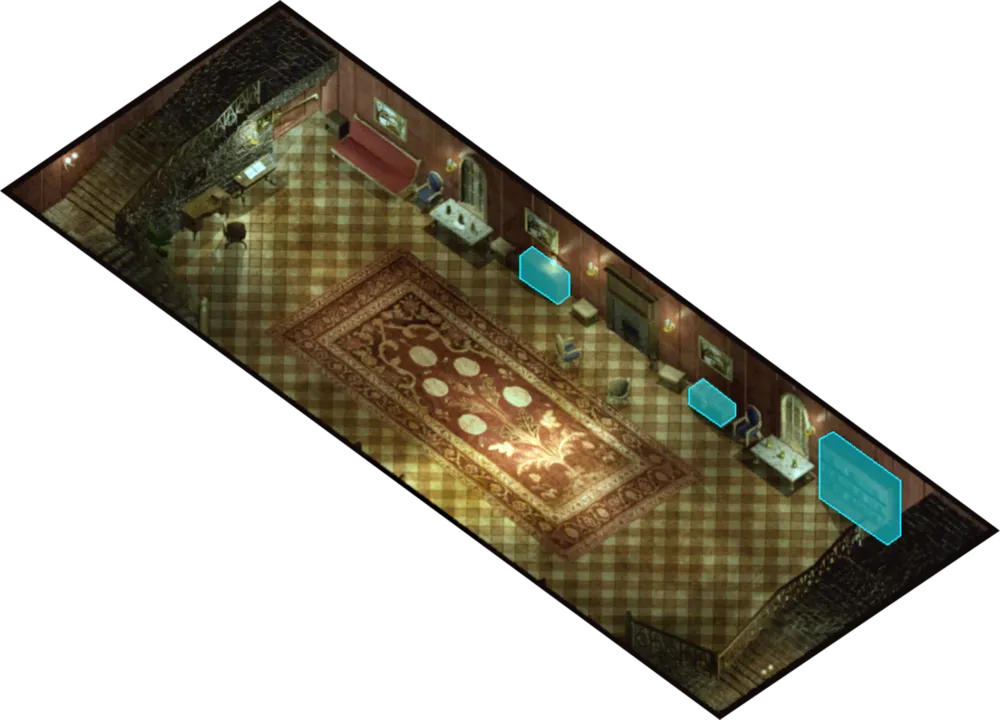
6. Zaviak. In the middle booth, there is a strange fellow in glasses. In conversation, he will mainly ignore what you say, but continuing the conversation, he will eventually give you his Observation Glasses. They will allow you to see and interact with immaterial beings. There are ten such beings in the game, but the item only has three charges. In this chapter, only one of these beings is in the tavern - a fire elemental named Al-Alai.
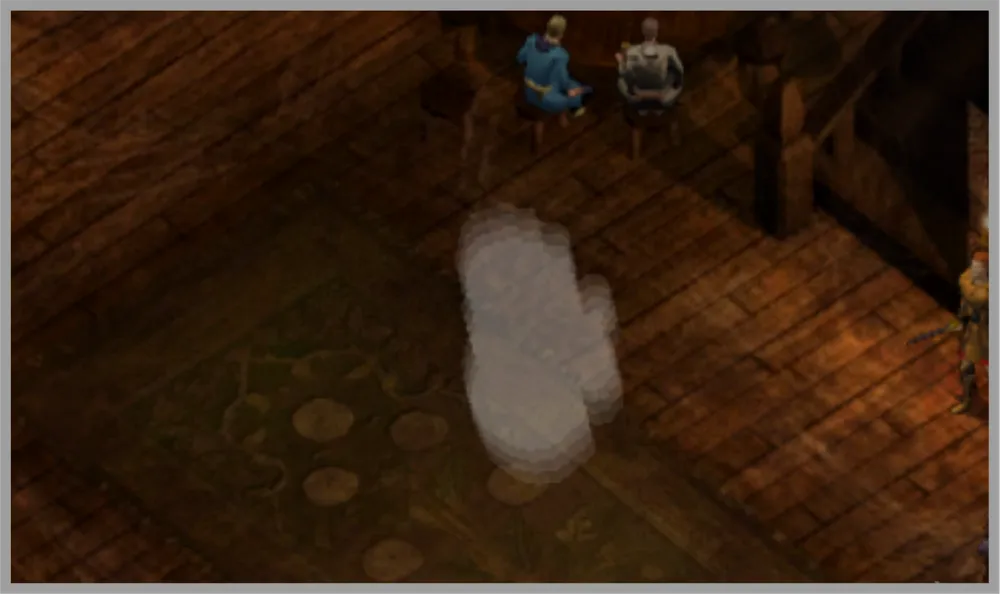
Wandering Shadow

Al-Alai, the first wrath of the white forge.
By equipping the glasses in the helmet slot, you will see a floating gray cloud moving across the first floor of the tavern. Use a charge of the glasses on the cloud to summon the elemental into the material world, after which a short dialogue will ensue. Whatever you choose, the battle with him is inevitable. Defeating the monster will be quite difficult, even though some patrons, including Captain Corwin, will help you. Perhaps before the summoning, you should gather the whole party, buy potions, and spells of fire protection. After defeating him, you will earn 6000 XP (provided you killed him and not someone among the patrons).
I recommend not wasting a precious charge on this monster, as the fight is tough and resource-demanding (potions and scrolls are still worth money), and there is a risk of patrons getting hurt or even dying, including quest ones.
Near the booths, there is a bar counter where the bartender sells drinks.
7. Lady Alif Elendara. The tavern owner stands next to the bar. You can talk to her about providing food for the refugees to Garachen’s house (see Duke's Palace, p. 14). She will tell you that she has just received a new supply of provisions and will offer them to you for 1000 coins. There are several ways to get food:
- pay for them or ask Alif to gift them (charisma 15 and higher). Then Alif will give you a key that will unlock the chest in the storeroom on the upper floor;
- steal the supplies.
In this walkthrough, I refused to pay such a high sum and lacked the skill to persuade the owner to give the supplies free of charge. Also, my hero does not have lock-picking skills and lacks spells to unlock them. So we will return to this matter later.
8. Garrik. In another part of the room, opposite the bar counter, you will meet an old acquaintance - the bard Garrik. He will perform a love ode dedicated to lady Alif (see above p. 7). As you approach him, you will witness their conversation in which Alif remains indifferent to Garrik's advances and asks him to perform his songs elsewhere. In the first dialogue, Garrik will suggest you move to the bar counter. He will then tell you a bit about Keilar Argent but will refuse to join the team as he intends to win Alif's favor. After talking to Garrik, speak with lady Alif, who will give you a potion of agility.
9. Irina. In the kitchen next to the cook, you will meet Irina, who is panicking because the tavern has run out of ruby wine, and the demand for it is great among clients with "high impulsiveness." In the dialogue, she will recognize the hero and offer to bring a barrel from Duke Belt's personal stash in the basement of the Duke's Palace. Once you agree to do this, Irina will say that the ruby wine has a "sharp, spicy smell." You can also demand money to buy the wine. She will give you 50 coins.
Upon returning to the Duke's Palace basement, you will see barrels in various places in the basement. You need those at the doppelganger's cell (see Duke's Palace, p. 11). This wine will indeed have a "sharp, spicy smell." You can either just take the barrel with it or leave 50 coins at the barrel; there will be no consequences. When you return to Irina, you will receive the helm "Battle Mug" and 500 XP.
A small addition: if you are playing as a dwarf, you can tell Irina the recipe for a drink called Tongblister (traditional dwarven). After that, she will decide to make it and move to the other side of the kitchen. Warning: there is a bug. If Irina remains in place and you do not initiate a dialogue with her, you will need to exit the tavern and re-enter (the quest will start over) or reload the game. In the second dialogue, she will say that she loves the drink, and you will receive a reward for the quest (the helm "Battle Mug" and 500 XP).
Also, while playing as a mage or sorcerer, you will be able to enchant regular wine into ruby. The spell will succeed with intelligence 16 and above. In case of success, you will receive the quest reward. If the spell fails, you will have to go for the wine to the palace.
If your character is a druid, the check will be made on wisdom 16 and above. Upon failing the spell, Irina, after tasting the beverage, will turn into... Uh... A squirrel? It can be cured with a dispel magic spell. After this, Irina will refuse to deal with you (the quest will end, reward 250 XP).
After finishing up on the first floor, ascend to the second.
10. Safana's Room. Upon reaching the second floor, you will witness Safana kicking Koran out of her room, threatening him with a dagger. Koran will leave, telling you he's unable to help in the battle against the crusade but will give you a water opal. Meanwhile, Safana will agree to join you without any conditions or unnecessary questions.
11. Storeroom. In this room, you will find the supplies of lady Alif (see above p. 7) that you previously requested or bought for Garachen (see Duke's Palace, p. 14). You can unlock the chest with a key received from Alif. In my case, I didn’t reach an agreement with the tavern owner, so I used Safana's skills to break the lock.
The second floor is full of chests, cupboards, cabinets, and other containers, many of which are locked. Don’t be afraid and, using your new companion, break in and take the contents.
At this stage, business at the tavern is done. Go back downstairs to Captain Corwin. Introduce her to Safana and head to the next district of the city.
You may return to Garachen (see Duke's Palace, p. 14) and deliver the previously obtained food to him. The owner of the house will acknowledge that he was unfair with the rates, and refugee Perrin will gift you a random gem.
HEADQUARTERS OF THE IRON THRONE
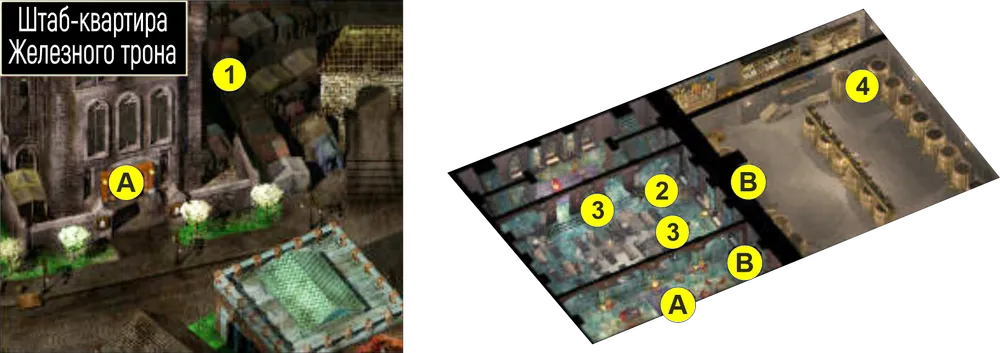
A - Entrance to the headquarters; B - stairs to the basement
1. Bayzon and Riggs. You will meet them after passing through the refugee camp. Upon reaching the turn, you will see a fiery fist soldier named Riggs threatening a refugee named Bayzon. If you get involved in the dialogue, Riggs will brush you off, lying that he is helping Bayzon with a problem. By a non-verbal threat, he forces the latter to confirm his ‘truth,’ after which he leaves. If you choose not to intervene, the guard will first hit the refugee, then leave. In conversation, Bayzon will tell you that Riggs is stealing gold from the refugees. You can show compassion for their plight and offer help.
You will find Riggs to the left of the entrance to the Iron Throne headquarters (see the map marker A) standing under a tree. With Captain Corwin's support, in dialogue you can make him return your money. If the captain steps away from you, you can provoke him into a fight by speaking to him while she has not caught up. During the fight, nearby guards will help you. If there was no fight, he will return the taken money (150 coins) and promise to stop breaking the law.
Returning to Bayzon, you will have two ways to complete the quest. Either give back the money and earn 300 XP or keep it for yourself as a "fee."
2. Ra'saad. Upon entering the room, head to the upper corner. There stands an old acquaintance, Ra'saad. In conversation with him, you will learn that refugees are disappearing in masses in town, so he cannot join you. After finishing the conversation, you will earn 500 XP.
3. Bertha and Lon. After speaking with Ra'saad, Bertha will approach sleeping Lon nearby and accuse him of stealing an amulet. When you delve deeper into their dialogue, Bertha will explain her reasons for suspicion. At this point, Ra'saad will interrupt the dialogue. Lon will deny the accusations. You can either believe him and demand convincing evidence of his guilt, after which the quest will conclude and everyone will disperse, or offer to search him to resolve the situation. After which he will admit to the theft but refuse to surrender and will transform into a werewolf. After defeating him, take the amulet from his body. Meanwhile, Bertha will be under the effect of a fear spell. Wait until she calms down and talk to her. After the incident, Bertha is downcast and no longer wants to see the amulet, as now it is tied to terrible memories for her. So the amulet will remain for you as a reward.
4. The Doppelganger’s Stash. If you released the doppelganger from the Duke's Palace basement with the condition that he would give you his valuables (see Duke's Palace, p. 11), then when you descend to the headquarters basement, you will meet him in the guise of a Fiery Fist officer. He will keep his word and give you three random potions, a random wand, and 250 coins.
Business in this area is done; you may leave the vicinity.
CASTLE OF THE FIERY FIST
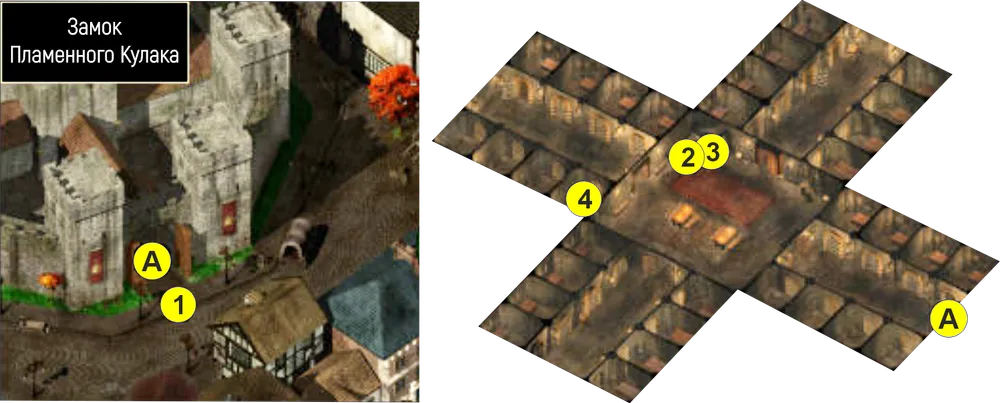
A - entrance to the castle
1. Dauston. Approaching the entrance to the castle, you will witness a drunken man being thrown out. Getting involved in the conversation, you will learn that he was once a paladin and served under Auna Argent, who was Keilar Argent’s uncle and somehow, Keilar is the reason for his noble relative's 'fall.' After this, he will lose consciousness, without revealing anything specific.
After finishing the conversation, enter the castle. Proceeding down the corridor, you will enter the hall, where two officers are located.
2. Officer Jenks. You were sent to him by officer Vida (see Tavern "Elven Song", p. 1). You will have two options of dialogue with him: either you can ask him to show leniency to the refugees or advise to punish them strictly by the law. In any case, you will earn 1000 XP by the end of the conversation; when you return to Vida, you will receive a clarity potion and another 500 XP.
3. Officer Fritz. Instead of helping Garachen (see Duke's Palace, p. 14), you can create problems for him. To do this, you need to talk to this officer. When you describe what Garachen is doing, Fritz will sympathize but tell you that it is entirely legal. So you will need to raise the stakes by lying to Fritz that he is selling refugees into slavery. The officer will believe you and promise to arrest the house owner. Returning to Garachen, tell him that he has been "exposed," and officer Fritz will appear with the Fiery Fist soldiers to arrest him. However, you won't receive a reward for this option.
You can also inform this officer about Eilin (see Inn "Three Old Barrels", p. 2).
4. Tiaks. Proceeding further through the hall, you will enter the northwest wing of the castle. In the nearby cell, you will find Tiaks. He will not join you but you will earn 1000 XP for trying to recruit him.
A small addition: if you haven’t taken out the rebels (see Inn "Three Old Barrels", p. 10), you will find them in the northeast wing of the castle locked in cells. Using ranged weapons, you can kill them here (there will be no consequences). Collect the loot, and the letter from the rebels needs to be given to Corwin, but only after returning to the inn.
Mainly, business in town is done. Return to the exit, and talk to Captain Corwin. And it’s time to go back to the palace.
ON CRUSADE
Everything that was planned to be done in the city has been fulfilled. It’s time to pack up for the crusade. But before that, I recommend checking your quest journal and completing what is left.
If you haven’t done so already:
- report on the reinforcements to officer Vida (see Tavern "Elven Song", p. 1);
- summon and defeat Al-Alai (see Tavern "Elven Song", p. 6) if planned;
- talk to Tira (see Duke's Palace, p. 13) about her debt to pawnbroker Senna (see Tavern "Elven Song", p. 2);
- bring supplies to Garachen (see Duke's Palace, p. 14; Tavern "Elven Song", p. 11) or arrest him for "selling refugees into slavery" (see Castle of the Fiery Fist, p. 3);

In the area around the inn "Three Old Barrels" on the street, you might have noticed a locked chest. Now that you have Safana with you, you can unlock it and take the skin of a snow wolf. Quite an expensive item.
Using Safana's skills, you can now access the treasury (see Duke's Palace p. 9).
For everything to go smoothly, you need to: break the door lock; disable the trap on the chest; break the chest lock. As a reward, you will receive several precious gems and 1647 coins.
Tidy up in your chest (see Duke's Palace, p. 2) and sell all excess at the "Potion Supplies" shop. Buy what you consider necessary, as it won’t be possible to exit to the city later.
Once you're done preparing, return to the dukes' palace sitting room and tell Captain Corwin that you are ready to set off for Dragonspear. Corwin will agree and bid farewell until morning. After which, she will inform you that Imoen is feeling better and you can talk to her. Ascend to your bedroom (see Duke's Palace, p. 1). Here we will be met by a mysterious hooded man. As is customary for such "capuchins," he will speak in riddles, and then go away.
Now you can talk to Imoen. She will inform you that she is better, but she will not go with you on the campaign. She will remain to recover from the attack and will continue to practice magic.
After finishing the conversation, the hero will lie down to sleep, but later, the dream will be interrupted by Ski (see Duke's Palace, p. 7). She will inform you that she has joined the Fiery Fist squad, which is going with us to Dragonspear. And she asks not to tell her father about this.
In the morning, descend to the first floor. And talk to three dukes: Belt, Entar, and Lia. Duke Elthana was unable to attend because "the crisis's developments required his personal intervention elsewhere." The dukes will inform you that they have formed a squad of the Fiery Fist to assist you led by Captain Corwin and Corporal Duncan. Next, they will enlighten you about the upcoming plans. Because the "company" has become quite large, it has been decided to travel via the main roads. The direct route to the Dragonspear castle leads north to the "Serpent's River." The squad will cross the river via the "Shoreway Bridge." At the castle, you will join forces with Waterdeep and Daggerford's armies. After that, a confrontation with Keilar's crusade will follow.
After discussing the plan, you can disclose Ski's secret to her father. It turns out that he already knows everything and does not intend to stop her. In his eyes, Ski needs a stern lesson to learn to appreciate what she has. For showing concern for his daughter, he will gift you the Guardian's Ring +2.
After finishing the dialogue, exit the castle. The entire "honest folk" has come out to see off the heroes. In the crowd, you will encounter several more characters.
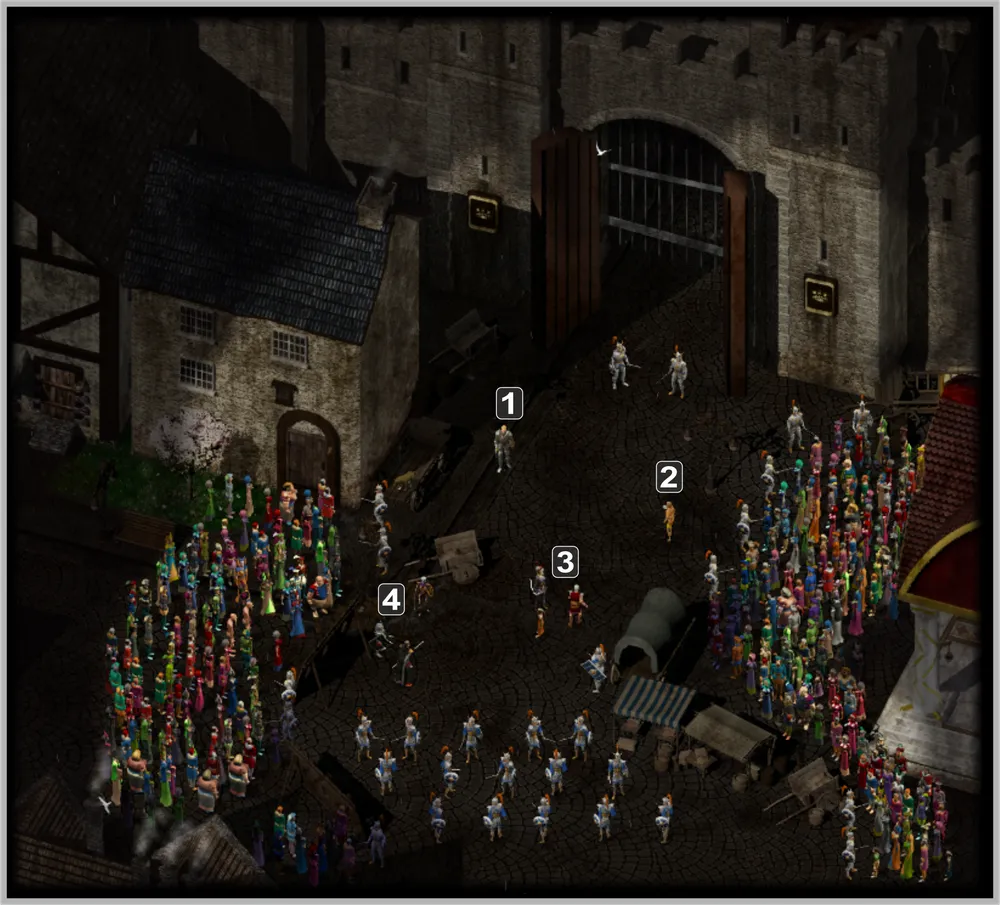
1 - Raifus; 2 - Belegarm; 3 - Corwin, Adamare, and Rohma; 4 - Pfaug, Patrescus, and Vikonia
1. Raifus. This soldier is in the employ of Corporal Duncan. According to him, all companions you detach from your party will be waiting for you with him.
2. Belegarm. Supplier of the Fiery Fist. You can buy many things from him, from weapons and armor to magical trinkets, potions, and so on. He regards the hero with coldness. I recommend only dealing with him in an emergency, as he will buy your loot for extremely cheap, while his prices for his goods are heavily inflated. If you closed your trading affairs at the "Potion Supplies" shop, you can avoid trading with him now.
3. Corwin, Adamare, and Rohma. You will witness Captain Corwin bidding farewell to her daughter Rohma. Adamare, Corwin's father, stays to watch over his granddaughter.
4. Pfaug, Patrescus, and Vikonia. A group of adventurers who have joined the campaign. Among them is an old acquaintance, Vikonia Devir. You can re-recruit her into your party.
After making the final preparations, address Corwin and lead the army on the way. Along the way out of the city, some residents will boo the hero of Baldur's Gate. Thus, at last, you will have the opportunity to deliver a passionate speech to the crowd, after which you leave the city.
From the compilers.
*We remind you that this walkthrough was created in collaboration with the respected nemsik. Please consider this factor when composing the next Non-Quest. We hope that our collaborative work meets your expectations.*
To be continued...